


To add new bulk email, go to the [Email] section and select the [Bulk email] option from the [New] menu. Populate the field on the page of the new record (Fig. 1):
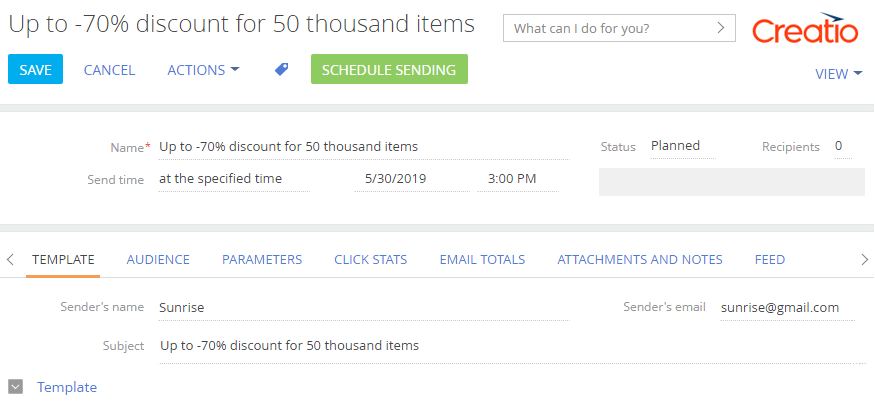
1.[Name] – specify the name of the new bulk email. The name will be displayed in the [Email] section list only, the recipients will not see it.
2.[Send time] – specify how and when the bulk email will be sent. This field has two options:
•run manually – the bulk email will be sent when you click the [Start sending] button;
•at the specified time – the bulk email will be sent automatically at a specified time. If you select this option, additional required fields will appear to the right. Use these fields to specify the date and time when your bulk email should start.
Template
The [Template] tab contains information that will be visible to the recipient:
1.[Sender’s name] – specify the name that will be displayed to the recipient as the sender of your marketing email. Note that if your email address is added to a recipient’s address book, their mail client will display the name from the address book instead.
2.[Sender’s email] – specify the email address that will be used for sending emails. This email address will be displayed to the recipient in the “From” field.
Creatio automatically validates any entered email address. A valid email address must contain “@” and “.” characters and the corresponding address text.
Note
If you do not verify your email domain with the email provider, recipients may see a notification that the message was sent from the server of your email provider’s domain with a note “on behalf of”, for example: “UniOne_Best <postman1847554@usndr.com>; on behalf of; UniOne_Best <john.best@gmail.com>”. To avoid this, verify your email domain authentication to allow the email service to send emails from your email address. Read more in the “Domain verification for the UniOne provider” and “Domain verification for the Elastic Email provider” articles.
3.[Subject] – enter the email subject that will be visible to the recipients before they open the email contents. You can personalize the email subject using macros. Read more in the “Add macros in an email subject” article.
Avoid using “spam trigger” words and phrases in subject lines. Spam filters check spam trigger words and phrases to flag "trash mail". Spam triggers are words such as: “Click here!", "SALE!", "FREE!", “$$” etc.
Note
You can also add an email pre-header to the marketing email template in the Content Designer. Read more in the “Configure email pre-headers” article.
Note
If you select an email template from the [Email templates] lookup, the email subject will be populated automatically.
4.Specify the template (body) of the email. Click [Select from lookup] on the [Template] tab and select a template in the [Email templates] lookup.
Click [Edit] to edit the body of the email. The Content Designer will open where you can enter all the needed changes.
You can also create an email template directly in the Content Designer without using the [Email templates] lookup. Read more about creating templates in the “Marketing email templates” article.
Attention
When creating your email, consider the factors that are analyzed by mail systems to decide whether your emails should be delivered or sent to a spam folder. Read more about the topic in the “Email guidelines” article.
Parameters
On the [Parameters] tab, specify the email information.
1.[Email type] – specify the type of your email, e.g., “Focus email” or “Newsletter”.
Note
The email type is used for implementing subscriptions to different types of content. For more information, see the “How to manage subscriptions for various email types” article.
2.[System email] – select this checkbox if the current email is not a marketing email. In this case, Creatio will ignore the [Do not use email] checkbox on the [Communication channels] detail of the recipients’ contact records and will send emails to all contacts from the email audience. Read more in the “How to send a system email” article.
Sending test emails
We recommend sending test emails before you send your bulk email to its actual audiences. By checking an actually delivered email, you can ensure that your macros and other contents are displayed correctly for an actual recipient. Read more in the “How to send a test email” article.
Use the [Audience] tab to set up the list of recipients. You can add all contacts who match a specific filter (the [Add contact folder] option) or add them individually by using the [Add contact] option (Fig. 2).
Fig. 2 Adding audiences to email
To add all contacts who match a filter:
1.On the [Audience] tab, click  and elect the [Add contact folder] option.
2.Select a folder (one or several) from the [Contacts] section and click [Select].
As a result, the contacts in the folders will be added to the email audiences. You can check the exact number of the contacts added in a notification on the communication panel. The email audience includes contacts who have unsubscribed from all emails and those, whose email address is not populated. When you add the email audience, Creatio checks subscriptions to the selected email type only. The contacts, who have unsubscribed from the current email type, will not be added.
You can check the subscription status on the contact page: use the [Email subscription] detail on the [Communication channels] tab.
Note
Creatio additionally verifies the email audiences when the bulk email starts. Read more in the “How to start a bulk email” article.
Note
The [Audience] tab will display recipient responses to the email sometime after the email starts. Use this tab to view the information about each response. For more information on managing individual responses, please see the “Recipient individual responses” article.
How to set up email click tracking
Add the UTM tracking codes to the email to receive information about the number of clicks from the email. For instance, you can track the number of leads received from the email.
To add the UTM tracking codes:
1.Go to the [Parameters] tab on the email page.
2.Select the [Use UTM tracking codes] checkbox in the [Email-to-website click tracking] block. Specify the UTM tracking codes of the email: “utm_source”, “utm_campaign” and “utm_medium”.
3.In the “List of domains” filed, specify the list of domains for which the tracking codes will be applied when generating the click link. You can specify multiple domains using commas (,).
Save the changes.
Note
Learn more about how to identify a marketing email when tracking leads in the “How to identify a campaign and a marketing email using the tracking feature” article.
See also
•How to identify a campaign and a bulk email using the tracking feature