


Starting a split test analysis
To start split testing in Creatio, perform the below steps.
•Create emails for split testing
•Start sending emails as part of the split test
•Perform the final sending of the “winner” email
Create emails for split testing
Prepare the email content that you want to be tested and add it to the new split test.
1.In the [Email] section, create emails for the test. You can prepare two or more variants of emails for A/B testing. Do not add the audience to the email as the recipients will be added and distributed upon testing. Also, do not start created marketing emails.
Note
You can use split tests for bulk emails only
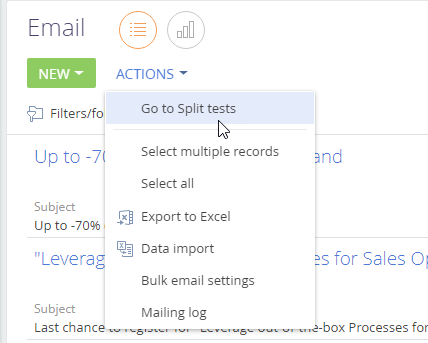
2.Open the list of split tests: [Email] —> [Actions] —> [Go to split tests] (Fig. 1).
Fig. 1 Opening the split test list
3.Add a new split test.
4.At the first [Bulk email] wizard step, select which emails you want to be compared during the test. Make sure that each email:
•has a “Planned” status;
•is not included in another split test;
•does not contain any list of recipients on the [Audience] detail.
Go to the second wizard [Audience] step, and add the list of email recipients. There are several general recommendations for audiences used in split tests. Read more in “How to conduct split tests correctly”.
1.Specify the audience percentage that will comprise the test group of the email recipients during the split test. For example, if you test two versions, you can specify 10% and add 1000 contacts on the [Split test audience] detail. As a result, the test audience of each version will contain 50 contacts. The email recipients are randomly selected from the audience. Also, you can test several emails on the entirety (100%) of a selected segment.
Note
You cannot change the test group percentage after you added the audience.
2.Add the required contact folders on the [Split test audience] detail. For example, to test several email templates for a seminar which your company is going to hold, select the “Participated in events”.
Start sending emails as part of the split test
Go to the third wizard [Start] step and specify the email sending time. You can start sending manually or specify the time when the email will be started automatically. All split test emails will be sent simultaneously.
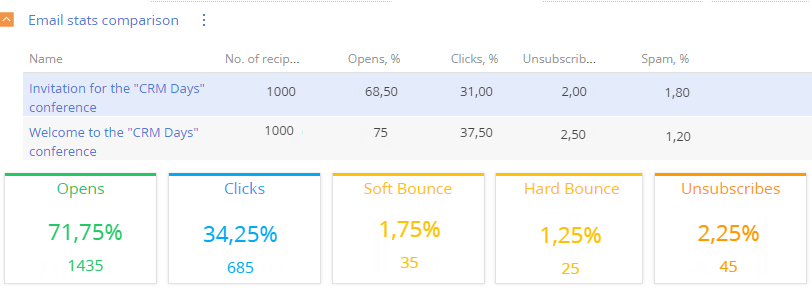
When your split test is performed, analyze the email totals at the [Results] step. The dashboard functionality of this step is similar to the functionality of the email delivery statistics diagram. Read more in “Delivery statistics”.
The diagram displays summary information about the split test, for example, the total number of all email opens by different test groups. The totals for each email are displayed in a table above the diagram (Fig. 2).
Follow these recommendations when analyzing split test results:
-
Analyze responses of the recipients after the split test start (from 2 to 72 hours depending on the email type).
-
Estimate conversion rates of all emails that were included in the split test at the same time to eliminate the influence of time on the result.
-
When estimating results, pay attention to the metrics that are influenced by the tested item. For example, the call-to-action button color (CTA) may influence the number of clicks and the wording of the email subject line may influence the number of opens.
Perform the final sending of the “winner” email
If at the [Audience] step of the wizard you select a test group audience percentage that is different from 100%, you can send the winning email to the rest of the target audience that was not involved in the test group. To do this:
1.Select the needed email in the [Email] section and click [Copy] in the [Email] section.
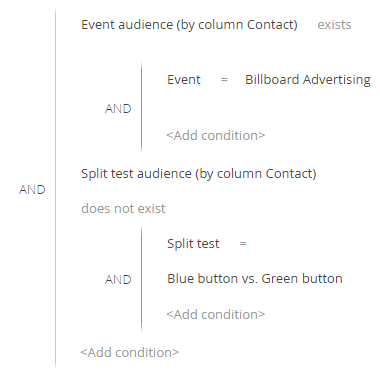
2.Select the dynamic folder in the [Contacts] section, which will be used for sending the winner email. This folder includes contacts from the segment that were tested but were not included in the split test audience. An example of setting the folder is shown in Fig. 3.
Fig. 3 Example of setting the contact folder for sending the winner email
Note
You can learn more about working with folders in a separate “Folders” article.
3.Select a pre-configured folder on the [Audience and response] tab of the copied email and start the email.
See also