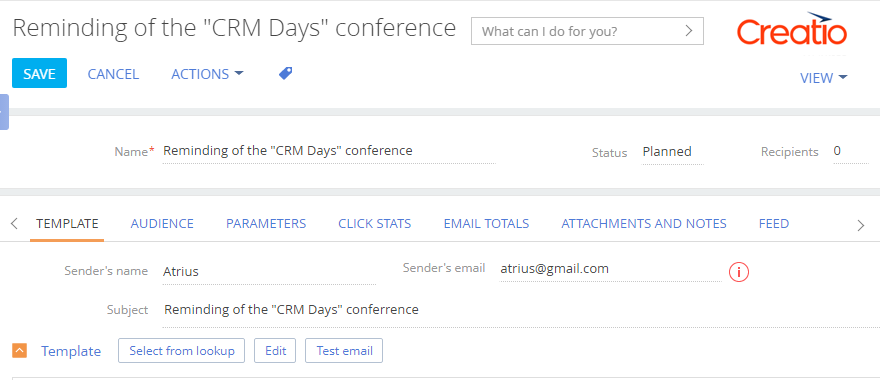
To add a new trigger email, go the [Email] section and select the [Trigger email] option from the [New] menu. Populate the field on the page of the new record (Fig. 1):
Fig. 1 Creating a trigger email

[Name] – specify the name of the new tirgger email. The name will be displayed in the [Email] section list only, the recipients will not see it.
Template
The [Template] tab contains information that will be visible to the recipient:
1.[Sender’s name] – specify the name that will be displayed to the recipient as the sender of your marketing email. If your email address is added to the recipient’s address book, their mail client will display the name from the address book.
2.Sender’s email – specify the email address that will be used for sending emails. This email address will be displayed to the recipient in the “From” field.
Creatio automatically validates any entered email address. A valid email address must contain “@” and “.” characters and the corresponding address text.
3.[Subject] – enter the email subject that will be visible to the recipient before they open the email contents. You can personalize the email subject using macros. Read more in the “Add macros in an email subject” article.
Avoid using “spam trigger” words and phrases in subject lines. Spam filters check spam trigger words and phrases to flag "trash mail". Spam triggers are words such as: “Click here!", "SALE!", "FREE!", “$$” etc.
Note
You can also add an email pre-header to the marketing email template in the Content Designer. Read more in the “Configuring an email template” article.
Note
If you select an email template from the [Email templates] lookup, the email subject will be populated automatically.
4.Specify the template (body) of the email. Click [Select from lookup] on the [Template] tab and select a template in the [Email templates] lookup.
Click the [Edit] button to edit the body of the email. The Content Designer will open where you can enter all the needed changes.
You can also create an email template directly in the Content Designer without using the [Email templates] lookup. Read more about creating templates in the “Configuring an email template” article.
Parameters
Select the email type on the [Parameters] tab.
Note
The email type is used when performing a subscription to a specific type of content. For more information, please see the “How to manage subscriptions for various email types” article.
Email testing
We recommend sending test emails before you send your bulk email to its actual audiences. By checking an actually delivered email, you can ensure that your macros and other contents are displayed correctly for an actual recipient. Read more in the “How to send a test email” article.
The trigger email audience is populated automatically:
-
Based on the campaign audience and participant responses at the corresponding steps of a campaign. The audience of a trigger email is formed when a participant moves to a campaign item that is connected to the corresponding trigger email.
-
Based on the business process that adds participants to the current email.
In this case, the recipient's email is checked for validity. This is necessary to ensure that trigger emails are sent to only those contacts who are interested and to minimize the number of delivery errors Read more in the “How to start sending trigger emails” article.
How to set up email click tracking
Add the UTM tracking codes to the email to receive information about the number of clicks from the email. For instance, you can track the number of leads received from the email.
To add the UTM tracking codes:
1.Go to the [Parameters] tab on the email page.
2.Select the [Use UTM tracking codes] checkbox in the [Email-to-website click tracking] block. Specify the UTM tracking codes of the email: “utm_source”, “utm_campaign” and “utm_medium”.
3.In the “List of domains” filed, specify the list of domains for which the tracking codes will be applied when generating the click link. You can specify multiple domains using commas (,).
Save the changes.
Note
Learn more about how to identify a marketing email when tracking leads in the “How to identify a campaign and a marketing email using the tracking feature” article.
See also
•How to create a trigger email
•How to start sending trigger emails
•How to set up an unsubscribe link in emails


