Set up sales forecasts
Your sales team can track quota, booked revenue, pipeline, and other key metrics in one table and submit forecasts on a regular cadence. The Sales forecasts section builds this table from opportunity data. Rows follow a forecast hierarchy that you set up, for example, sales reps under their managers, and Creatio rolls the totals up to each level automatically. Columns show the metrics for each period. You can change the preconfigured columns and add your own to match your sales process. Unlike the Forecasts section that focuses on strategic planning and pivot tables, Sales forecasts helps you run a predictable forecasting cadence with your sales team and review the pipeline. Learn more: Sales forecast configuration.
Creatio sets the Forecast category field of opportunities automatically based on their stage. The base stages are mapped to forecast categories out of the box. If you use custom stages, map them before you start: set the Forecast category column for each stage in the Opportunity stages lookup. To add a category, use the Forecast category lookup. Learn more: Manage lookup values. The preconfigured forecast columns calculate values from the Forecast category and Closed on fields of opportunities. Learn more about the preconfigured columns: Sales forecast configuration. The Manager judgement column includes opportunities whose In/out Forecast field is selected. If your managers use this column, add the field to the opportunity page.
When you update the Lead and Opportunity Management app to the version that adds forecast categories, Creatio populates the empty forecast category based on the stage in the following records:
- Opportunities whose stage is not final and whose Closed on date is January 1 of the year before the update or later.
- Closed opportunities whose Closed on date is in the quarter of the update.
- Opportunity history records created in the 6 months before the update, that is, changes made during that time. Each record receives the category of the stage that it stores.
Other opportunities receive a forecast category when their stage changes. This way, the forecast and the Sales pipeline movement (Sankey) chart have data right after the update.
To set up sales forecasts:
- Create a forecast hierarchy. Read more >>>
- Configure and activate the forecast. Read more >>>
- Grant users access to forecast data. Read more >>>
1. Create a forecast hierarchy
The forecast hierarchy defines the rows of the forecast and how totals roll up. To forecast by sales team, build the hierarchy based on contacts. Creatio places each sales rep under their manager based on the Manager field of the contact. Learn more about other hierarchy options: Sales forecast configuration.
Choose the hierarchy source before you save the hierarchy. After that, Creatio locks the Hierarchy source field.
-
Open the Forecast hierarchies section and click New. This opens the Hierarchy builder page.
For Creatio 10.0
In Creatio 10.0, open the forecast in the Sales forecasts configuration section, click the Forecast hierarchy field on the General setup tab, and select Add new. This opens the Hierarchy builder page.
-
Enter the hierarchy name in the Name field.
-
Select the object whose records make up the hierarchy in the Hierarchy source field. For example, "Contact."
-
Build the hierarchy structure. You can do this in one of the following ways:
-
Build the structure automatically. Select the field that links records to their parent record in the Hierarchy relation field field, for example, "Manager." Click Continue in the confirmation window. Creatio builds the tree on the Hierarchy structure tab.
To include only the records you need, set up conditions in the filter block below the Hierarchy relation field field, for example, "Type is Employee," and click Apply. Creatio rebuilds the tree based on the filter and shows how many records match it, for example, "13 of 73 records."
-
Build the structure manually. Click Add root, select the top-level record, for example, the head of sales, and click Select. To add a child node, click
 next to a node, select the record, and click Select.
Review the structure before you save it. You can drag nodes to move them. To exclude records you do not need, for example, contacts of technical users such as "Supervisor," click Remove next to their nodes or add a filter condition that excludes them.
Fig. 1 Sales team hierarchy in the Hierarchy builder 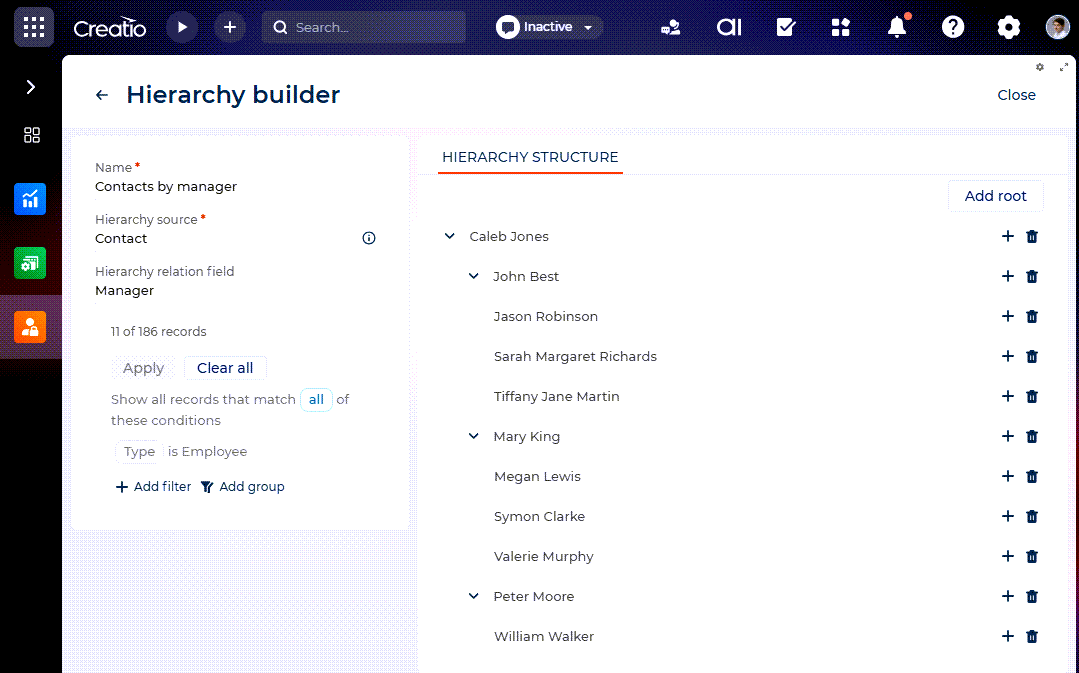
For Creatio 10.0
In Creatio 10.0, automatic building adds all records of the hierarchy source to the tree, for example, both employees and customer contacts. After Creatio builds the tree, remove the nodes you do not need. To add only the employees who submit forecasts, build the structure manually instead.
-
-
Click Save.
If a forecast already uses the hierarchy, Creatio lists the affected forecasts in the Save changes? window. Click Continue. Creatio recalculates the totals in these forecasts the next time they are opened.
2. Configure and activate the forecast
-
Open the Sales forecasts configuration section.
-
Open the forecast to set up. For example, open the "Quarterly sales forecast" forecast that comes with the app. This opens the Forecast configuration page.
-
Select the hierarchy you created in the Forecast hierarchy field on the General setup tab. Creatio locks this field after you save the forecast.
-
Select "Opportunity" in the Forecast hierarchy drill-down to field. This enables users to drill down from a hierarchy node to individual opportunities.
-
Select the period type in the Period type field: "Month," "Quarter," or "Year."
-
Set up the forecasting cadence in the Forecasting cadence block. Fill out the Submission frequency and Week starts on fields. Turn on the Show submission status toggle to show whether each rep submitted their forecast.
-
Click Save. The "Quarterly sales forecast" forecast includes preconfigured columns on the Layout tab. For a new forecast, add the columns on this tab.
-
Review the columns on the Layout tab. Click a column to change its settings, or click New to add a column. Adjust the columns to the metrics on which your sales process relies.
Learn more about column types and view examples of what you can model with them: Sales forecast configuration.
-
Check how opportunities are linked to the hierarchy in each Value from object column on the Layout tab: "Booked," "Manager judgement," "Best case," "Commit," and "Open pipeline."
- Click the column → Advanced settings.
- Check the Field in [Opportunity] for link with [Contact] field of the Forecast object binding block. Select the opportunity field that specifies the people in the hierarchy.
- Click Save in both windows.
Out of the box, Creatio uses the field that matches the hierarchy source, for example, "Contact" for a hierarchy built on contacts. If your sales reps are specified in another field, for example, "Owner," select that field.
-
Set up the submission value of the "Forecast call" column if needed.
- Click the column on the Layout tab.
- Select the column whose value to prefill in the Reference column for submissions field, for example, "Commit."
- Click Save.
When a user submits a forecast call, Creatio prefills the value from the selected column. If the field is empty, users enter the value manually. To lock the prefilled value for specific users or roles, select the Read-only submission value checkbox when you grant permission to submit forecast calls on the Permissions tab.
For Creatio 10.0
Creatio 10.0 does not have the Reference column for submissions field. Users enter forecast call values manually.
-
Go back to the General setup tab → select the Set as active forecast checkbox. Activate the forecast after you set up its columns.
-
Set up automatic updates in the Automatic updates block. The Live update and Scheduled updates options work independently, so you can enable one or both:
- Live update. Creatio updates the metrics as forecast data changes. Users see edited values, source record changes, and recalculated formulas right away, without clicking Update metrics. If your forecast processes very large data volume, turn off this toggle and use scheduled updates.
- Scheduled updates. Creatio regularly runs a cron job that recalculates all forecast data. Fill out the Run every, Period, From, To, and Time zone fields.
For Creatio 10.0
When you select the Set as active forecast checkbox, Creatio turns on the Enable scheduled updates toggle. Set up the schedule in the Run every, Period, From, To, and Time zone fields.
-
Click Save.
Creatio applies setup changes, such as changes to the hierarchy, columns, or period type, on the next scheduled update. To apply setup changes right away, click Update metrics in the Sales forecasts section.
3. Grant users access to forecast data
Users see forecast data only for the hierarchy nodes to which they have access. System administrators can view and edit all forecast data regardless of these permissions.
-
Open the Sales forecasts configuration section.
-
Open the forecast → Permissions tab.
-
Go to the Hierarchy list → select the hierarchy node.
-
Grant forecast visibility.
- Click Add in the Forecast visibility block.
- Select the user or role in the User or role field.
- Select the access level in the Access level field.
- Click Grant.
-
Grant permission to edit quotas.
- Click Add in the Quota management block.
- Select the column in the Forecast column field, for example, "Quota."
- Select the user or role in the User or role field.
- Click Grant.
-
Grant permission to submit forecast calls.
- Click Add in the Forecast submission block.
- Select the column in the Forecast column field, for example, "Forecast call."
- Select the user or role in the User or role field.
- Select the Read-only submission value checkbox (optional). This locks the submitted value to the reference column for this user or role. The checkbox works only for columns that have a reference column for submissions.
- Click Grant.
Creatio applies the permissions immediately.
As a result, the forecast will be active. Users with access will be able to open the Sales forecasts section and see one table that shows quota, booked revenue, and pipeline for each hierarchy node they can view. They can filter the table by hierarchy node and period and enter quota values in the Quota column. If live updates are enabled, Creatio updates the metrics as data changes. With scheduled updates only, the first calculation runs on the next scheduled update. To calculate the metrics right away, click Update metrics. Learn more about working with the forecast: Work with sales forecasts.