The Terrasoft.AlignableContainer custom element
Glossary Item Box

Introduction
The Terrasoft.AlignableContainer custom element has been introduced in bpm'online version 7.8. This element is inherited from the Terrasoft.Container element, and contains the properties associated with the fixed container positioning, which depends on another element.
The Terrasoft.AlignableContainer view depends on the element used to position the container (the container is positioned at the center of the screen in case of element absence). Default container positioning order is defined by the following sequence:
- The container displays under the element at first.
- If there is no space under the element, the container displays above it.
- If placing either below or above is impossible, the container displays on the right.
- If placing on the right is impossible, the container displays to the left of the element.
You can also specify the container background for the Terrasoft.AlignableContainer custom element. The mentioned Terrasoft.AlignableContainer found their
Case description
When you click on a photo in the [Contacts] section, display an enlarged image in the center of the screen with a background. When hovering over a photo, a larger version of the contact image relative to the photo container should be displayed.
Case implementation algorithm
1. Create a replacing client module
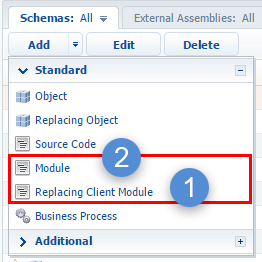
Go to the [Configuration] section, click [Add] and select [Replacing client module] (Fig. 1, 1) to create a replacing client module.
Fig. 1. Creating a replacing module
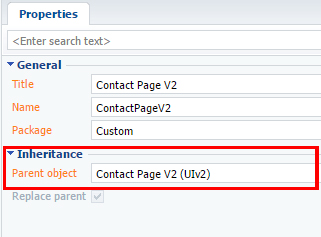
Select the ContactPageV2 schema as the parent object of the UIv2 package (Fig. 2).
Fig. 2. The ContactPageV2 replacing schema properties
2. Display a larger version of a photo in the screen center.
To display images in the screen center, you must use the Terrasoft.AlignableContainer custom element. The element link (near which you want to display the container) is not specified as a parameter. Set the true value to the checkbox which is responsible for displaying the background for it to show up.
To display a photo in the center of the screen, you must create a handling method for the clicking on the contact's photo event. Add a closing button to hide the image.
To do this, add the following source code to the created edit page schema of a contact:
// Defining a module and it's dependencies.
define("ContactPageV2", ["css!UsrContactPhotoContainerCSS"], function() {
    return {
        // Object schema name.
        entitySchemaName: "Contact",
        attributes: {
            // The attribute responsible for displaying the container when clicking on a photo.
            "LargeSizeContainerVisible": {
                // Element type.
                dataValueType: this.Terrasoft.DataValueType.BOOLEAN,
                // Column type.
                type: this.Terrasoft.ViewModelColumnType.VIRTUAL_COLUMN,
                // Element value.
                value: false
            }
        },
        methods: {
            // A method that displays a container with a larger photo.
            openLargeSizeImage: function() {
                // Sets the container to visible with a larger photo.
                this.set("LargeSizeContainerVisible", true);
                // Hides the container with an average-sized image.
                this.set("MiddleSizeContainerVisible", false);
            },
            // A method that hides containers with images.
            close: function() {
                // Hides a container that displays a large photo.
                this.set("LargeSizeContainerVisible", false);
                // ides a container that displays an average-sized image.
                this.set("MiddleSizeContainerVisible", false);
            }
        },
        diff: /**SCHEMA_DIFF*/[
            {
                // Connecting element properties.
                "operation": "merge",
                // Element name.
                "name": "Photo",
                // Parent element name.
                "parentName": "AccountPhotoContainer",
                // Property name.
                "propertyName": "items",
                // Element value.
                "values": {
                    // Adding a method handler for a container click event.
                    "onImageClick": {
                        // Binding to the method handler of a container click event.
                        "bindTo": "openLargeSizeImage"
                    }
                }
            },
            {
                // Element inserting.
                "operation": "insert",
                // Element name.
                "name": "AlignableLargePhotoContainer",
                // Element value.
                "values": {
                    // Container id.
                    "id": "AlignableLargePhotoContainer",
                    // Element type.
                    "itemType": Terrasoft.ViewItemType.CONTAINER,
                    // Element object classes.
                    "className": "Terrasoft.AlignableContainer",
                    // Element classes.
                    "wrapClass": ["photo-alignable-container", "large-size-image-container"],
                    // Container visibility method handler.
                    "visible": {"bindTo": "LargeSizeContainerVisible"},
                    // The element near which you want to display the container.
                    "alignToEl": null,
                    // Background display chackbox.
                    "showOverlay": {"bindTo": "LargeSizeContainerVisible"},
                    // Container elements.
                    "items": []
                }
            },
            {
                // Inserting an element.
                "operation": "insert",
                // Element name.
                "name": "CloseLargePhotoButton",
                // Parent element name.
                "parentName": "AlignableLargePhotoContainer",
                // Property name.
                "propertyName": "items",
                // Element values.
                "values": {
                    // Element type.
                    "itemType": Terrasoft.ViewItemType.BUTTON,
                    // Element classes.
                    "classes": {
                        "imageClass": ["close-no-repeat-button"],
                        "wrapperClass": ["close-button-wrapper"]
                    },
                    // Forming an button with an image property.
                    "imageConfig": {
                        "bindTo": "Resources.Images.CloseButtonImage"
                    },
                    // Method-handler for pressing the button to close the element.
                    "click": {"bindTo": "close"}
                }
            },
            {
                // Inserting an element.
                "operation": "insert",
                // Element name.
                "name": "AccountLargeResizedPhotoContainer",
                // Parent element name.
                "parentName": "AlignableLargePhotoContainer",
                // Property name.
                "propertyName": "items",
                // Element values.
                "values": {
                    // Element type.
                    "itemType": Terrasoft.ViewItemType.BUTTON,
                    // Element object class.
                    "className": "Terrasoft.ImageView",
                    // Method of obtaining a link to an image.
                    "imageSrc": {"bindTo": "getContactImage"}
                }
            }
        ]/**SCHEMA_DIFF*/
    };
});
In order to set the required dimensions of the displayed photo container, you need to define its CSS-style.
To do this, go to the [Configuration] section, and select [Add] > [Standard] > [Module] in the [Schemas] tab (Fig. 1, 2).
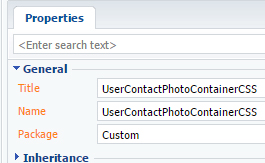
In module properties, set the title and header to "UsrContactPhotoContainerCSS" (Fig. 3).
Fig. 3. Module properties
Module styles are defined on the LESS tab (Fig. 4).
Fig. 4. LESS module tab

Add the following CSS selectors for the contact photo to display correctly in the screen center:
.schema-wrap .photo-alignable-container::before,
.schema-wrap .alignable-container-overlay::before {
    background: transparent;
}

.schema-wrap .photo-alignable-container.alignable-container {
    background: white;
}


.photo-alignable-container.large-size-image-container {
    width: 500px;
    height: 525px;
}

.photo-alignable-container .close-no-repeat-button {
    background-repeat: no-repeat;
}

.photo-alignable-container .close-button-wrapper:hover {
    background: transparent;
}

#ContactPageV2AccountLargeResizedPhotoContainerButton-image-view,
#ContactPageV2AccountResizedPhotoContainerButton-image-view
{
    height: 90%;
}
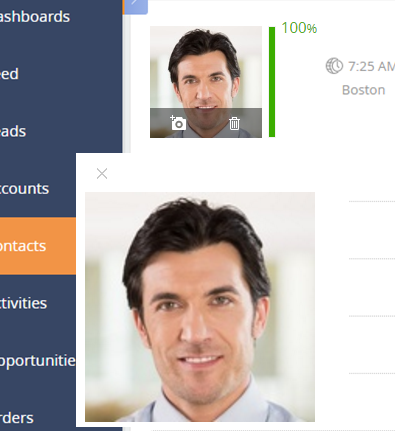
To check the generated code functionality, save the created modules, restart the application, and go to the contact page and click on the photo. A larger contact photo in the page center on a semi-transparent gray background will show up as the result (Fig. 5).
Fig. 5. A larger contact phone in the screen center

3. Display a larger photo after hovering the mouse cursor over the contact photo container.
To display a larger image after hovering over the user photo container, you must add an event handler for the cursor hovering event. Also, the Terrasoft.AlignableContainer container needs to transfer the name of the element near which the container should be displayed. Finally, add the logic of hiding the Terrasoft.AlignableContainer container. To do this, make the following changes to the source code of the replaced contact page schema.
Add the followinf attributes to the attributes section.
attributes: {
    // The id of the element near which you want to display the container.
    "AlignToElementId": {
        // Element type.
        dataValueType: this.Terrasoft.DataValueType.TEXT,
        // Column type.
        type: this.Terrasoft.ViewModelColumnType.VIRTUAL_COLUMN,
        // Element value.
        value: "ContactPageV2AccountPhotoContainerContainer"
    },
    // The attribute responsible for displaying the container when hovering over a photo.
    "MiddleSizeContainerVisible": {
        // Element type.
        dataValueType: this.Terrasoft.DataValueType.BOOLEAN,
        // Column type.
        type: this.Terrasoft.ViewModelColumnType.VIRTUAL_COLUMN,
        // Element value.
        value: false
    }...
},
Add the following methods to the methоds section.
methods: {
    // A method that performs actions after loading an object entity.
    onEntityInitialized: function() {
        // Calls the parent element.
        this.callParent(arguments);
        // Sets the element near which you want to display the container.
        this.setAlignToEl();
        // Creates a subscription to the mouse cursor hover event.
        this.subscribePhotoContainerEvents();
    },
    // The method that sets the element near which you want to display the container.
    setAlignToEl: function() {
        // Gets the item ID.
        var alignToElementId = this.get("AlignToElementId");
        // Gets the DOM element.
        var alignToEl = this.Ext.get(alignToElementId);
        // Writes the value of the DOM element to the AlignToEl parameter.
        this.set("AlignToEl", alignToEl);
    },
    // A method that creates a subscription to the mouse hover event.
    subscribePhotoContainerEvents: function() {
        // Gets the DOM element of the photo container.
        var container = this.get("AlignToEl");
        // Creates a subscription to the mouse cursor hover event.
        container.on("mouseover", this.openMiddleSizeImage, this);
    },
    // The method that displays the image after hovering over the container.
    openMiddleSizeImage: function() {
        // Makes the average-sized photo container visible.
        this.set("MiddleSizeContainerVisible", true);
        // Hides the larger photo container.
        this.set("LargeSizeContainerVisible", false);
    },
    ...
    // A method that hides containers with images.
    close: function() {
        // Hides the larger photo container.
        this.set("LargeSizeContainerVisible", false);
        // Hides the average-sized photo container.
        this.set("MiddleSizeContainerVisible", false);
    }
},
Add the following configuration objects to the diff array:
diff: /**SCHEMA_DIFF*/[
    {
        // Inserting an element.
        "operation": "insert",
        // Element name.
        "name": "AlignablePhotoContainer",
        // Element values.
        "values": {
            // Container id.
            "id": "AlignablePhotoContainer",
            // Element type.
            "itemType": Terrasoft.ViewItemType.CONTAINER,
            // Element object class.
            "className": "Terrasoft.AlignableContainer",
            // Element classes.
            "wrapClass": ["photo-alignable-container", "middle-size-image-container"],
            // Method handler of container visibility.
            "visible": {"bindTo": "MiddleSizeContainerVisible"},
            // The element near which you want to display the container.
            "alignToEl": {"bindTo": "AlignToEl"},
            // A checkbox for displaying the background.
            "showOverlay": false,
            // Container elements.
            "items": []
        }
    },
    {
        // Inserting an element.
        "operation": "insert",
        // Element name.
        "name": "ClosePhotoButton",
        // Parent element name.
        "parentName": "AlignablePhotoContainer",
        // Property name.
        "propertyName": "items",
        // Element values.
        "values": {
            // Element type.
            "itemType": Terrasoft.ViewItemType.BUTTON,
            // Element classes.
            "classes": {
                "imageClass": ["close-no-repeat-button"],
                "wrapperClass": ["close-button-wrapper"]
            },
            // Forming an button with an image property.
            "imageConfig": {
                "bindTo": "Resources.Images.CloseButtonImage"
            },
            // Method-handler for pressing the button to close the element.
            "click": {"bindTo": "close"}
        }
    },
    {
        // Inserting an element.
        "operation": "insert",
        // Element name.
        "name": "AccountResizedPhotoContainer",
        // Parent element name.
        "parentName": "AlignablePhotoContainer",
        // property name.
        "propertyName": "items",
        // Element values.
        "values": {
            // Element type.
            "itemType": Terrasoft.ViewItemType.BUTTON,
            // Element object class.
            "className": "Terrasoft.ImageView",
            // Method of getting an image url.
            "imageSrc": {"bindTo": "getContactImage"}
        }
    },...
]/**SCHEMA_DIFF*/
Also, to set the required size of the "pop-up" photo, add the following CSS selector on the LESS tab of the UsrContactPhotoContainerCSS module:
.photo-alignable-container.middle-size-image-container {
    width: 250px;
    height: 275px;
}
To check the generated code functionality, save the created modules, restart the application, and go to the contact page and hover the cursor over the photo. A larger contact photo will show up next to the main one as the result (Fig. 6).
Fig. 6. A larger contact photo next to the main one
Download the full case source code here.


