Creating a pop-up summary (mini page) for adding records
Glossary Item Box

Introduction
You can quickly add and view records using bpm’online pop-up summaries. Information about adding pop-up summaries that display record details is available in the “Creating pop-up summaries (mini pages)” and “Adding pop-up summaries (mini pages) to a module” articles.
To implement a custom pop-up summary page for adding new records in an existing section:
- Add a pop-up view model schema to the custom package. Select BaseMiniPage schema as a parent object.
- Modify the SysModuleEdit system table in the bpm’online database via a special SQL query.
- Add the necessary pop-up summary functionality to the schema source code.
- Add the HasProductMiniPageAddMode system setting.
 |
NOTE For bpm’online sections with default pop-up summaries, there are system settings, whose codes have the following format Has[Section code]MiniPageAddMode (for instance, HasAccountMiniPageAddMode). These system settings are used to toggle between the two modes: adding new records and editing existing records. |
Case description
Create a custom pop-up summary page for adding new records in the [Products] section. The pop-up summary must contain a base set of fields: [Name] and [Code].
Source code
Use the following link to download a package with the [Products] section pop-up summary schema, implemented according to this case.
Case implementation algorithm
1. Create a pop-up summary view model schema
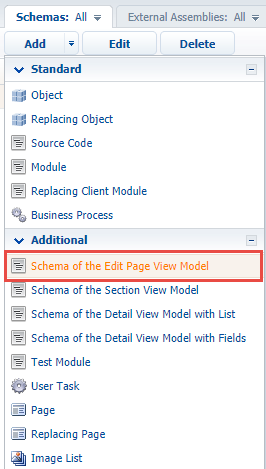
Execute the [Add] — [Additional] — [Schema of the Edit Page View Model] menu command on the [Schemas] tab in the [Configuration] section (Fig.1).
Fig. 1. Adding a pop-up summary view schema
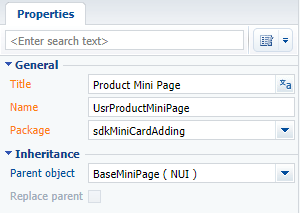
Populate the following properties of the pop-up summary view schema (Fig.2):
- [Name] – “UsrProductMiniPage”.
- [Subject] – “Product Mini Page”.
- [Package] – the custom package, in which the development is performed, for instance, Custom.
- [Parent object] — the BaseMiniPage schema from the NUI package.
Fig. 2. Properties of the pop-up summary view model schema
2. Register the pop-up summary in the database
Execute the following SQL query to make changes in the database:
DECLARE
    -- The name of the created pop-up summary view schema.
    @ClientUnitSchemaName NVARCHAR(100) = 'UsrProductMiniPage',
    -- The name of the pop-up summary object schema.
    @EntitySchemaName NVARCHAR(100) = 'Product'

UPDATE SysModuleEdit
SET MiniPageSchemaUId = (
    SELECT TOP 1 UId
    FROM SysSchema
    WHERE Name = @ClientUnitSchemaName
)
WHERE SysModuleEntityId = (
    SELECT TOP 1 Id
    FROM SysModuleEntity
    WHERE SysEntitySchemaUId = (
        SELECT TOP 1 UId
        FROM SysSchema
        WHERE Name = @EntitySchemaName
            AND ExtendParent = 0
    )
);
As a result of this query execution you will have a unique pop-up identifier, populated in SysModuleEdit table of the record MiniPageSchemaUId field that corresponds to the [Products] section (Fig.3).
Fig. 3. Unique pop-up summary identifier value in SysModuleEdit table

 |
ATTENTION Since the changes were made directly in the database, log in to your bpm’online again to see them. You may need to compile the application using the corresponding action in the [Configuration] section. |
3. Add fields from the primary object to the pop-up summary
Add the source code below to the created pop-up summary view model schema.
define("UsrProductMiniPage", ["UsrProductMiniPageResources"],
    function(resources) {
        return {
            entitySchemaName: "Product",
            details: /**SCHEMA_DETAILS*/{}/**SCHEMA_DETAILS*/,
            attributes: {
                "MiniPageModes": {
                    "value": [this.Terrasoft.ConfigurationEnums.CardOperation.ADD]
                }
            },
            diff: /**SCHEMA_DIFF*/[
                {
                    "operation": "insert",
                    "parentName": "MiniPage",
                    "propertyName": "items",
                    "name": "Name",
                    "values": {
                        "isMiniPageModelItem": true,
                        "layout": {
                            "column": 0,
                            "row": 1,
                            "colSpan": 24
                        },
                        "controlConfig": {
                            "focused": true
                        }
                    }
                },
                {
                    "operation": "insert",
                    "parentName": "MiniPage",
                    "propertyName": "items",
                    "name": "Code",
                    "values": {
                        "isMiniPageModelItem": true,
                        "layout": {
                            "column": 0,
                            "row": 2,
                            "colSpan": 24
                        }
                    }
                }
            ]/**SCHEMA_DIFF*/
        };
    });
The array containing the collection of the necessary pop-up summary operations is assigned to MiniPageModes attribute, which was declared in the base schema. Two objects that configure the [Name] and [Code] fields are added to the diff array.
 |
NOTE Add this.Terrasoft.ConfigurationEnums.CardOperation.VIEW value to the array assigned to MiniPageModes attribute if you also need to display the pop-up summary on the section page (see “Creating pop-up summaries (mini pages)”). |
 |
ATTENTION If the required columns are not indicated in the diff array, they will be displayed at the bottom of the pop-up summary. |
4. Add the HasProductMiniPageAddMode system setting
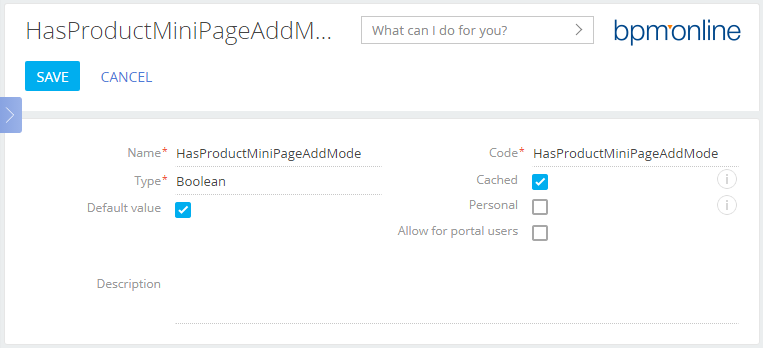
In the [System settings] section of the system designer, add a new system setting with the following properties (fig. 4)
- [Name] — "HasProductMiniPageAddMode".
- [Code] — "HasProductMiniPageAddMode".
- [Type] — "Boolean".
- [Default value] — true.
Fig. 4. — System setting
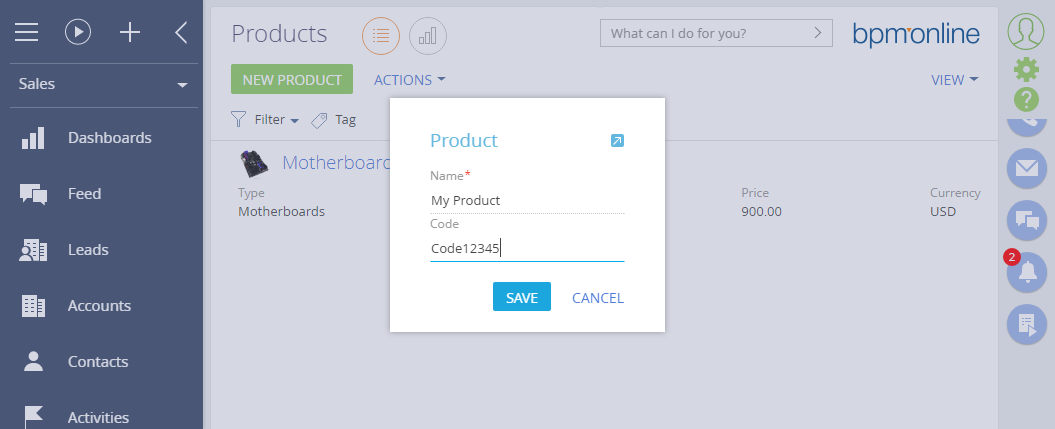
As a result, a pop-up summary with two fields will be displayed when you add a new product (Fig.4).
Fig. 4. Implemented pop-up summary
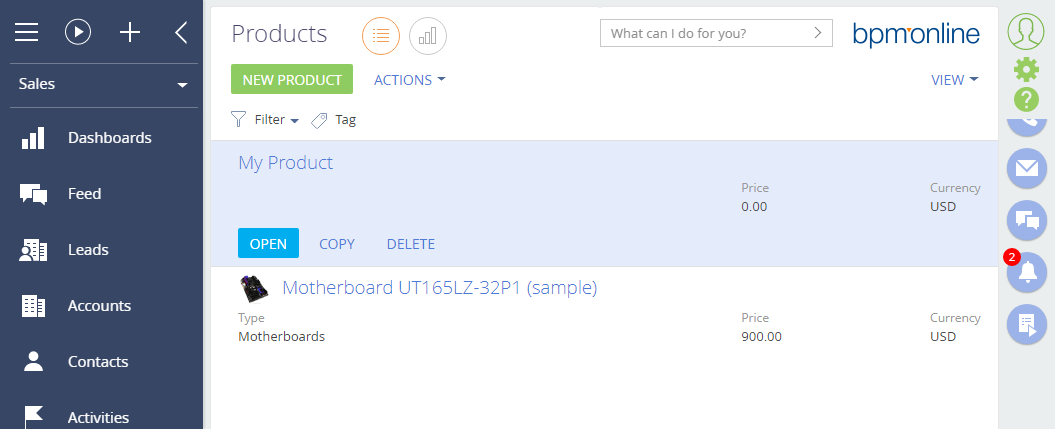
After saving the pop-up summary, a corresponding record will appear in the section list (Fig.5).
Fig. 5. Records in the [Products] section
 |
ATTENTION The record will only display in the section list after you update the browser page. To display the record immediately after saving the pop-up summary, add the corresponding functions to pop-up summary and the section page schema via the message mechanism (for more information, see “Sandbox. Module message exchange”). |


