


How to import a customer database
Let's have look at an example of importing customer database from an Excel file.
Attention
Before importing contacts ensure that the [Order of first/last names] system setting has the “Last name, First name [Middle name]” value. It is necessary to correctly display contact names per separate columns: [Last name], [First name], [Middle name].
To import data, go to the [Contacts] section and perform the [Data import] action from the [Actions] button menu. The import page with automatically selected object will open in a new browser tab.
Uploading a file
Use the first page of the wizard to upload the Excel file to the automatically selected object.
Note
If you opened the data import window from the system designer you need to specify the object for import.
Click the [Select file] button and choose the Excel file containing your customer database. You can also drag-and-drop the file.
Note
File format and volume validation is performed at this stage.
Click the [Next] button.
Note
Before adding an import file, please ensure that all plugins are disabled in your browser. Certain plugins may cause errors during the import process.
How to set up columns
On the next wizard step, you need to specify the column mapping in your file. Match columns in the selected Creatio object to the columns in the imported file. On this step:
-
If the name of the column in the file corresponds to the name of the column in Creatio, it will be mapped automatically. For example, if the name of the contact in your file is specified in the "Full name" column, the system will automatically map the [Full name] column on the contact page in Creatio. Automatic mapping is performed for the columns of the main object.
-
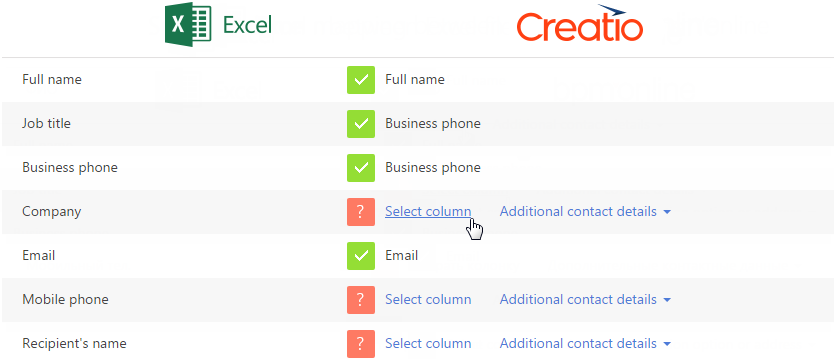
If the column name in the file differs from the column name in Creatio, you need to map that perform column manually. For example, if the imported file with contacts has "Company" column where the contact’s employer company is specified, you need to map the "Company" column from the Excel file to the [Account] column in Creatio. To do this, click the [Select column] link (Fig. 1) and select the [Account] column from the list of contact columns.
Fig. 1 Selecting a column for mapping
Importing additional information
When importing contacts and accounts, you can also upload additional details of the objects, e.g., records from the [Communication options] and [Addresses] details. Use this feature if you need to upload multiple addresses or different communication options of one type, for example, several mobile phone numbers.
Note
Please note that the communication options and addresses can be imported either to the main object columns or to the details. When importing to the main object columns, the communication option data will also be saved in the details. By importing only to the primary object columns you can upload only one communication option and address of each type from the list of available ones. The columns that correspond to the main object columns can be used for the duplicate search during import.
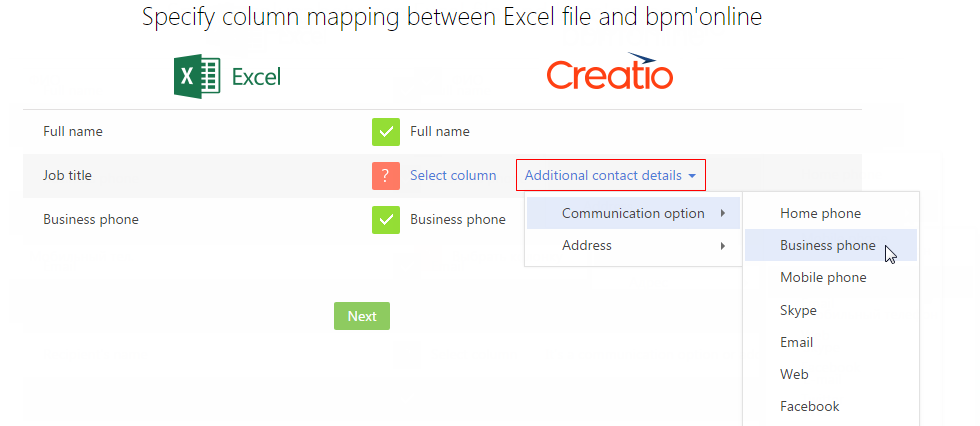
When mapping [Communication options] and [Addresses] detail, click the [Additional contact details] and select the required column (Fig. 2).
Fig. 2 Selecting a column to correspond to the [Communication options] and [Addresses] details
Note
In Creatio you can only import an address of one type in the [Addresses] detail.
Click the [Next] button to start importing the file.
Note
If the data is imported to the [Accounts] section, and the “Primary contact” column is populated in, the [Career] tab of the [Job] tab will be filled in automatically.
Duplicate parameters
Use the [Duplicate management] page to specify duplicate search parameters. If duplicate records are found in the import file, only the first record will be uploaded. Duplicates will not be imported.
You can perform a duplicate search by the values of one or several columns.
Note
Be aware that the columns of the main object are used while searching for duplicates in the communication options and addresses for contacts and accounts the columns.
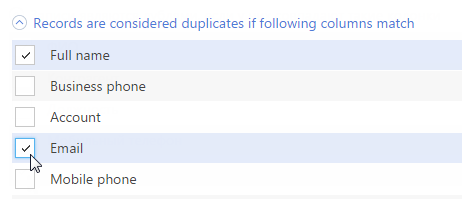
To use a column for duplicate search during import, select the checkbox for this column on the [Duplicate management] page of the Import Wizard. When selecting several columns for the duplicate search, they are joined using the "AND" logical operator which means that duplicate records will have similar values in both selected columns. For example, you can set the duplicate check for the contacts in the [Full name] and [Email] columns (Fig. 3). If several contacts are found with the same full name and email address, only one contact will be uploaded into the system.
Fig. 3 Setting duplicates search rules while importing
Note
Use the duplicate search while importing to update existing Creatio records. For example, you can update phone numbers for multiple contacts. To do this, make sure that the imported file contains a column that also exists in Creatio and can uniquely identify each contact in both. Set the duplicate search by this column(s) that all imported records are considered duplicates. As a result, existing contacts will be updated with new phone numbers, and other fields that are left blank in the imported file, will not affect data in Creatio.
Uploading data
Click the [Start data import] button after specifying columns for duplicate search. The import process will start. If you close the page, the import will proceed in background mode.
After the import is completed, you will receive a confirmation message with the number of uploaded records. You will also receive a system notification with file name and the number of imported records in the notification center.
Note
You can abort data import by stopping the “FileImportProcess“ process in the [Process log] section. When you cancel the import, the process status changes to “Canceled” and the data import terminates. You can view the data that managed to be imported into the system before the process stopped.
Check the import result in the [Contacts] section. You can go to the list of imported records from the “import finished” message. All imported records will be automatically tagged with the time and date of import. Later you will be able to easily find all imported records, using a filter by the corresponding tag.
Note
You can tag the imported records and open their list only when importing records to a section.
You can view information about errors during import in the [Excel import log] lookup. This lookup contains data about those records that were not imported.
Please note that Creatio will add all lookup values that were specified in the imported file but are not found in Creatio lookups, e.g., cities, contact and account types, etc. If you have not specified the values for the auto-fill fields in the imported file, these fields will be filled with the default values.
See also