


All information about the record is available on its edit page. There is no need to move on to other objects in the system — all the main functions are available on the record page.
Each record page consists of several blocks with structured details containing record data (Fig. 1). The page contains:
-
Record profile
-
Connected information profile
-
Page tabs
-
Dashboard tile if it was added to the page by user
-
Toolbar
-
As well as stage indicator and action panel depending on the section.
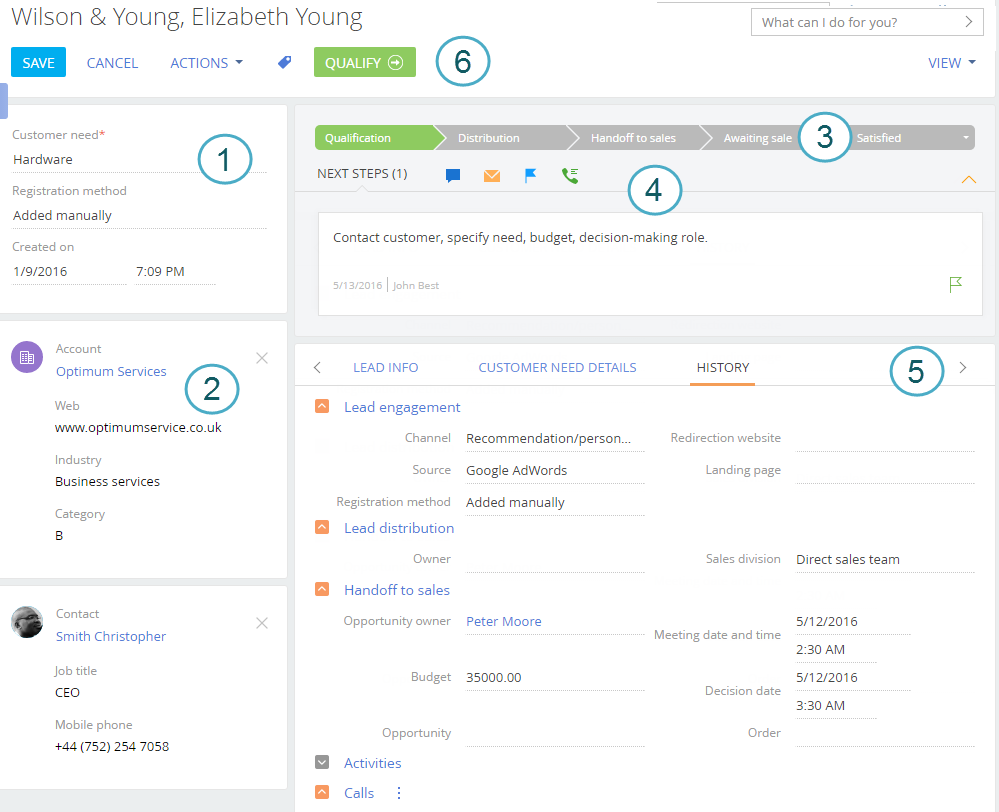
Record profile (1)
The most important information about a record is displayed on the record page in the main sections of Creatio.
Brief information about connected records, for example, client name, job title and mobile phone number in the profile enables you to look through all the key data of the connected record on the page of the main record. A page can contain one or several profiles.
If the connected record in the profile is not specified, you can select it from existing ones or create a new record. You can delete a record connection by clicking  at the top right of the profile page.
In sections where records are maintained by a business process, a workflow bar is displayed. It enables you to see at what stage of the workflow a record is, and quickly move on to the next stage. This makes the case intuitive and simple and helps you to focus on moving forward.
The bar color changes depending on the stage. For example, the workflow bar is colored red if the opportunity is moved to [Closed lost] stage.
Note
Use the case designer to set up the workflow bar. Read more >>>
With the actions panel you can always see scheduled tasks and with just one click proceed to your activities, work with email or the feed. You don't need to leave the main section because all the work with activity takes place in the mini page.
For sections that use business processes or cases, you can also work with a list of tasks that are scheduled automatically according to the process (case). You can, for example, approve a document (order, memo, etc.) right from the action panel. You can work with the case, communicate with a client, or follow the opportunity history and lead registration data at the same time.
Using the action panel, you can:
-
schedule a task

-
Send an email
 .
. -
Create a case in the self-service portal
 .
. -
Create a post in the record feed
 .
. -
Record call results
 .
.
The action panel displays the following:
-
Activities connected to a section object in a specific field. For example, in the lead action panel, only tasks that contain the selected lead in the [Lead] field are shown.
-
Activities not in a final state.
Note
The activity is in its final state when the [Final state] checkbox is selected in the [Activities states] lookup.
-
Approval in the “To set” status which is not canceled (Fig. 2).
Fig. 2 Approval on the action panel
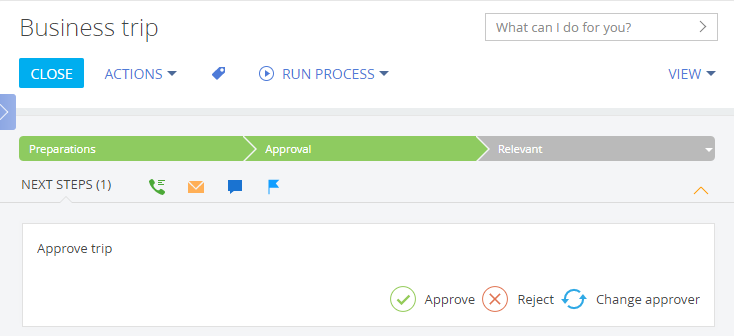
The action panel can contain other business process elements, such as user dialogs and other pages that the process is supposed to open.
Page tabs (5)
Detailed information about the record is displayed on separate tabs. For example, the [History] tab contains the history of activities, calls and messages, and information about connected records. The [Feed] tab contains user-published messages related to the record. These tabs contain fields, groups of fields, details and dasboards.
Toolbar (6)
The toolbar contains buttons to perform actions with the record.
-
You can save data, cancel changes or close page on the toolbar.
-
The [Actions] button enables you to set access rights and subscribe to updates for a selected record. With the help of the action menu you can also perform other tasks that depend on the section, for example, update a contact with social network data, create an order based on opportunity, or send an invoice or order for approval.
-
The [Tags] button enables you to set tags to make searching more convenient and to group records.
-
The [Print] button enables you to save information about a record in a separate file. Clicking the button opens a list of print forms and reports available in this section. The list of data, displayed in the printed form, depends on the section. After you select a report or a printed form, the information from the record page is stored in a separate file in PDF format.
-
You can launch a process for the selected record by clicking the [Run process] button. The [Run process] button is enabled only if the start of the business process for a section record is configured. Read more >>>
-
The [View] button opens the section wizard.
Page dashboards (7)
You can configure displaying of dashboard tiles on any record page. A dashboard component displays the system data in various ways, for example, as a chart or a number. Adding of dashboard tiles on record pages is performed in the section wizard. Read more >>>
Fields and details
Information can be displayed as a field or a detail.
A field is an element displayed in the form of a certain value. The value can be specified in a textual, numeric, or logic format, in the format of date or time, and can also be selected from a list or a lookup.
When selecting values from a list or a lookup, the system will offer a list of records starting with the entered value after entering a few characters.
Similar fields can be grouped in field groups. You can minimize groups.
A detail is an element about other objects connected to the selected record. Details are implemented are used when the main record may be connected to more than one record object. For example, the information connected to activity contact, addresses, documents, etc.
Visually, a detail is different from a group field due to the presence of the toolbar for managing data (update and change records, sort, filter, configure details, etc)
The records in a detail can have their own edit pages.
Lookup fields with predicted values
If a lookup field in a section is configured to predict values, Creatio will display the prediction results in the field and automatically rate the quality of the prediction based on the following factors:
Depending on the balance of probabilities, Creatio determines the following prediction types:
-
certain prediction
-
near certain prediction
-
weak prediction
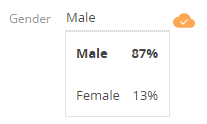
Certain prediction
Certain prediction is a prediction with an evident leader. In this case, the field is automatically populated with the predicted value, and the  icon appears next to it. Save the page if the field is populated correctly.
Clicking the  button displays all possible predictions and their probabilities with the most probable item highlighted (Fig. 3).
If you modify the field, the  button appears. Clicking the button displays all predictions.
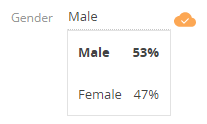
Near certain prediction
If there are multiple values with close probabilities, the field is not populated, and the  button appears next to it. Clicking the button displays the list of predictions (Fig. 4).
Fig. 4 Near certain prediction
Weak prediction
Weak prediction occurs when Creatio cannot compare the historical data to the data used for analysis. The  button appears next to the unpopulated field. Clicking the button displays the list of predictions and their probabilities.
See also
•How to create a lookup value prediction model
•Predicting a contact’s gender
Video tutorials