


How to set up push notifications for mobile application users
Bpm’online mobile app uses push technology to display custom notifications on mobile devices. These “push notifications” are generated by a pre-configured “Send push notifications” BPMN process. Use it as a sub-process to integrate push notifications in your custom processes and cases.
Example
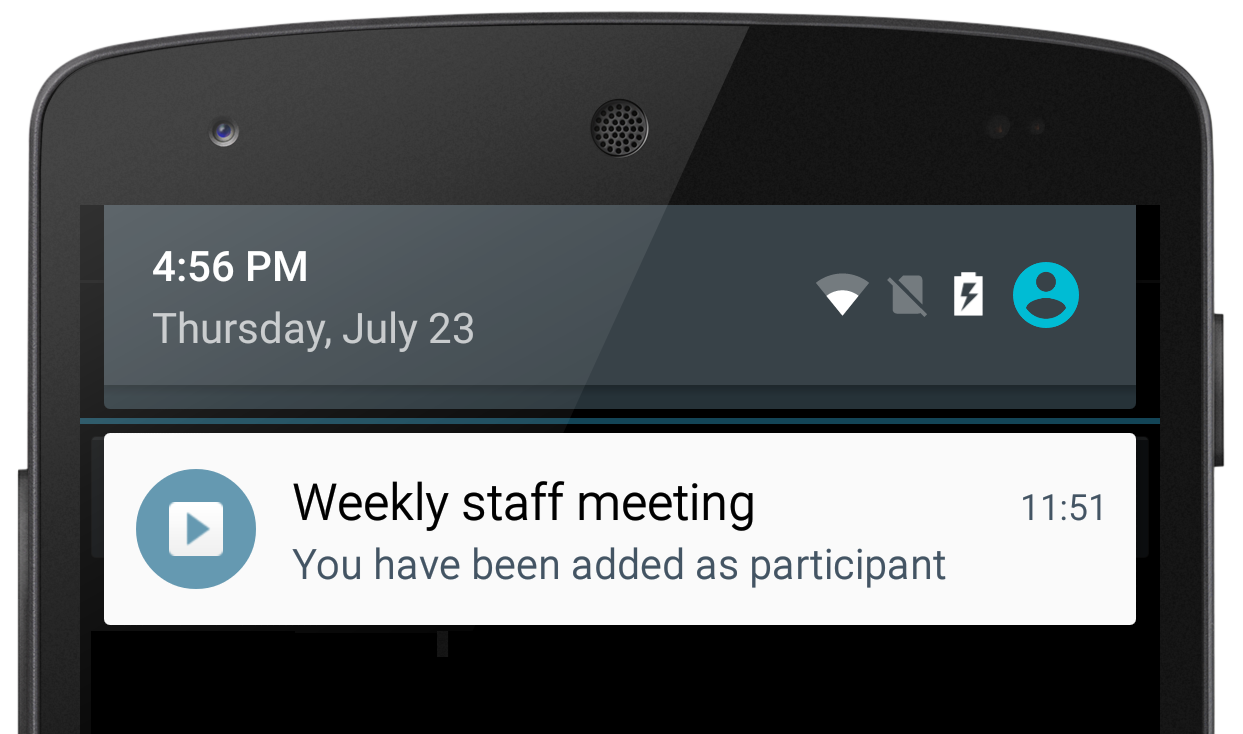
Create a business process that will send a push notification to mobile app users once they are added to activities as participants. The notification message displays the name of the activity and text “You have been added as participant”. By tapping the notification, the user opens the corresponding activity record.
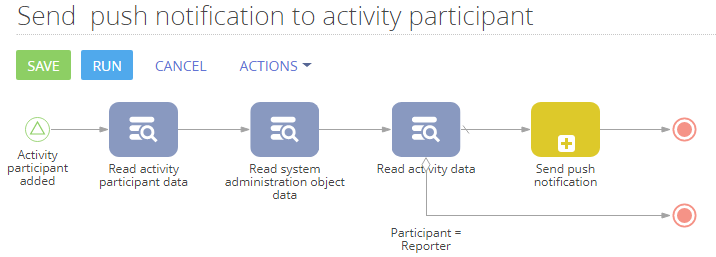
Business process diagram (Fig. 179) elements:
1.Signal start event: “Activity participant added” – the process is triggered when a contact is added to activity participants.
2.Read data system action: “Read activity participant data” – the process obtains activity participant data needed to perform the next steps.
3.Read data system action: “Read system administration object data” – based on the activity participant data, the process obtains information on the user whose contact was added to activity participants.
4.Read data system action: “Read activity data” – based on the activity participant data, the process obtains information on the activity record. Outgoing conditional flow to the terminate element that will end the process if the activity participant is the same as the activity author (to avoid sending push notification to the activity author). Outgoing default flow to the “Send push notification” sub-process.
5.Sub-process: “Send push notification” – the process sends push notification to the specified user with the specified text.
Fig. 179 The “Send push notification to activity participant” process
The “Activity participant added” element properties (Fig. 180):
Fig. 180 The “Activity participant added” element
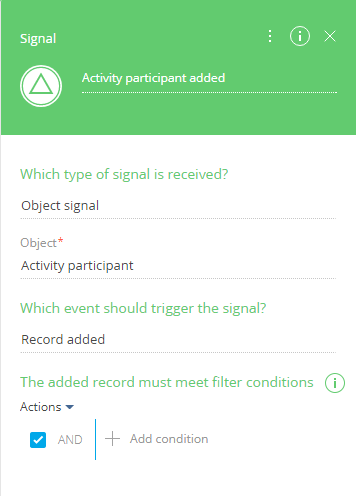
1.In the [Which type of signal is received?] field, select “Object signal”.
2.In the [Object] field, select “Activity participant”.
3.In the [Which event should trigger the signal] field, select “Record added”.
The “Read activity participant data” element properties (Fig. 181):
Fig. 181 The “Read activity participant data” element properties

1.In the [Which data read mode to use?] field, select “Read the first record in the selection”.
2.In the [Which object to read data from?] field, select “Activity participant”.
3.Set up the following filter in the [How to filter records?] area: “Id = Activity participant added.Unique identifier of record”.
Note
To set the “Id = Activity participant added.Record Id” filter: click [Add condition], select the [Id] column; click [<?>] and select [Compare with parameter] command; select the “Activity participant added” signal in the list to the left, and select the “Id” column in the list to the right.
4.In the [What record data should the process read?] field, select “Read data from selected columns only”.
5.Add the “Activity” and “Participant” columns (only these two columns from the activity participant record will be used further in the process).
Note
To optimize business processes, especially on applications that run large numbers of process instances, it is highly recommended to limit the list of columns that the “Read data” element reads to only those that are actually used by the process.
The “Read system administration object data” element properties (Fig. 182):
Fig. 182 The “Read system administration object data” element properties
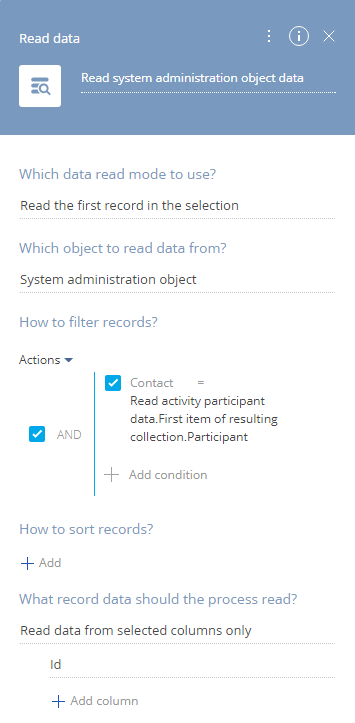
1.In the [Which data read mode to use?] field, select “Read the first record in the selection”.
2.In the [Which object to read data from?] field, select “System administration object”.
3.Set up the following filter in the [How to filter records?] area: “Contact = Read activity participant data.First item of resulting collection.Participant”.
Note
To set the “Id = Read activity participant data.First item of resulting collection.Participant” filter: click [Add condition], select the [Contact] column; click [<?>] and select [Compare with parameter] command; select the “Read activity participant data” element in the list to the left, and select the “Participant” column in the list to the right.
4.In the [What record data should the process read?] field, select “Read data from selected columns only”.
5.Add the “Id” column (the “Send push notification” process will require the identifier of the user to send push notification to).
The “Read activity data” element properties (Fig. 183):
Fig. 183 The “Read activity data” element properties
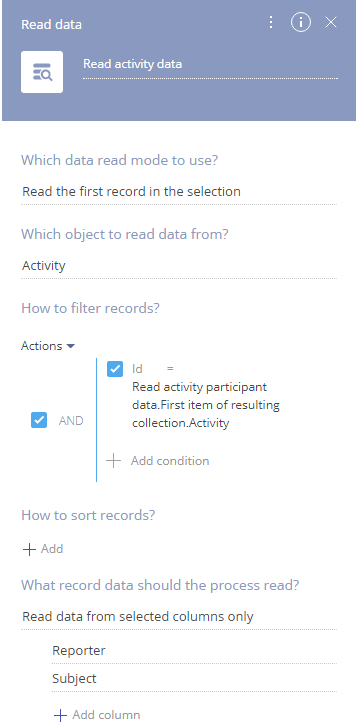
1.In the [Which data read mode to use?] field, select “Read the first record in the selection”.
2.In the [Which object to read data from?] field, select “Activity”.
3.Set up the following filter in the [How to filter records?] area: “Id = Read activity participant data.First item of resulting collection.Activity”.
Note
To set the “Id = Read activity participant data.First item of resulting collection.Activity” filter: click [Add condition], select the [Contact] column; click [<?>] and select [Compare with parameter] command; select the “Read activity participant data” element in the list to the left, and select the “Activity” column in the list to the right.
4.In the [What record data should the process read?] field, select “Read data from selected columns only”.
5.Add the “Subject” and “Reporter” columns (the “Send push notification” process will use the “Subject” column as the title of the push notification and the “Reporter” column will be used in the conditional flow).
The properties of the outgoing conditional flow (Fig. 184)
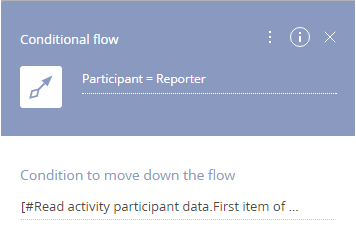
1.In the [Condition to move down the flow] parameter, click  and select [Process elements]. In the [Formula] window, click the “Read activity participant data” in the list to the left and select [Participant] column in the list to the right.
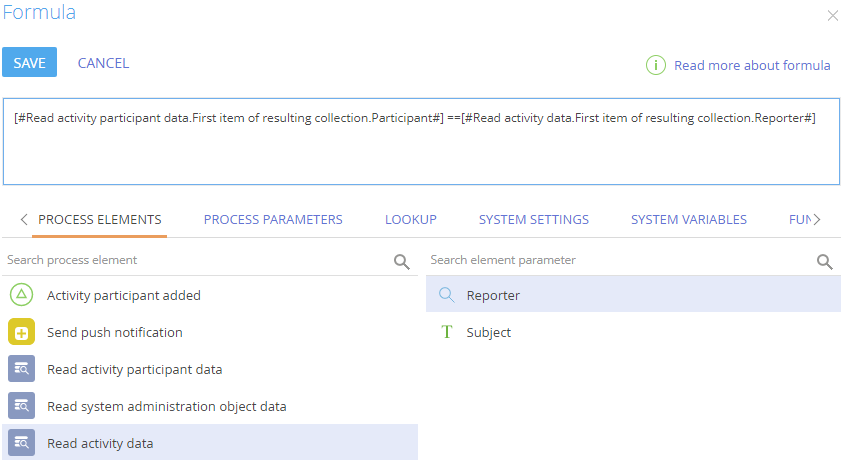
2.Type “==” after the selected formula in the formula area.
3.Click the “Read activity data” in the list to the left and select [Reporter] column in the list to the right.
As a result, the formula area will contain the following formula: “[#Read activity participant data.First item of resulting collection.Participant#]==[#Read activity data.First item of resulting collection.Reporter#]”(Fig. 185).
Fig. 185 Conditional flow formula
The “Send push notification” sub-process parameters (Fig. 186):
Fig. 186 The “Send push notification” sub-process

1.In the [Which process to run?] field, select “Send push notification”. As a result, the parameters of the selected sub-process will become available.
2.In the [Push notification text] parameter, enter “You have been added as participant”.
3.In the [Push notification title] parameter, click  and select [Process parameter]. In the [Select parameter] window, click the “Read activity data” in the list to the left and select [Subject] column in the list to the right.
As a result, the title of the push notification displayed on mobile devices will correspond to the activity subject.
4.In the [Recipient user] parameter, click  and select [Process parameter]. In the [Select parameter] window, click the “Read system administration object data” in the list to the left and select [Id] column in the list to the right.
The “Send push notification” sub-process will send notification to the user that was selected by the “Read system administration object data” element, which is the user connected to the contact added as the activity participant.
5.In the [Related entity] parameter, click  and select [Lookup value]. In the lookup window, select the “Activity” object.
6.In the [Related record ID] parameter, click  and select [Process parameter]. In the [Select parameter] window, click the “Read activity participant data” in the list to the left and select [Activity] column to the right.
Note
The [Related entity] (EntityId) and [Related record ID] (RecordId) parameters of the “Send push notification” sub-process determine which record page will open when the user taps the push notification on their mobile device. For example, to open the activity page, we selected the “Activity” object as the value of the [Related entity] parameter, and mapped the [Related record ID] to the unique identifier of the activity record to open.
Note
The [Related entity] (EntityId) and [Related record ID] (RecordId) parameters are optional. If they are left empty, tapping a push notification will simply open bpm’online mobile app.
As a result, when the business process is run, a push notification will be sent to the user, whose contact was added as the activity participant (Fig. 187).
Fig. 187 A push notification in a mobile device
See also
•How to notify employees by email when a lead has been received via a landing page
•How to notify an employee when he becomes an activity participant
•How to reallocate rights to read and modify records if an owner is changed