


Use the [Forecasts] section to plan the financial, quantitative, or temporal metrics, as well as analyze the actual KPIs, determine the bottlenecks, and increase the efficiency.
Forecasts in Creatio
The forecasting functionality enables out-of-the-box planning sales volumes by managers, accounts, or industries. You can also create custom forecasts for any type of data, set up custom forecasting indicators and periods. All forecasts are available in the [Forecasts] section (Fig. 1).
Fig. 1 The [Forecasts] section

The forecasting functionality enables:
-
creating multiple forecasts
-
configuring forecasts based on different Creatio data
-
configuring forecasts by custom sections
-
configuring the forecast periods
-
grouping data by different parameters
-
configuring custom rules for calculating metrics
-
setting up access permissions to each forecast separately.
The section has two views:
-
 Forecasts. Displays all the configured forecasts.
 -
 Forecast dashboards. Displays charts, metrics, ratings, and other analytics based on the forecast data.
Each of the forecasts in the section displays as a separate tab, where you can configure the following properties:
-
Forecast entity – the object whose data is forecasted. For example, you can configure the forecast by responsible managers, sales types, accounts, customer needs (leads), or products. You can also specify a custom section as the forecast entity. Read more >>>
-
Data grouping. You can group the forecast entities if they are too many to show as a plain list. For example, in a sales forecast, you group the customer accounts by their location: countries, regions, and cities. A forecast can have up to 10 grouping criteria, organized as a hierarchy of groups (e.g., country->region->city). You can modify the hierarchy at any time.
-
Forecast periods. Three forecast periods are available out-of-the-box: “Month,” “Quarter,” and “Year.” You can add a custom period, e.g., day, week, six months, etc. Read more >>>
-
Calculation running method. For every forecast, you can set up running calculation manually or automatically as per the set period.
-
Expected and actual data. You can populate the forecasted and actual data in several ways: enter the data manually, calculate it using a formula or pull the data from Creatio.
-
Access permissions. You can restrict the access permissions to a forecast for specific roles and users.
For example, you can create a quarterly sales forecast by sales managers and group them by departments. To do this:
-
Specify “Contacts” as the forecast entity and select grouping by the “Department” field of the “Contacts” object.
-
In the Period type field, specify “Quarter.”
-
In the columns with actual data, display the total amounts of the won opportunities, where the managers were the owners.
Similarly, you can set up forecasts by leads, contracts, and other entities for your employees.
You can only specify the entity (an “object”) while creating a new forecast and cannot change the object of an existing forecast. We recommend that you select objects that are rarely modified. This type of object better suits for the long-term analysis of data. Examples of good forecast entities include responsible managers (contacts), customers and partners, their need types (product or service categories of your company), opportunity types, products. Use objects like leads, activities, opportunities, invoices, and orders for calculating the expected metrics, and not as the forecast entities.
Note
When you add a forecast by an entity that has not been used in forecasts before, Creatio will add a new database table in the background. This table will store all the forecasts configured for this entity.
Learn more about setting up forecasts in the “Set up a forecast“ article.
Three forecast period types are available out-of-the-box: “Month,” “Quarter,” and “Year.” You can create custom periods as well. Use the [Periods] and [Period types] lookups to manage forecast periods.
Note
The [Periods] and [Period types] lookups are not registered in Creatio by default. You need to register these lookups before they become available in the [Lookups] section. Read more about working with lookups in the “Creating and registering lookups.”
To set up a new period:
1.Click  to open the System Designer.
2.Open the [Lookups] section and find the [Period types] lookup.
3.Click [New].
4.Enter the name of a new period type, e.g., “Half-year”.
5.Click  and save the changes.
6.Open the [Lookups] section again and find the [Periods] lookup.
7.Click [View] -> [Set up fields to display] and add the “Period type” column to the section list. Save the changes.
8.In the lookup list, click [New] and populate the name, period type, the start and end dates for the new period (Fig. 2).
Fig. 2 Setting up a new period
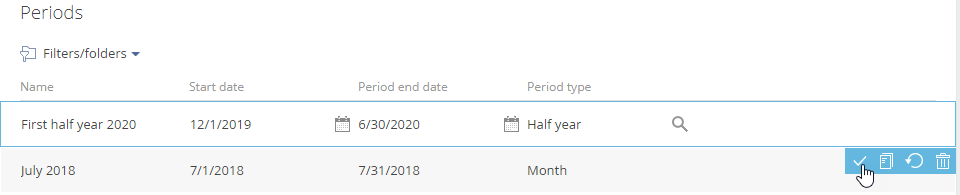
9.Add the missing periods up to the end of the current year. For example, with a period that is six months long, you will only need two periods.
As a result, new periods become available for your forecasts.
Forecast metric calculation setup
The forecast metrics are calculated in the forecast columns. The following forecast column types are used:
-
Editable – you enter the value manually.
-
Value from object – Creatio pulls the necessary data from the database.
-
Formula – you specify a formula for calculating the value based on the data available in Creatio.
For new forecasts, a single [Expected] column is available by default for each period. You can edit this value. You can change the column settings or delete the column completely.
To add a column to the forecast, select the period and click  . A setup window will open. In this window, specify the column title and select its type. If you specify the “Value from object” or “Formula” type for your column, you will have to populate additional parameters that appear in the setup window. Creatio needs these parameters to calculate the metrics correctly.
To change the column settings, hover your cursor over the column title and click  on the left.
To hide a column, hover your cursor over the column title and click  –> select the [Hide column] checkbox.
To delete a column, hover your cursor over the column title and click  –> [Delete].
If necessary, change the forecast column order using drag&drop (Fig. 3).
Fig. 3 Changing the column order in a forecast
To facilitate working to summary forecast indicators, lock the [Totals] column on the right by clicking  .
.
See also