


You can set up several record pages” for a section, e.g., for different types of section records.
To add multiple edit pages to a section, follow the below steps:
1.Open a section, e.g., [Requests].
2.In the [Section pages] area, click [ Add page].
Note
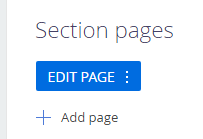
The [Section pages] area view changes once you save the newly created section in the Section Wizard: the [Set up page] button disappears, the [Edit page] and [Add page] buttons appear instead (Fig. 1).
Fig. 1 The [Section pages] area buttons after saving the new section
Attention
To add multiple section pages, you need to configure the section main page by clicking [Edit page] first. Read more >>>
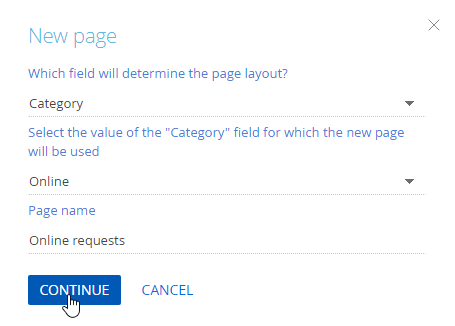
3.Populate the fields in the opened window (Fig. 3):
Fig. 2 Adding a new edit page

a.[Which field will determine the page layout?] – select the field, whose values will determine, which page to use for each record. For example, in the [Requests] section, you can set up different edit pages for different request categories: online requests and offline requests.
Note
The corresponding lookup column must be added to the section page, otherwise, it will not be available for selection in the drop-down list of the [Which field will determine the page layout?] field.
b.Select the value of the "..." field for which the new page will be used – the value of the lookup field selected at the previous step. You can specify which page to use for each value in the lookup.
Note
For new sections, populate the corresponding lookup with values in advance, You can also enter a new value directly in the [Select the value of the "..." field for which the new page will be used] field and Creatio will offer to add this lookup value. Read more >>>
c.[Page name] – the name of the new section page. The field is populated with a default value that looks as follows: “Edit page: “Section name” (Name of the corresponding lookup value).” For example, “Edit page: "Requests" (Online).” You can rename the page using any custom name to make it clearer for other users, e.g., ”Online requests” (Fig. 3).
4.Click [Continue].
5.On the Content Designer page that opens, configure the added page.
Note
You can set up additional section pages similarly to setting up the first section page.
Multiple pages of the same section can differ from each other: you can apply separate business rules for the page fields and link different section cases to each section page, as well as add different field groups and details that are only relevant for this particular request category
To stop using a page in the section:
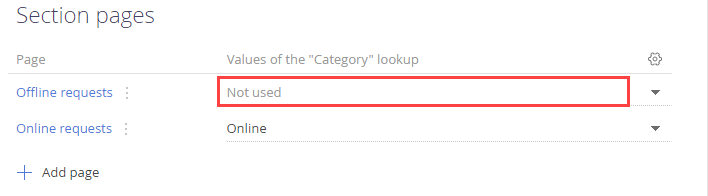
1.Delete the value in the [Values of the “...” lookup] column in the [Section pages] area.
2.After you delete the data, the field will automatically set to “Not used.” The page will be saved, but will not open for users (Fig. 4).
3.Click [Save] to save the changes in the section.
Fig. 4 The section edit page is not used anymore
To delete the configured section page from the list of available section pages completely:
1.In the [Section pages] block of the Section Wizard, click  next to the name of the section page you want to delete.
2.Select [Remove] from the drop-down menu (Fig. 5).
Fig. 5 Deleting a section page from the section
To modify the column that determines the page view:
1.In the [Section pages] area, click  .
.
2.In the opened window, select the new lookup field, e.g., “Type” instead of “Category.”
Note
After you change the column, the [Values of the “...” lookup] field value will be set to “Not used” for all edit pages configured earlier.
3.Specify the selected lookup values that will use the configured edit pages.
4.Rename the pages accordingly if needed (Fig. 6).
Fig. 6 Changing the column that determines the page type
See also