


Domain verification for the UniOne provider
If you use UniOne for sending marketing emails, you will need to verify your email address and your corporate domain to allow the provider to send emails on your behalf.
If your recipients use MS Outlook, Hotmail, Gmail and other common mailing services, they can see that the email was sent from your provider's server on your behalf (this information is available in the “From” field):
NOTE
If you are sending emails through UniOne, the “From” field of the emails may contain the following text: “UniOne_Smith <postman1847554@usndr.com>; on behalf of; UniOne_Smith <smith.john@gmail.com>” or “UniOne_Smith john.smith@gmail.com from domain usndr.com”.
To verify your email addresses and domain for the UniOne provider, perform the following steps:
1.Verify your email address. Read more >>>
2.Obtain SPF and DKIM records. Read more >>>
3.Specify SPF and DKIM records in the DNS area of your domain. Read more >>>
Attention
A single domain may only be verified for a single Creatio application. If you are using two separate Creatio applications you cannot verify the same domain for both.
4.Postmaster.mail.ru and Feedback Loop services are required to send emails to the addresses belonging to the mail.ru group. Read more >>>
This step is required in order to send emails from specific individual addresses, as well as to ensure that only you can send emails on your behalf.
To verify your email address in Creatio:
1.Create a new email in the [Emails] section.
2.Populate all required fields (sender’s name, necessary email address, etc.)
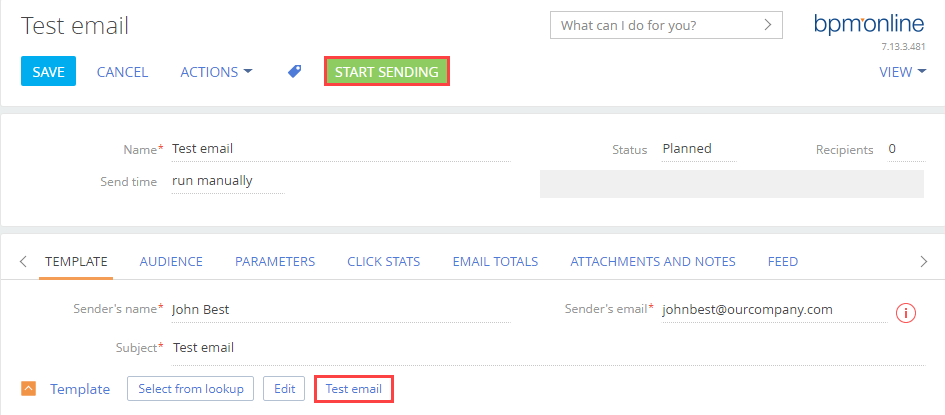
3.Start sending the emails, or send a test email via a corresponding action on the email page (Fig. 1).
NOTE
Email providers like UniOne do not allow sending test emails from free mail services (e.g., Gmail, Yahoo! Mail, iCloud, etc.)
4.If an email is sent from this address for the first time, a notification will be displayed asking to confirm the sender's address. An email with a confirmation link will be automatically sent to you.
5.Open the received email and follow the confirmation link.
6.Run the email service once more.
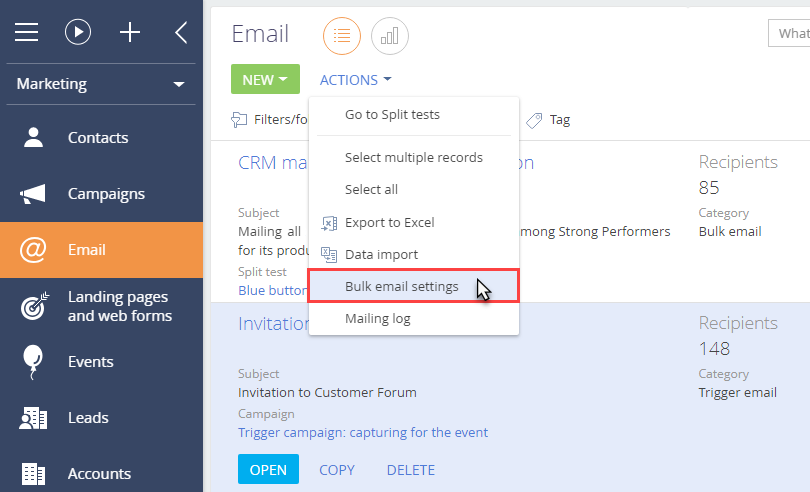
The SPF and DKIM records are generated automatically in the [Emails] section once your email address is verified. To obtain these records, in the [Emails] section, select [Bulk email settings] in the [Actions] menu (Fig. 2).
Fig. 2 Opening the email settings page
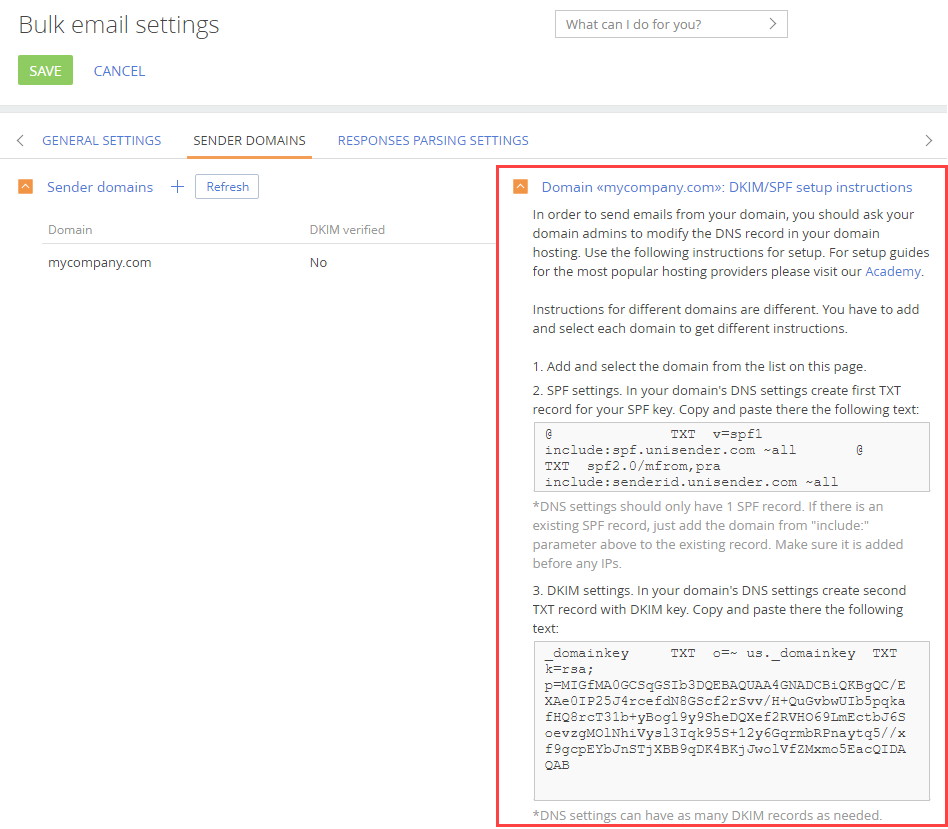
The SPF and DKIM records will be generated automatically in the [DKIM/SPF setup instructions] area on the [Bulk email settings] page (Fig. 3) for your specified domain once your email is verified.
Fig. 3 SPF and DKIM keys for the specified domain
NOTE
The SPF/DKIM settings are different for each separate domain. You have to add and select each domain to get different instructions. Only the domains of verified email addresses can be added in the [Sender domains] area.
Adding the necessary records to the DNS area of your domain
To verify the mail domain using the UniOne provider, you need to add the SPF and DKIM records, as well as the DMARC policy and the tracking domain to the DNS area of the mail domain settings, otherwise, the domain reputation and the mail delivery quality are not guaranteed.
NOTE
We recommend looking into the examples provided in the “Specifics of popular DNS providers” article.
Specify SPF and DKIM records in the DNS area of your domain
1.If the DNS zone of your domain does not have an SPF record yet, you need to copy the generated SPF record from the [DKIM/SPF setup instructions] area on the [Bulk email settings] page. The record will look as follows:
| Name | Type | Value |
|---|---|---|
| @ | TXT | v=spf1 include:spf.unisender.com ~all |
| @ | TXT | spf2.0/mfrom,pra include:senderid.unisender.com ~all |
2.If the TXT record with SPF information already exists, add the following values in the end of the first and second strings of this record (usually it is ?all, ~all or -all):
| Name | Type | Value |
|---|---|---|
| SPF1 record (first line) | TXT | include:spf.unisender.com |
| SPF2 record (second line) | TXT | include:senderid.unisender.com |
Note
Depending on the DNS editor, you may need to specify the “@” symbol in the “Name” field of the DNS zone. Contact your hosting provider for information about this value correct entering.
Specify the DKIM record in the DNS area of your domain
Set up the corresponding DKIM record:
1.Copy the generated DKIM record from the [DKIM/SPF setup instructions] area on the [Bulk email settings] page, which will look as follows: The record will look as follows:
| Name | Type | Value |
|---|---|---|
| _domainkey | TXT | o=~ |
| us._domainkey | TXT | k=rsa; p=XXXXXXXXXXXXXXXXXXXXX |
NOTE
In the record above, XXXXXXXXXXXXXXXXXXXXX is a unique key for each domain. The key is generated automatically and is available on the [Sender domains] tab.
Attention
UniOne allocates 24 hours for verification of the domain once SPF / DKIM keys have been generated. If the process is delayed, contact support@creatio.com to complete your verification.
Specify SPF and DKIM records in the DNS area of your domain
DMARC verification is only added after adding SPF and DKIM records and it provides the receiving server with the information upon further actions with emails from the unverified domain. Configuration of the DMARC policy is optional for UniOne but it is recommended for improving the reputation of the domain. Add a rule as TXT record of the DNS domain to activate DMARC:
| Name | Type | Value |
|---|---|---|
| _dmarc | TXT | v=DMARC1;p=none; |
The v tag specifies the protocol version, while p specifies the method of processing emails that have not been verified.
NOTE
Learn more about the DMARC policy in the following article.
Additional settings for correct sending emails to mail.ru domains
To send emails to addresses of the mail.ru domain group (inbox.ru, mail.ua, list.ru, bk.ru, etc.), you need to perform additional setup:
-
Add the domains from which your emails are sent to the Postmaster.mail.ru service.
-
Configure the Feedback Loop (FBL).
Note
Learn more about the Feedback Loop mechanism in the “How do I monitor the “Marked as spam” responses and why?” article.
If these settings are disabled, UniOne and Creatio will not get the response from the mail system for emails that recipients marked as SPAM. Sending more emails to these recipients can affect your sender's reputation and lead to banning of your domain by the mail service.
The setup procedure is as follows:
1.Register a new mailbox on the mail.ru and log in to the created account.
2.Open https://postmaster.mail.ru/add/. Follow the instructions to add the domains for sending your emails.
3.Configure addresses for getting feedback with the "This is spam” responses via the Feedback Loop mechanism on the https://postmaster.mail.ru/settings/ page.
a.For each domain, specify the address in the following format fbl@your_domain. All emails marked as spam by recipients will be sent to this address in “Abuse Reporting Format”.
b.Configure the automatic redirect from this address to fbl@unisender.com for processing.
See also