


Testing tools. NUnit
Glossary Item Box

Introduction
Unit-testing (module testing) is a software development process for verifying the operation capacity of the isolated program components (see “Module testing”). The tests are usually written by developers for every advanced method of the developed class. This allows to quickly reveal the source code recession – errors in the tested program components.
One of the NET-application Unit-testing frameworks is NUnit – Unit-testing environment with an open source code. A special adapter has been developed to integrate it with Visual Studio. Such adapter can be installed as a Visual Studio extension or as a project NuGet package with the implemented Unit-tests. Use this link to access the 3.x version framework documentation.
To create Unit-tests for methods or Creatio custom package class properties:
1. Install NUnit Visual Studio adapter
2. Switch to the file system development mode
3. Set up the Unit-test project
4. Create the tests
5. Perform testing
Case description
Add tests for the custom class, implemented in the [Source code] type UsrNUnitSourceCode schema of the Creatio application sdkNUnit custom package.
Source code
You can access the custom class implementation package at sdkNUnit repository at Github.
Case implementation algorithm
1. Install NUnit Visual Studio adapter
You can install NUnit Visual Studio adapter either as a Visual Studio extension or as a NuGet package.
Installing NUnit adapter as a Visual Studio extension
The advantage of installing NUnit adapter as a Visual Studio extension is its availability for any test project since the adapter becomes part of IDE. Another advantage is the automatic extension update. The disadvantage is the necessity to install it for every test project team member.
To install NUnit adapter:
1. Download extension from Visual Studio Marketplace *.VSIX-file.
2. Double-click the *.VSIX-file and run the installation. Select the needed Visual Studio versions during installation.
NOTE
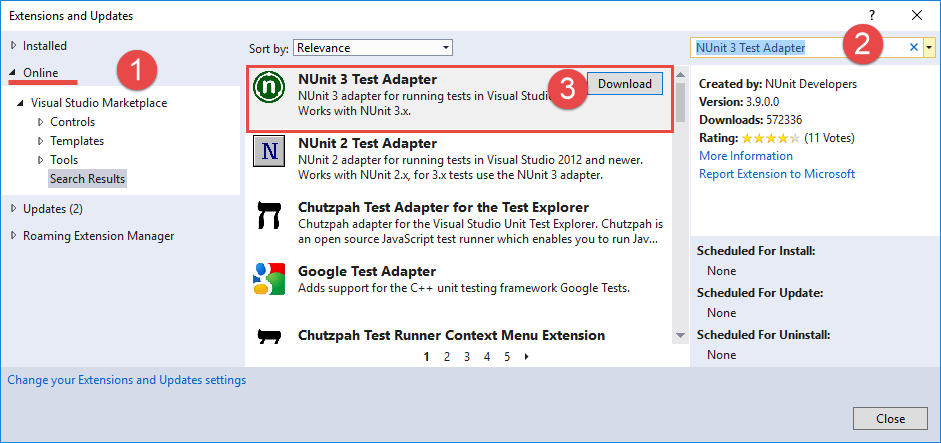
As an alternative, you can install NUnit adapter via the Tools > Extensions and Updates menu. Select [Online] filter (Fig. 1. 1) and indicate “NUnit 3 Test Adapter” (2) in the search string. Select NUnit 3 Test Adapter extension in the search results and click [Download]. The extension installation starts automatically.
Fig. 1. Extension search by Visual Studio built-in tools
Installing NUnit adapter as a NuGet package
The advantage of NUnit adapter installation as a NuGet-package is that in this case it becomes part of Visual Studio project and is available for access to all developers who use the project. The disadvantage is the necessity to install it for all Unit-test projects.
To install NUnit adapter:
1. Right-click the test project (for instance, Terrasoft.Configuration.Tests.csproj) and select the [Manage NuGet Packages...] command.
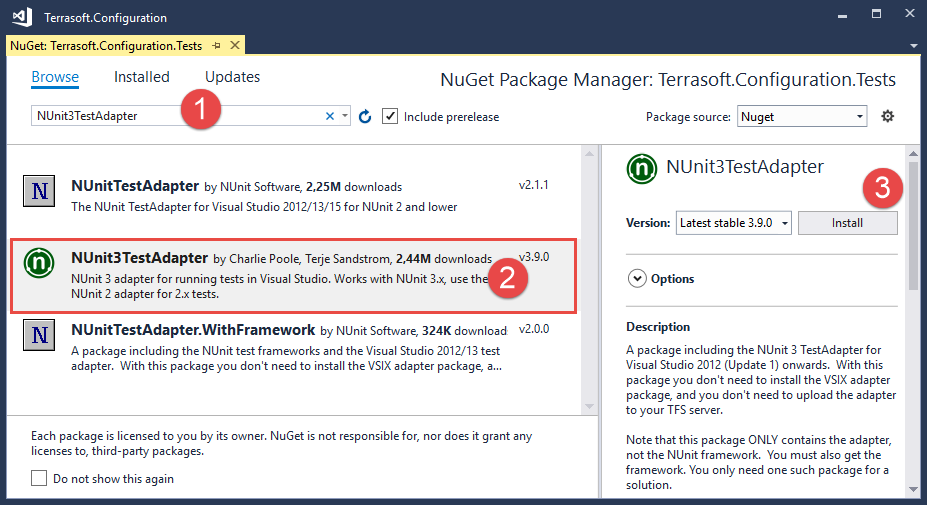
2. Indicate “NUnit3TestAdapter” (1) in the search string of the opened NuGet package manager tab (Fig.2). Select the package in the search results (2) and install it (3).
Fig. 2. Installing NUnit3TestAdapter package in the NuGet package manager
NOTE
You can find detailed description of NuGet-package installation into Visual Studio projects in the “Package Manager UI” Microsoft article.
2. Switch to the file system development mode
Creating Unit-tests for .NET classes, implemented in Creatio packages is only possible in the file system development mode. You can find more information about the Creatio configuration development in the file system, setting up Visual Studio and the server code operation case in “Development in the file system”, “IDE settings for development” and “Working with the server side source code”.
The sdkNUnit custom package containing [Source code] type UsrNUnitSourceCode schema is used in this case. The UsrNUnitSourceCode C# class containing methods that require writing tests is implemented in this schema source code.
ATTENTION
You can access the custom class implementation package at sdkNUnit repository at Github.
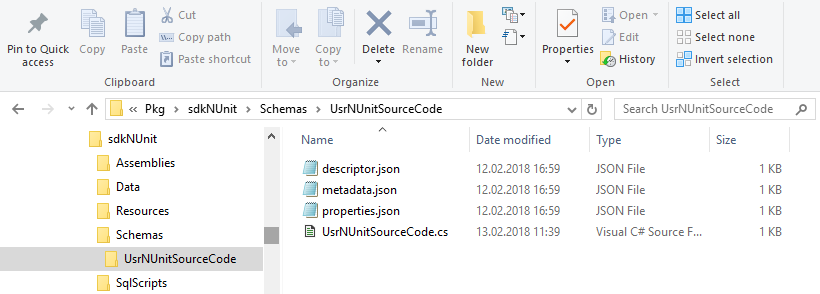
The sdkNUnit custom package has the following view (see Fig.3) after it has been uploaded to the file system:
Fig. 3. The sdkNUnit package structure
Class source code for testing:
namespace Terrasoft.Configuration
{
    public class UsrNUnitSourceCode
    {
        // String property.
        public string StringToTest
        {
            get
            {
                return "String to test";
            }
        }
        // The method that verifies the equality of the two strings.
        public bool AreStringsEqual(string str1, string str2)
        {
            return str1 == str2;
        }
    }
}
3. Set up the Unit-test project
The Terrasoft.Configuration.Tests.csproj pre-configured project is used for creating Unit-tests in this case. It is delivered with the Terrasoft.Configuration.sln solution (see “Server code operation in Visual Studio”).
Add the NUnit NuGet-package in the project dependency to use NUnit framework for creating tests in the Terrasoft.Configuration.Tests.csproj project. To do this:
1. Right-click the Terrasoft.Configuration.Tests test project in Solution Explorer and select the [Manage NuGet Packages...] command.
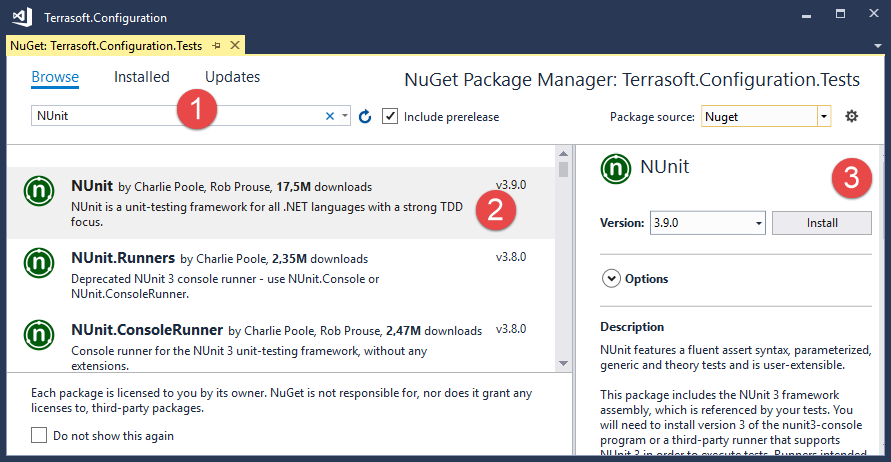
2. Indicate “NUnit” (1) in the search string of the opened NuGet package manager tab (Fig.4), select the package in the search results (2) and install it (3).
Fig. 4. Installing NUnit package in the NuGet package manager
4. Create the tests
NOTE
It is common practice that the test-containing class name must have the tested class name with “Tests” word in it. It is also convenient to place tests in catalogs to group them in a project. The catalog name should match the tested package name and have “.Tests” ending in it.
To create tests for UsrNUnitSourceCode class:
1. Create sdkNUnit.Tests catalog in the Terrasoft.Configuration.Tests.csproj project.
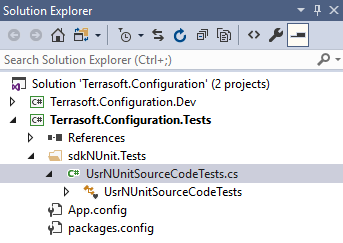
2. Create the new UsrNUnitSourceCodeTests.class in the sdkNUnit.Tests catalog. This class source code will be stored in the UsrNUnitSourceCodeTests.cs file (Fig.5).
Fig. 5. Test project structure
3. Add the implementation test methods to the UsrNUnitSourceCodeTests class:
using NUnit.Framework;

namespace Terrasoft.Configuration.Tests.sdkNUnitTests
{
    [TestFixture]
    class UsrNUnitSourceCodeTests
    {
        // The tested class instance.
        UsrNUnitSourceCode objToTest = new UsrNUnitSourceCode();
        // Testing string.
        string str = "String to test";

        [Test]
        public void ClassReturnsCorrectStringProperty()
        {
            // Testing the string property value.
            // The value must be populated and match the required value.
            string res = objToTest.StringToTest;
            Assert.That(res, Is.Not.Null.And.EqualTo(str));
        }

        [Test]
        public void StringsMustBeEqual()
        {
            // Testing the value equality of the two strings.
            bool res = objToTest.AreStringsEqual(str, "String to test");
            Assert.That(res, Is.True);
        }

        [Test]
        public void StringsMustBeNotEqual()
        {
            // Testing the value inequality of the two strings.
            // This test will fail since the values are equal.
            bool res = objToTest.AreStringsEqual(str, "String to test");
            Assert.That(res, Is.False);
        }
    }
}
The UsrNUnitSourceCodeTests class is decorated by the [TestFixture] attribute, which marks it as a test-containing class. Every method testing a specific functionality must be decorated by the [Test] attribute. You can find the description of the NUnit framework attributes in the “Attributes” NUnit article.
The testing is performed via the Assert.That() method that accepts the tested value and such value limiting objects as arguments. You can find more information about the assertions, Assert.That() method and limiting model in the “Assertions” and “Constraint Model” NUnit articles.
5. Testing
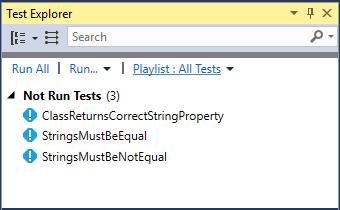
To perform testing, execute the [Test] > [Windows] > [Test Explorer] menu command to open the [Test Explorer] window in Visual Studio (Fig.6).
Fig. 6. [Test Explorer] window
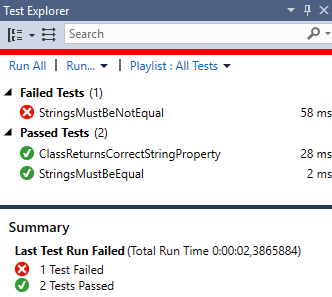
Execute the [Run All] command to run the tests. The successfully passed tests will be moved to the [Passed Test] group, the failed tests will be moved to the [Failed Test] group (Fig.7).
Fig. 7. Passed and Failed tests
You can find more information about the [Test Explorer] window functionality in the “Run unit tests with Test Explorer” Visual Studio article.