IDE settings for development
Glossary Item Box

Introduction
Using an Integrated Development Environment (IDE), Microsoft Visual Studio maximizes development speed. Microsoft Visual Studio IDE usually enables you to create, modify and compile the source code, debug it, run team development, use version control systems, etc.
Development in Microsoft Visual Studio became possible after the implementation of the configuration packages in the file system mechanism in Creatio. With this mechanism, you can export the packages from the database to a set of files, edit the package source code using an IDE and upload the updated packages back to the database.
NOTE
For development in the file system, you can use Microsoft Visual Studio Community, Professional and Enterprise version 2017 (with latest updates) and higher.
The WorkspaceConsole utility integrated into Visual Studio is used to compile applications. The WorkspaceConsole has the following benefits:
- Significantly speeds up the compilation process, because the whole configuration assembly is split into independently compiled modules. Only the modules that contain modified packages are compiled.
- Compilation does not require exiting the debugging mode or disconnecting from the IIS process.
ATTENTION
You can also compile the configuration project using the Visual Studio compiler. However, it may not take into account the dependencies and the position of packages.
Visual Studio settings for development in the file system:
- Enable compilation mode in the IDE.
- Configure the WorkspaceConsole to compile the application.
- Configure Microsoft Visual Studio.
Visual Studio configuration steps
1. Enable compilation mode in the IDE
To enable compilation mode in the IDE, edit the Web.config file (located in the root folder with the installed application) and set the enabled attribute of the fileDesignMode element to true.
<fileDesignMode enabled="true" />
ATTENTION
Enable the development mode in the file system to compile in the Visual Studio.
ATTENTION
Currently, the development in the file system is no compatible with getting client content from preliminary generated files. For the correct work of the development in the file system you need to disable getting static client content from the file system. Set the “false” for the UseStaticFileContent flag in the Web.config file to disable this functions.
<fileDesignMode enabled="true" />
...
<add key="UseStaticFileContent" value="false" />
ATTENTION
If the development mode in the file system is enabled, IIS will use the Terrasoft.Configuration.dll library only from the file system.
After switching to the file system development mode for the first time, upon logging in, the user is redirected to the "Configuration" section. At this time, "The "Default" workspace assembly is not initialized" error appears. To eliminate this error, run the "Compile all items" action.
2. Configure the WorkspaceConsole to compile the application.
Configuration projects are compiled via the WorkspaceConsole utility, which is included in the application setup files. The utility should be configured before using. In addition to the settings covered in the "WorkspaceConsole settings” article, you must also enable the development mode in the file system in the Terrasoft.Tools.WorkspaceConsole.exe.config configuration file.
<fileDesignMode enabled="true"/>
To speed up the compilation by splitting the configuration assembly into independent compiled modules, set the CompileByManagerDependencies setting to “true” in the “internal” Web.Config (located in the Terrasoft.WebApp directory) and in the Terrasoft.Tools.WorkspaceConsole.exe.config file of the WorkspaceConsole utility.
<appSettings>
    ...
    <add key="CompileByManagerDependencies" value="true" />
    ...
 </appSettings>
3. Configure Microsoft Visual Studio
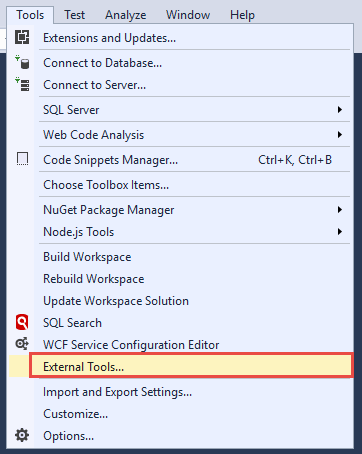
To use the WorkspaceConsole utility for compilation in Visual Studio, set up External Tools. To do this, execute the Tools > External Tools... command in the Visual Studio (Fig. 1).
Fig. 1 Adding external tools in the Visual Studio
In the opened dialog window (Fig 2), add and set up three commands for calling the WorkspaceConsole utility. The Build Workspace and Rebuild Workspace commands initiate compilation of changes and full compilation of configuration projects. The Update Workspace Solution command updates the Visual Studio solution of the configuration package from the application database. It applies all changes made by the users within the application. The properties and arguments of commands are available in tables 1, 2 and 3. Select the Use Output window checkbox (Fig. 2) for all three commands.
Fig. 2 Setting properties and arguments for an external Visual Studio command
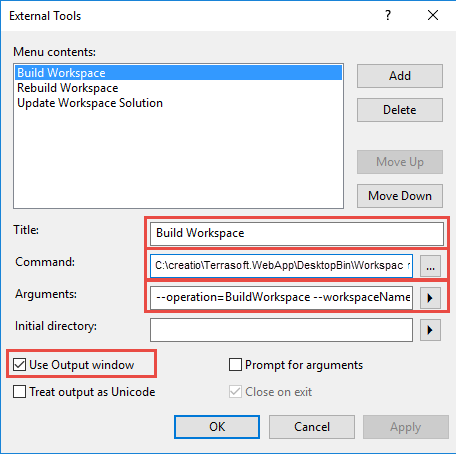
Table 1. Update Workspace Solution command properties
| Title | Update Workspace Solution |
|---|---|
| Command |
[Path to the catalog with installed application]\Terrasoft.WebApp\DesktopBin\WorkspaceConsole\Terrasoft.Tools.WorkspaceConsole.exe Example: C:\Creatio\Terrasoft.WebApp\DesktopBin\WorkspaceConsole\Terrasoft.Tools.WorkspaceConsole.exe |
| Arguments |
--operation=UpdateWorkspaceSolution --workspaceName=Default --webApplicationPath="[Path to the catalog with installed application]\Terrasoft.WebApp" --confRuntimeParentDirectory="[Path to the catalog with installed application]\Terrasoft.WebApp" Example: --operation=UpdateWorkspaceSolution --workspaceName=Default --webApplicationPath="C:\Creatio\Terrasoft.WebApp" --confRuntimeParentDirectory="C:\Creatio\Terrasoft.WebApp" |
Table 2. Build Workspace command properties
| Title | Build Workspace |
|---|---|
| Command |
[Path to the catalog with installed application]\Terrasoft.WebApp\DesktopBin\WorkspaceConsole\Terrasoft.Tools.WorkspaceConsole.exe Example: C:\сreatio\Terrasoft.WebApp\DesktopBin\WorkspaceConsole\Terrasoft.Tools.WorkspaceConsole.exe |
| Arguments |
--operation=BuildWorkspace --workspaceName=Default --webApplicationPath="[Path to the catalog with installed application]\Terrasoft.WebApp" --confRuntimeParentDirectory="[Path to the catalog with installed application]\Terrasoft.WebApp" Example: --operation=BuildWorkspace --workspaceName=Default --webApplicationPath="C:\creatio\Terrasoft.WebApp" --confRuntimeParentDirectory="C:\creatio\Terrasoft.WebApp" |
Table 3. Rebuild Workspace command properties
| Title | Rebuild Workspace |
|---|---|
| Command |
[Path to the catalog with installed application]\Terrasoft.WebApp\DesktopBin\WorkspaceConsole\Terrasoft.Tools.WorkspaceConsole.exe Example: C:\сreatio\Terrasoft.WebApp\DesktopBin\WorkspaceConsole\Terrasoft.Tools.WorkspaceConsole.exe |
| Arguments |
--operation=RebuildWorkspace --workspaceName=Default --webApplicationPath="[Path to the catalog with installed application]\Terrasoft.WebApp" --confRuntimeParentDirectory="[Path to the catalog with installed application]\Terrasoft.WebApp" Example: --operation=RebuildWorkspace --workspaceName=Default --webApplicationPath="C:\creatio\Terrasoft.WebApp" --confRuntimeParentDirectory="C:\creatio\Terrasoft.WebApp" |
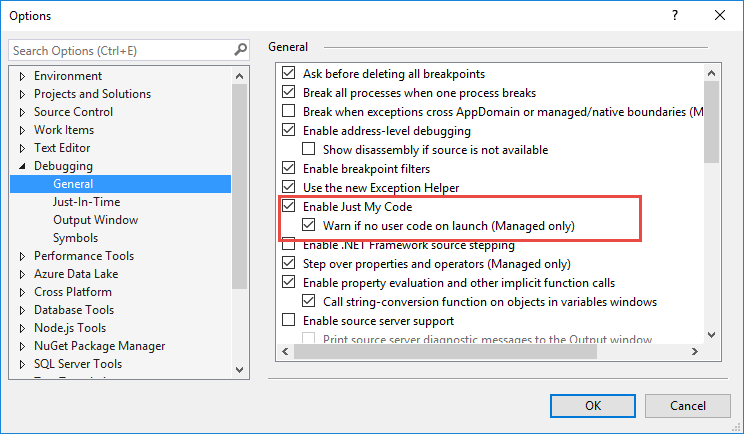
To prevent the debugger from accessing the source code that is disabled in the project, execute the Debug > Options... menu command and enable the Enable Just My Code option in the opened dialog (Fig. 3). For more information about the Enable Just My Code, please refer to this page.
Fig. 3 Enable Just My Code option
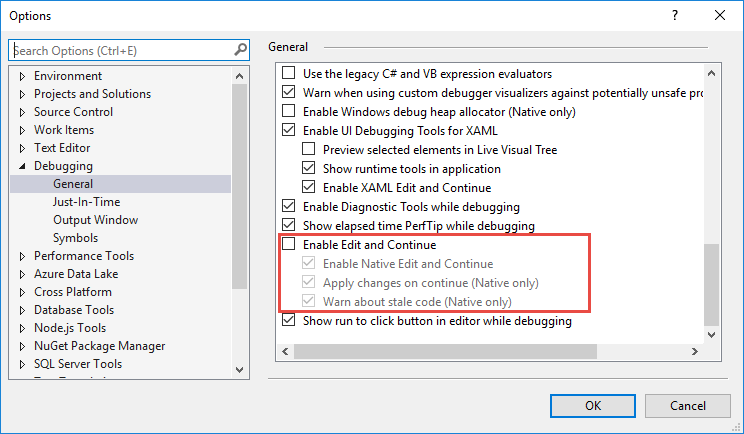
After the configuration is compiled, the application is automatically restarted. The Enable Edit and Continue option is not supported and should be disabled (Fig. 4).
Fig. 4 Edit and Continue option
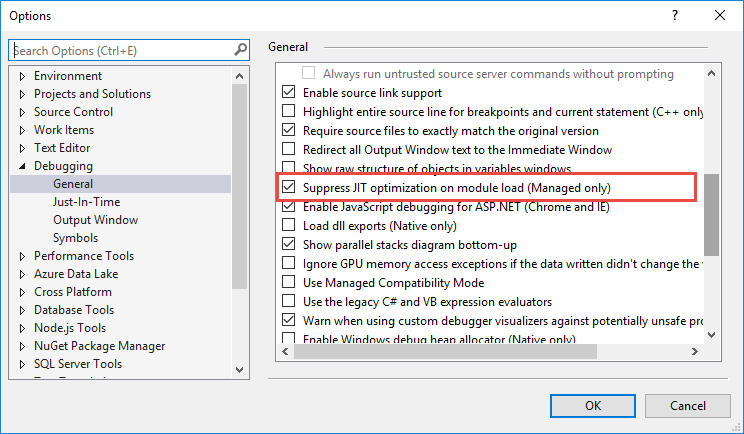
For the debugger to stop correctly on breakpoints, make sure that the Suppress JIT optimization on module load option is enabled (Fig. 5).
Fig. 5 Suppress JIT optimization on module load