Creating pop-up summaries (mini pages)
Glossary Item Box

Introduction
Starting from version 7.7 we have introduced a new module in bpm’online - a pop-up summary. For regular users, pop-up summaries are improved screen tips containing additional functions based on the current section. Using pop-up summaries enables receiving information about the account address and opening its location on a map, sending emails or making contact calls directly from the section without opening the edit page. You can see examples of pop-up summaries by hovering the cursor over hyperlinks pointing at edit pages in the [Accounts] and [Contact] sections.
Primary purposes of using pop-up summaries:
- Enabling users to get the necessary information by record without opening edit pages.
- Providing possibility to quickly add records to sections with populating only the required fields without opening full record pages.
The structure of a pop-up summary view model schema does not differ from the general structure of bpm’online module schema. Required properties of pop-up summary schema structure include:
- entitySchemaName containing the object schema name bound to a pop-up summary
- the diff modification array
These parameters enable building a module view in bpm’online custom interface.
You can also use other general schema structure elements to implement the necessary functions, such as attributes, methods, mixins and messages that can be used to add custom control elements, register messages and form the pop-up summary business logics. The appearance of pop-up summary visual elements can be modified using custom styles.
ATTENTION
Pop-up summaries do not support the mechanism of business logics setup via business rules.
To add a custom pop-up summary to a current bpm’online section:
- Add a pop-up view model schema to the custom package. Select BaseMiniPage schema as a parent object.
- Modify the SysModuleEdit system table in the bpm’online database via a special SQL query.
- Add the necessary pop-up summary functions to the schema source code. Specify the object schema name in the entitySchemaName element bound to the pop-up summary and perform at least one modification in the diff array.
- Apply styling to the pop-up summary.
- Add the Has[Section code]MiniPageAddMode setting.
ATTENTION
To bind a pop-up summary to specific section objects, specify the unique pop-up summary identifier in the MiniPageSchemaUId column of these objects. Currently you can only do it by modifying the SysModuleEdit system table of bmp’online database via an SQL-query.
Pay high attention to creating and executing the SQL query. Executing an incorrect SQL query can damage the existing data and disrupt the system.
NOTE
For bpm’online sections with default pop-up summaries, there are system settings, whose codes have the following format Has[Section code]MiniPageAddMode (for instance, HasAccountMiniPageAddMode). These system settings are used to toggle between the two modes: adding new records and editing existing records via pop-up summaries.
You can create a pop-up summary for any bpm’online object.
Case description
Creating a custom pop-up summary for the [Knowledge base] section. The pop-up summary will be used for viewing the basic [Name] and [Tags] fields with a possibility to download the attached files.
Source code
Use the following link to download a package with the [Knowledge base] section pop-up summary schema implemented according to this case.
Case implementation algorithm
1. Creating a pop-up summary view model schema
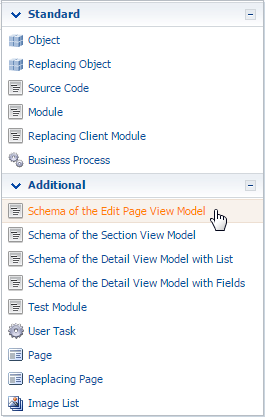
Open the [Schemas] tab in the [Configuration] section and select the [Add] — [Replacing Client Module] command from the menu (Fig.1).
Fig.1 Adding a pop-up summary view schema

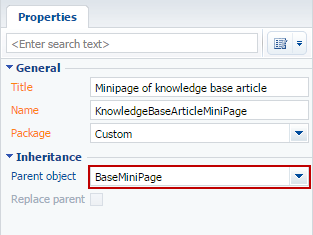
Populate the following properties of the pop-up summary view schema (Fig.2):
- [Title] – “UsrKnowledgeBaseArticleMiniPage”
- [Name] – “KnowledgeBase Mini Page”
- [Package] – the custom package, in which the development is performed, for instance, UsrPackage
- [Parent object] - the BaseMiniPage schema from the NUI package
Fig.2 Properties of the pop-up summary view model schema

2. Registering a the pop-up summary in the database
Execute the following SQL query to perfrom modifications in the database:
DECLARE
    -- Name of the created pop-up summary view schema.
    @ClientUnitSchemaName NVARCHAR(100) = 'UsrKnowledgeBaseArticleMiniPage',
    -- Name of the object schema bound to the pop-up summary.
    @EntitySchemaName NVARCHAR(100) = 'KnowledgeBase'

UPDATE SysModuleEdit
SET MiniPageSchemaUId = (
    SELECT TOP 1 UId
    FROM SysSchema
    WHERE Name = @ClientUnitSchemaName
)
WHERE SysModuleEntityId = (
    SELECT TOP 1 Id
    FROM SysModuleEntity
    WHERE SysEntitySchemaUId = (
        SELECT TOP 1 UId
        FROM SysSchema
        WHERE Name = @EntitySchemaName
            AND ExtendParent = 0
    )
);
As a result of this query execution you will have a unique pop-up identifier, populated in SysModuleEdit table of the record MiniPageSchemaUId field that corresponds to the [Knowledge base] section (Fig.3).
Fig.3 Unique pop-up summary identifier value in SysModuleEdit table

3. Displaying primary object fields
The pop-up summary code structure is identical to the edit page structure. Specify the KnowledgeBase schema as the object schema and add the necessary modifications to the diff view model modification array.
The base pop-up summary consists of the following elements:
- MiniPage – Terrasoft.GridLayout – pop-up summary field
- HeaderContainer – Terrasoft.Container – pop-up summary name (initially is placed in the first row of the pop-up summary field
Two objects that configure the [Name] and [Keywords] fields are added to the diff modification array.
At this stage the pop-up summary can already be used and the following actions are not required.
Source code of the pop-up summary view model schema:
define("UsrKnowledgeBaseArticleMiniPage", [], function() {
    return {
        entitySchemaName: "KnowledgeBase",
        attributes: {
            "MiniPageModes": {
                "value": [this.Terrasoft.ConfigurationEnums.CardOperation.VIEW]
            }
        },
        diff: /**SCHEMA_DIFF*/[
            {
                "operation": "insert",
                "name": "Name",
                "parentName": "HeaderContainer",
                "propertyName": "items",
                "index": 0,
                "values": {
                    "labelConfig": {
                        "visible": false
                    },
                    "isMiniPageModelItem": true
                }
            },
            {
                "operation": "insert",
                "name": "Keywords",
                "parentName": "MiniPage",
                "propertyName": "items",
                "values": {
                    "labelConfig": {
                        "visible": false
                    },
                    "isMiniPageModelItem": true,
                    "layout": {
                        "column": 0,
                        "row": 1,
                        "colSpan": 24
                    }
                }
            }
        ]/**SCHEMA_DIFF*/
    };
});
4. Adding a function button to the pop-up summary
As per the example conditions, the pop-up summary must enable downloading files bound to the knowledge base.
You can access additional data via a drop-down list of a pre-configured button. To add a button of selecting files from the knowledge base article:
- Add the button description to the diff array – the FilesButton element.
- Add an attribute binding the primary and additional records – the Article virtual column.
- Add the MiniPageModes attribute – the array containing a collection of necessary operations performed by the pop-up summary.
- Add the button image to bpm’online resources. For example, you can add the following image –
 . Adding an image to resources is covered in the "How to add a field with an image to the edit page” article.
 - To add methods of working with a drop-down list of a file selection button:
- override the init() method.
- override the onEntityInitialized() method
- set the Article attribute value via the setArticleInfo() method
- get information about the current knowledge base article files via the initFilesMenu(files) method
- populate the drop-down list collection of the file selection button via the initFilesMenu(files) method
- initiate the file upload and adding to the drop-down list of the file selection button via the fillFilesExtendedMenuData() method
- initiate the selected file download via the downloadFile() method
5. Applying styling to the pop-up summary.
Create the UsrKnowledgeBaseArticleMiniPageCss module and specify the necessary styles on the LESS tab.
div[data-item-marker="UsrKnowledgeBaseArticleMiniPageContainer"] > div {
width: 250px;
}
Specify the pop-up summary schema dependency on the style module in the page designer and add this module download in the source code.
Below is the full source code of a pop-up summary:
define("UsrKnowledgeBaseArticleMiniPage",
["terrasoft", "KnowledgeBaseFile", "ConfigurationConstants", "css!UsrKnowledgeBaseArticleMiniPageCss"],
    function(Terrasoft, KnowledgeBaseFile, ConfigurationConstants) {
        return {
            entitySchemaName: "KnowledgeBase",
            attributes: {
                "MiniPageModes": {
                    "value": [this.Terrasoft.ConfigurationEnums.CardOperation.VIEW]
                },
                "Article": {
                    "type": Terrasoft.ViewModelColumnType.VIRTUAL_COLUMN,
                    "referenceSchemaName": "KnowledgeBase"
                }
            },
            methods: {
                // Initiates the drop-down list collection of the file selection button.
                init: function() {
                    this.callParent(arguments);
                    this.initExtendedMenuButtonCollections("File", ["Article"], this.close);
                },
                // Initiates the attribute value binding the primary and additional records.
                // Populates the drop-down list collection of the file selection button.
                onEntityInitialized: function() {
                    this.callParent(arguments);
                    this.setArticleInfo();
                    this.fillFilesExtendedMenuData();
                },
                // Initiates the file download and adding to the drop-down list of the file selection button.
                fillFilesExtendedMenuData: function() {
                    this.getFiles(this.initFilesMenu, this);
                },
                // Sets the attribute value binding the primary and additional records.
                setArticleInfo: function() {
                    this.set("Article", {
                        value: this.get(this.primaryColumnName),
                        displayValue: this.get(this.primaryDisplayColumnName)
                    });
                },
                // Receives information about files of the current knowledge base article.
                getFiles: function(callback, scope) {
                    var esq = this.Ext.create("Terrasoft.EntitySchemaQuery", {
                        rootSchema: KnowledgeBaseFile
                    });
                    esq.addColumn("Name");
                    var articleFilter = this.Terrasoft.createColumnFilterWithParameter(
                        this.Terrasoft.ComparisonType.EQUAL, "KnowledgeBase", this.get(this.primaryColumnName));
                    var typeFilter = this.Terrasoft.createColumnFilterWithParameter(
                        this.Terrasoft.ComparisonType.EQUAL, "Type", ConfigurationConstants.FileType.File);
                    esq.filters.addItem(articleFilter);
                    esq.filters.addItem(typeFilter);
                    esq.getEntityCollection(function(response) {
                        if (!response.success) {
                            return;
                        }
                        callback.call(scope, response.collection);
                    }, this);
                },
                // Populates the drop-down list collection of the file selection button.
                initFilesMenu: function(files) {
                    if (files.isEmpty()) {
                        return;
                    }
                    var data = [];
                    files.each(function(file) {
                        data.push({
                            caption: file.get("Name"),
                            tag: file.get("Id")
                        });
                    }, this);
                    var recipientInfo = this.fillExtendedMenuItems("File", ["Article"]);
                    this.fillExtendedMenuData(data, recipientInfo, this.downloadFile);
                },
                // Initiates the selected file download.
                downloadFile: function(id) {
                    var element = document.createElement("a");
                    element.href = "../rest/FileService/GetFile/" + KnowledgeBaseFile.uId + "/" + id;
                    document.body.appendChild(element);
                    element.click();
                    document.body.removeChild(element);
                }
            },
            diff: /**SCHEMA_DIFF*/[
                {
                    "operation": "insert",
                    "name": "Name",
                    "parentName": "HeaderContainer",
                    "propertyName": "items",
                    "index": 0,
                    "values": {
                        "labelConfig": {
                            "visible": true
                        },
                        "isMiniPageModelItem": true
                    }
                },
                {
                    "operation": "insert",
                    "name": "Keywords",
                    "parentName": "MiniPage",
                    "propertyName": "items",
                    "values": {
                        "labelConfig": {
                            "visible": true
                        },
                        "isMiniPageModelItem": true,
                        "layout": {
                            "column": 0,
                            "row": 1,
                            "colSpan": 24
                        }
                    }
                },
                {
                    "operation": "insert",
                    "parentName": "HeaderContainer",
                    "propertyName": "items",
                    "name": "FilesButton",
                    "values": {
                        "itemType": Terrasoft.ViewItemType.BUTTON,
                        // Button image setup.
                        "imageConfig": {
                            // You need to preliminary add the image to the pop-up summary resources.
                            "bindTo": "Resources.Images.FilesImage"
                        },
                        // Drop-down list setup.
                        "extendedMenu": {
                            // Drop-down list element name.
                            "Name": "File",
                            // The name of pop-up summary attribute binding the primary and additional records.
                            "PropertyName": "Article",
                            // Setup of button click handler.
                            "Click": {
                                "bindTo": "fillFilesExtendedMenuData"
                            }
                        }
                    },
                    "index": 1
                }
            ]/**SCHEMA_DIFF*/
        };
    });
6. Adding the HasProductMiniPageAddMode system setting
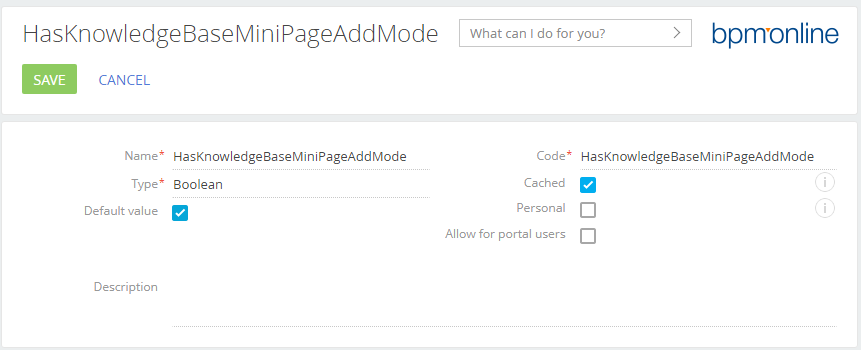
Add a system setting with the following properties to the [System settings] section of the system designer (Fig.4):
- [Name] – “HasKnowledgeBaseMiniPageAddMode”
- [Code] – “HasKnowledgeBaseMiniPageAddMode”
- [Type] – “Boolean”
- [Default value] – checkbox selected
Fig. 4. System setting

After you save the schema and update the application web-page, a custom pop-up summary containing the record bound files will be displayed when you hover over a name in the [Knowledge base] section. You will be able to download the displayed files (Fig.5).
Fig. 5. Case result


