Adding a custom dashboard widget
Glossary Item Box

Introduction
Dashboard widgets (analytic elements) are used for data analysis of sections. Go to the “Dashboards” view of the required section to work with its analytics. Use the [Dashboards] section to work with the entirety of bpm’online section data analytics.
To learn more about bpm’online dashboard widgets, please refer to the “Section analytics” article.
You can create custom dashboard widgets in bpm'online.
Creating a custom widget
To create a custom widget you need to:
- Create new or select the existing module. More information about dashboard widget modules can be found in the “Dashboard widgets” article.
- Add the source code that implements the necessary functionality to the created module. Widget module class must extend the BaseNestedModule class or one of its inheritors: ChartModule, IndicatorModule, GaugeModule, etc.
- Specify the module dependency in the [Dependencies] block of the module properties. Add messages that are used.
- Set the widget parameters in the [Module parameters] field when adding widgets on the dashboards panel. More information about parameters can be found in the “Dashboard widgets” article.
Case description
Create custom widget that shows currency exchange rate.
Source code
Use this link to download the case implementation package.
Case implementation algorithm
1. Create a currency indicator module.
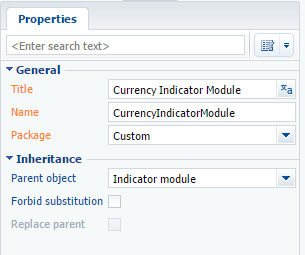
Go to the [Configuration] section in the system designer and on the [Schemas] tab, select [Add] -> [Standard] -> [Module] command. For the created module specify (Fig. 1):
- [Name] – “UsrCurrencyIndicatorModule”.
- [Title] – “Currency Indicator Module”.
Fig. 1. Currency indicator module properties
2. Add the source code
The module source code:
define("UsrCurrencyIndicatorModule", ["UsrCurrencyIndicatorModuleResources", "IndicatorModule"], function() {

    // Class that generates the configuration of the currency indicator module view..
    Ext.define("Terrasoft.configuration.CurrencyIndicatorViewConfig", {
        extend: "Terrasoft.BaseModel",
        alternateClassName: "Terrasoft.CurrencyIndicatorViewConfig",
        // Generates the configuration of the currency indicator module view.
        generate: function(config) {
            var style = config.style || "";
            var fontStyle = config.fontStyle || "";
            var wrapClassName = Ext.String.format("{0}", style);
            var id = Terrasoft.Component.generateId();
            // The returned configuration view object.
            var result = {
                "name": id,
                "itemType": Terrasoft.ViewItemType.CONTAINER,
                "classes": {wrapClassName: [wrapClassName, "indicator-module-wrapper"]},
                "styles": {
                    "display": "table",
                    "width": "100%",
                    "height": "100%"
                },
                "items": [
                    {
                        "name": id + "-wrap",
                        "itemType": Terrasoft.ViewItemType.CONTAINER,
                        "styles": {
                            "display": "table-cell",
                            "vertical-align": "middle"
                        },
                        "classes": {wrapClassName: ["indicator-wrap"]},
                        "items": [
                            // Display the name of the currency.
                            {
                                "name": "indicator-caption" + id,
                                "itemType": Terrasoft.ViewItemType.LABEL,
                                "caption": {"bindTo": "CurrencyName"},
                                "classes": {"labelClass": ["indicator-caption"]}
                            },
                            // Display the currency exchange rate.
                            {
                                "name": "indicator-value" + id,
                                "itemType": Terrasoft.ViewItemType.LABEL,
                                "caption": {
                                    "bindTo": "CurrencyValue"
                                },
                                "classes": {"labelClass": ["indicator-value " + fontStyle]}
                            }
                        ]
                    }
                ]
            };
            return result;
        }
    });

    // Class of the view model of the currency indicator module.
    Ext.define("Terrasoft.configuration.CurrencyIndicatorViewModel", {
        extend: "Terrasoft.BaseModel",
        alternateClassName: "Terrasoft.CurrencyIndicatorViewModel",
        Ext: null,
        Terrasoft: null,
        sandbox: null,
        columns: {
            // Currency name.
            CurrencyName: {
                type: Terrasoft.core.enums.ViewModelSchemaItem.ATTRIBUTE,
                dataValueType: Terrasoft.DataValueType.TEXT,
                value: null
            },
            // Currency value.
            CurrencyValue: {
                type: Terrasoft.core.enums.ViewModelSchemaItem.ATTRIBUTE,
                dataValueType: Terrasoft.DataValueType.FLOAT,
                value: null
            }
        },
        onRender: Ext.emptyFn,
        // Returns the currency value, depending on the name. This method is given as an example.
        // For each specific task, you should select an individual method to obtain data,
        // for example REST API, database query, etc.
        getCurrencyValue: function(currencyName, callback, scope) {
            var result = 0;
            if (currencyName === "USD") {
                result = 26;
            }
            if (currencyName === "EUR") {
                result = 32.3;
            }
            if (currencyName === "RUB") {
                result = 0.45;
            }
            callback.call(scope || this, result);
        },
        // Gets the data and displays them on the widget.
        prepareIndicator: function(callback, scope) {
            this.getCurrencyValue(this.get("CurrencyName"), function(currencyValue) {
                this.set("CurrencyValue", currencyValue);
                callback.call(scope);
            }, this);
        },
        // Initializes the widget.
        init: function(callback, scope) {
            this.prepareIndicator(callback, scope);
        }
    });

    // Widget module class.
    Ext.define("Terrasoft.configuration.CurrencyIndicatorModule", {
        extend: "Terrasoft.IndicatorModule",
        alternateClassName: "Terrasoft.CurrencyIndicatorModule",
        // The name of the wdget view model class.
        viewModelClassName: "Terrasoft.CurrencyIndicatorViewModel",
        // The name of the view configuration generating class.
        viewConfigClassName: "Terrasoft.CurrencyIndicatorViewConfig",
        // Subscribing to messages from third-party modules.
        subscribeMessages: function() {
            this.sandbox.subscribe("GenerateIndicator", this.onGenerateIndicator, this, [this.sandbox.id]);
        }
    });

    return Terrasoft.CurrencyIndicatorModule;
});
3. Add a style to the LESS tab
To display the widget text at the center, add the following style to the LESS tab of the module:
.indicator-module-wrapper {
    text-align: center;
}
3. Check the dependencies and messages
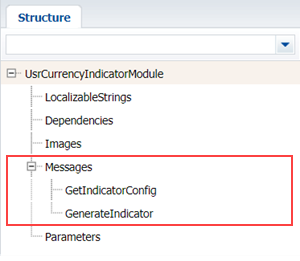
Add the messages of parent module in the created module (Fig. 2):
- Add the GetIndicatorConfig as address message to the [Messages] block. Sett the “Publish” direction for the message;
- Add the GenerateIndicator as address message with the “Follow” direction.
Fig. 2. Dependencies and messages of created module
Save the new module.
5. Add the widget to the dashboard panel and set its parameters
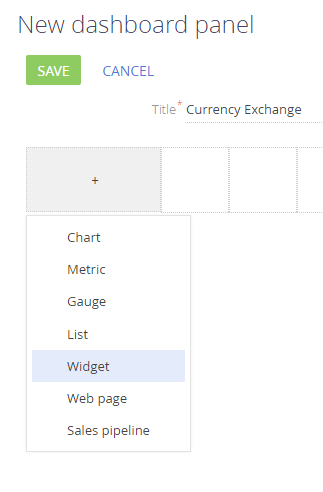
To display the widget, add it to the dashboard panel (Fig. 3).
Fig. 3. Adding the widget to the dashboard panel
In addition, you need to set the parameters of the module bound to the widget (Fig. 4).
Fig. 4. Configuration of the added widget module
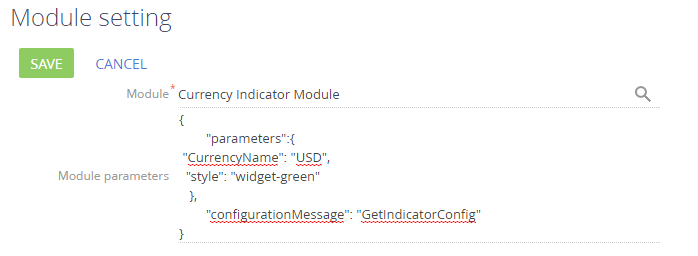
To bind the module to the added widget, add the “Currency Indicator Module” value in the [Module] field and add the configuration JSON object with the required parameters to the [Module parameters] field.
{
    "parameters": {
        "CurrencyName": "USD",
        "style": "widget-blue"
    },
    "configurationMessage": "GetIndicatorConfig"
}
A “CurrencyName” parameter sets the currency for which the exchange rate is displayed. A “style” parameter sets the widget style and “configurationMessage” parameter sets the message name that will be used to transfer the configuration object.
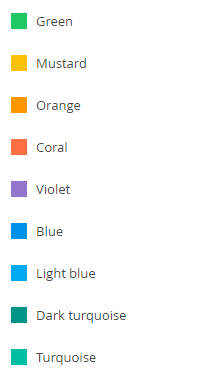
You can set up any of bpm’online system colors in the style parameter as widget color (Fig. 5).
Fig. 5. Style types of the widget
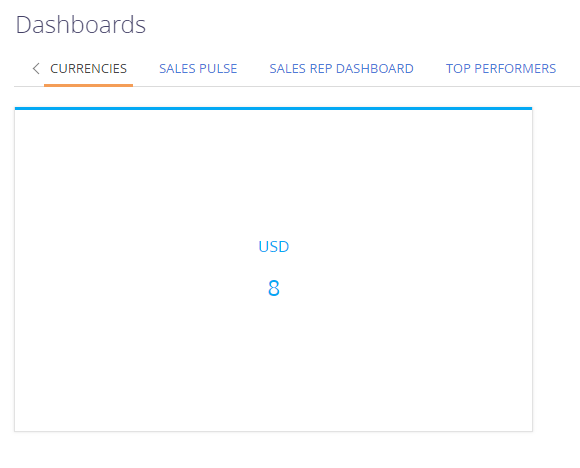
After saving the created widget and refreshing the page, the custom widget will be displayed on the dashboards panel (Fig. 6).
Fig. 6. Currency exchange rate widget