


Logging in Creatio. NLog
Glossary Item Box

Introduction
To test if the new functionality works as expected, we recommend enabling logging. Make sure you disable logging after testing and debugging are complete to prevent performance drop. In Creatio, logging is possible for all primary operations. We recommend using the NLog library, which is a free .NET logging library with ample routing features and high-quality log management. NLog is suitable for any application regardless of its size or complexity. The library can process diagnostic messages generated in any .NET programming language, enrich them with contextual data, format the messages according to the user preferences and send them to one or multiple message receivers, such as a file or database.
NLog logs events for the application loader and for the Default configuration independently. A developer can configure logging in the ..\Terrasoft.WebApp directory in the following configuration files:
- nlog.config.
- nlog.targets.config.
- nlog.cloud.config (for cloud applications).
- nlog.cloud.settings.config (for cloud applications).
ATTENTION
NLog documentation is available on the GitHub website.
Logging for on-site applications
Storing log data
ATTENTION
The location of log files depends on the values of Windows system variables.
By default, the loader log files are stored in the following path:
[TEMP]\Creatio\Site_[{SiteId}]\[{ApplicationName}]\Log\[{DateTime.Today}]
For example:
C:\Windows\Temp\Creatio\Site_1\creatio7121\Log\2018_05_22
The Default configuration log files are stored in the following path:
[TEMP]\Creatio\Site_[{SiteId}]\[{ApplicationName}]\[ConfigurationNumber]\Log\[{DateTime.Today}]
For example:
C:\Windows\Temp\Creatio\Site_1\creatio7121\0\Log\2018_05_22
In the examples above, the following variables are enclosed in square brackets:
- [TEMP] — base folder. By default, IIS uses the C:\Windows\Temp folder. Visual Studio (IIS Express) uses the C:\Users\{User name}\AppData\Local\Temp folder.
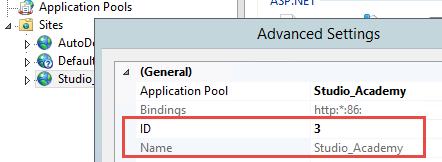
- [{SiteId}] — site number. For IIS, a developer can find the number in the advanced settings of the site (Fig. 1). For Visual Studio, the number is 2.
- [{ApplicationName}] — application name (Fig. 1).
- [ConfigurationNumber] — configuration number. The number for the Default configuration usually is 0.
- [{DateTime.Today}] — logging date.
Fig. 1. – Site advanced settings view in IIS
Log settings
You can set up logging in two ways:
- In the configuration file.
- In the LoggingConfiguration object.
Setting up the logging in the configuration file
1. Define the path to the logging configuration file
You can define the path to the nlog.config file in the ..\Terrasoft.WebApp\Web.config. file.
<common>
    <logging>
      <factoryAdapter type="Common.Logging.NLog.NLogLoggerFactoryAdapter, Common.Logging.NLog45">
        <arg key="configType" value="FILE" />
        <arg key="configFile" value="~/nlog.config" />
      </factoryAdapter>
    </logging>
  </common>
2 Define the log receivers
The log receivers display, store and transfer the log messages to other receivers. Certain receivers can receive and process the messages, while others can buffer or reroute them to another receiver.
The receivers are defined in the nlog.targets.config file using the following attributes:
- name — receiver name.
- xsi:type — receiver type. This setting can take one of these values: “File”, “Database”, “Mail”.
- fileName — the path to the logging file.
- layout — the layout of the logging file.
NLog documentation describes log receivers in detail.
Example: Setting up a log receiver
To do this, you need to define the properties of the log receiver in the <target> XML element in the ..\Terrasoft.WebApp\nlog.targets.config file.
<target name="universalAppender" xsi:type="File"
    layout="${DefaultLayout}"
    fileName="${LogDir}${LogDay}${logger:shortName=True}.log" />
3. Define the log rules
The log rules are defined in the nlog.config file with the following attributes:
- name — log name.
- minlevel — minimum log level.
- maxlevel — maximum log level.
- level — filter log events of a specific log level.
- levels — filter log events of several specific log levels (comma-separated list).
- writeTo — the name of the log receiver.
- final — if a log rule has this attribute, the subsequent rules are not processed.
- enabled — turn a log rule off (by specifying false) without deleting it.
- ruleName — the log rule identifier.
NOTE
Log rule attributes are processed in the following order:
- level.
- levels.
- minlevel and maxlevel (both have the same priority).
In the minLevel = "Warn" level = "Info” configuration, only the Info log level will be used. The level attribute has a higher priority than minLevel.
The log levels are defined in the nlog.config file. By default, the log level for all Creatio components is set to allow for the best performance of the application. Existing log levels in order of increasing priority:
- Trace — high-volume logging of all events, useful for debugging and tracing (the initial and final methods are displayed).
- Debug — logging all events, useful for debugging
- Info — logging Info messages normally triggered for regular application activity.
- Warn — logging warnings (when the application still functions).
- Error — logging errors (when the application may throw exceptions or crash).
- Fatal — logging errors that inevitably crash the application.
- Off — logging is disabled, not used for records.
NOTE
An example log rule that enables logging events to a database:
<logger name="IncidentRegistration" writeTo="AdoNetBufferedAppender" minlevel="Trace" final="true" />
Setting up the logging in the LoggingConfiguration object
To configure logging:
1. Create a LoggingConfiguration object to describe your configuration.
2. Create one or multiple log receivers.
3. Set up the properties of the log receivers.
4. Define the log rules using LoggingRule objects and add them to the LoggingRules configuration objects.
5. Activate the configuration by pointing to the newly created configuration object in LogManager.Configuration.
Examples of using C# for setting up the logging are available on the GitHub website.
Logging for cloud applications
To set up logging in a cloud application, you contact Creatio technical support.