


Advanced settings of a custom detail with fields
Glossary Item Box

Introduction
A detail with fields can include multiple field groups. The base detail with fields is implemented in the BaseFieldsDetail schema of the BaseFinance package, which is available in bpm'online bank customer journey, bank sales and lending. The detail record view model is implemented in the BaseFieldRowViewModel schema.
The process of creating a custom detail with fields is described in a separate Creating a custom detail with fields.
Adding custom styles
Case description
Redefine the field signature style for a detail implemented in the “Creating a custom detail with fields” article. The field signatures should be displayed in blue.
NOTE
You can override the basic CSS style classes for displaying detail records by using the getLeftRowContainerWrapClass() and getRightRowContainerWrapClass() methods.
Case implementation algorithm
1. Create a module schema and define record view styles
ATTENTION
You can not set the styles in a view model schema of the edit page. It is necessary to create a new module schema, define the styles and add the created module to module dependencies of a detail.
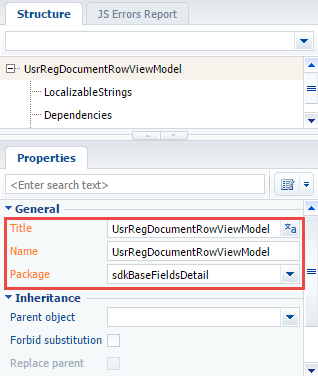
Create a new module schema in a custom package with the following property values:
- [Title] – “UsrRegDocumentRowViewModel”.
- [Name] – “UsrRegDocumentRowViewModel”.
- [Package] – the schema will be placed in this package after publishing. By default, this property contains the name of the package selected prior to creating a schema. It can be populated with any value from the drop-down list.
Fig. 1. UsrRegDocumentFieldsDetail custom schema properties
Create a module description, and define the Terrasoft.configuration.UsrRegDocumentRowViewModel class which is inherited from Terrasoft.configuration.BaseFieldRowViewModel.
The source code of the schema:
define("UsrRegDocumentRowViewModel", ["BaseFieldRowViewModel"], function() {
    Ext.define("Terrasoft.configuration.UsrRegDocumentRowViewModel", {
        extend: "Terrasoft.BaseFieldRowViewModel",
        alternateClassName: "Terrasoft.UsrRegDocumentRowViewModel"
    });
    return Terrasoft.UsrRegDocumentRowViewModel;
});
Define the CSS view classes for the correct display of detail records. To do this, add the following CSS classes to the LESS tab of the module designer:
.reg-document-left-row-container {
    .t-label {
        color: blue;
    }
}
.field-detail-row {
    width: 100;
    display: inline-flex;
    margin-bottom: 10px;

    .field-detail-row-left {
        display: flex;
        flex-wrap: wrap;
        width;

        .control-width-15 {
            min-width: 300px;
            width: 50;
            margin-bottom: 5px;
        }
        .control-width-15:only-child {
            width !important;
        }
    }
    .field-detail-row-left.singlecolumn {
        width: 50%;
    }
}
Save the schema to apply changes.
2. Modifying a replacing view model schema of a detail
To use the created module and its styles in a detail schema, add it to the dependency of the module defined in the detail schema.
Additionally, add the following methods to a detail schema module:
- getRowViewModelClassName() – returns the name of the record view model class to the detail.
- getLeftRowContainerWrapClass() – returns the string array with CSS class names, used to generate the views of record signature field containers.
The source code of the modified schema:
define("UsrRegDocumentFieldsDetail", ["UsrRegDocumentRowViewModel", "css!UsrRegDocumentRowViewModel"],
    function() {
        return {
            entitySchemaName: "UsrRegDocument",
            diff: /**SCHEMA_DIFF*/ [], /**SCHEMA_DIFF*/
            methods: {
                getDisplayColumns: function() {
                    return ["UsrSeries", "UsrNumber"];
                },
                getRowViewModelClassName: function() {
                    return "Terrasoft.UsrRegDocumentRowViewModel";
                },
                getLeftRowContainerWrapClass: function() {
                    return ["reg-document-left-row-container", "field-detail-row"];
                }
            }
        };
    });
Save the schema to apply changes.
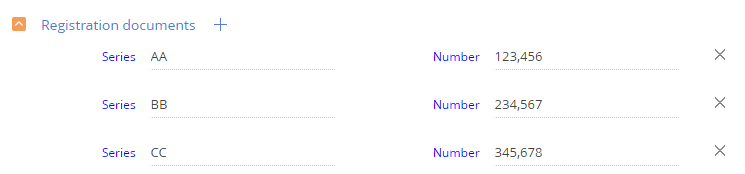
On the [History] tab of the contact edit page, the detail names will be displayed in blue (Fig. 2).
Fig. 2. Case result
Adding additional custom logic for detail records
Case description
Add the field validation to the [Number] field of the detail, implemented in the “Creating a custom detail with fields” article. The field value can not be negative.
Case implementation algorithm
1. Adding a localizable string with the error message
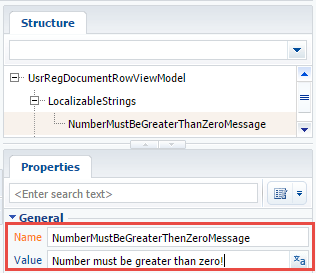
In the module designer, add the localizable string on the [Structure] tab of the opened UsrRegDocumentRowViewModel schema with the following property values
(Fig. 3):
- [Name] – “NumberMustBeGreaterThenZeroMessage”.
- [Value] – “Number must be greater thаn zero!”.
Fig. 3. Case result
NOTE
A localized string is a schema resource. In order for its values to appear in the client part of the application, add the UsrRegDocumentRowViewModelResources resource module to the dependencies of the UsrRegDocumentRowViewModel module.
Save the schema to apply changes.
2. Adding the validation program logic
Add the following methods to the UsrRegDocumentRowViewModel module to implement the validation program logic:
- validateNumberMoreThenZero() – contains the validation logic of the field value.
- setValidationConfig() – connects the [Number] column and the validateNumberMoreThenZero() validation method.
- Init() – an overridden base method that calls the base logic and the setValidationConfig() method.
Source code of the modified schema:
define("UsrRegDocumentRowViewModel", ["UsrRegDocumentRowViewModelResources", "BaseFieldRowViewModel"],
    function(resources) {
        Ext.define("Terrasoft.configuration.UsrRegDocumentRowViewModel", {
            extend: "Terrasoft.BaseFieldRowViewModel",
            alternateClassName: "Terrasoft.UsrRegDocumentRowViewModel",
            validateNumberMoreThenZero: function(columnValue) {
                var invalidMessage;
                if (columnValue < 0) {
                    invalidMessage = resources.localizableStrings.NumberMustBeGreaterThanZeroMessage;
                }
                return {
                    fullInvalidMessage: invalidMessage,
                    invalidMessage: invalidMessage
                };
            },
            setValidationConfig: function() {
                this.addColumnValidator("UsrNumber", this.validateNumberMoreThenZero);
            },
            init: function() {
                this.callParent(arguments);
                this.setValidationConfig();
            }
        });
        return Terrasoft.UsrRegDocumentRowViewModel;
    });
Save the schema to apply changes.
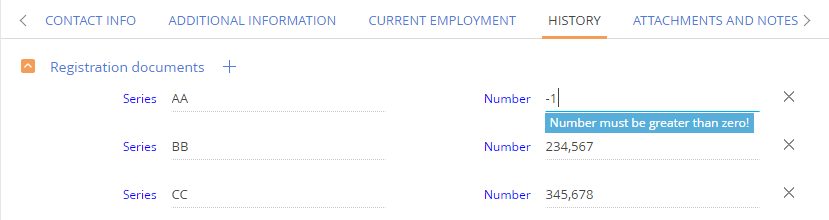
When a negative value is entered in the [Number] field on the [History] tab of the contact edit page, a warning message will be displayed (Fig. 4).
Fig. 4. Case result
Adding a virtual record
When a detail is loaded, adding virtual records enables you to display a field edit card immediately, without pressing the [Add] button.
That requires defining the useVirtualRecord() method (returns true) in the UsrRegDocumentFieldsDetail detail schema:
useVirtualRecord: function() {
  return true;
}
When opening a tab with a detail, a virtual record will be displayed (Fig. 5).
Fig. 5. Displaying a virtual record
