Adding multiple records to a detail
Glossary Item Box

Introduction
Normally, a detail allows you to only add one record. Adding multiple entries to a detail is done through the LookupMultiAddMixin mixin.
A mixin is a class designed to extend the functions of other classes. Learn more about mixins in the “Mixins. The "mixins" property”.
The LookupMultiAddMixin is designed to extend the detail schemas. It provides an opportunity to add multiple lookup records to the detail at the same time.
The sequence of adding the multiple records selection functionality to a detail:
1. Create a replacing schema of the detail.
2. Use mixin methods instead of base detail methods.
Case description
Implement the possibility of multiple records selection in the [Contacts] detail on the [Sales] section records edit page.
Source code
You can download the package with case implementation using the following link.
Case implementation algorithm
1. Create a replacing view model schema of a detail
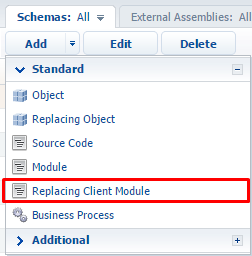
Create a detail replacing schema in the development package (Fig. 1). The procedure for creating a replacing schema is covered in the “Creating a custom client module schema”.
Fig. 1. Adding replacing client module

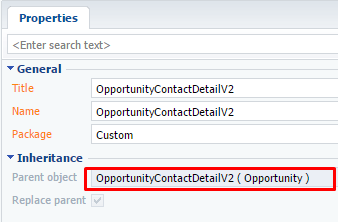
Select the OpportunityContactDetailV2 schema as the parent object (Fig. 2).
Fig. 2. Properties of the replacing client module

2. Use mixin methods instead of base detail methods.
To use the LookupMultiAddMixin mixin in a schema, add it to the mixins property and initialize it in the pre-defined init() schema method. Learn more about pre-defining the init() method in the “ Modular development principles in bpm'online” article.
To implement the required functionality, you need to pre-define the “add” button displaying methods (getAddRecordButtonVisible()), saving detail page methods (onCardSaved()), and adding a detail record methods (addRecord()).
Saving a detail page and adding record methods include the method of calling the help window for multiple selection openLookupWithMultiSelect() and the associated method getMultiSelectLookupConfig() which configures the help window, is used. The description and parameters of these methods are given in Table 1.
Table 1. Methods for calling and configuring the help window
| Methods. | Description |
|---|---|
| openLookupWithMultiSelect(isNeedCheckOfNew) | Opens a lookup window with a multiple selection option The isNeedCheckOfNew {bool} parameter indicates the need to check if the record is new. |
| getMultiSelectLookupConfig() |
Returns the configuration object for the help window. Object properties: rootEntitySchemaName – root object schema; rootColumnName – a connected column that indicates the root schema record; relatedEntitySchemaName – connected schema; relatedColumnName – a column that indicates the connected schema record. |
In this case the help window will pull data from the OpportunityContact table using the Opportunity and Contact columns.
Source code of the detail schema:
define("OpportunityContactDetailV2", ["LookupMultiAddMixin"], function() {
    return {
        mixins: {
            // Connecting the mixin to the schema.
            LookupMultiAddMixin: "Terrasoft.LookupMultiAddMixin"
        },
        methods: {
            // Overriding the base method for initializing the schema.
            init: function() {
                this.callParent(arguments);
                //Initializing the mixin.
                this.mixins.LookupMultiAddMixin.init.call(this);
            },
            // Overriding the base method for displaying the "Add" button.
            getAddRecordButtonVisible: function() {
                //Displaying the "add" button if the detail is maximized, even if the detail edit page is not implemented.
                return this.getToolsVisible();
            },
            // Overriding the base method.
            // The save event handler for the detail edit page.
            onCardSaved: function() {
                // Opens the window for multiple record selection.
                this.openLookupWithMultiSelect();
            },
            // Overriding the base method of adding a detail record.
            addRecord: function() {
                // Opens the window for multiple records selection.
                this.openLookupWithMultiSelect(true);
            },
            // A method that returns a window configuration object.
            getMultiSelectLookupConfig: function() {
                return {
                    // Root schema — [Opportunities].
                    rootEntitySchemaName: "Opportunity",
                    // Root schema column.
                    rootColumnName: "Opportunity",
                    // Connected schema — [Contact].
                    relatedEntitySchemaName: "Contact",
                    // Root schema column.
                    relatedColumnName: "Contact"
                };
            }
        }
    };
});
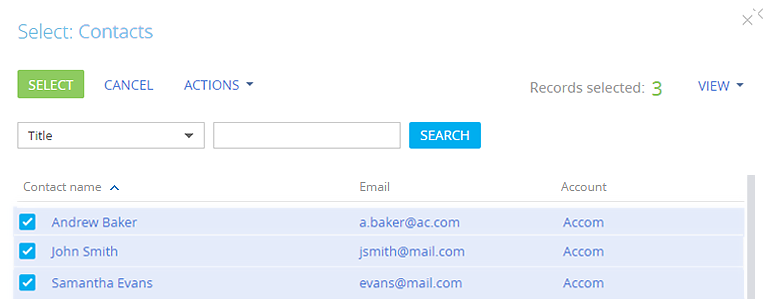
After saving the schema and reloading the application page, the user will be able to select multiple records from the lookup (Fig. 4) by clicking the “add” detail record button (Fig. 3). All selected records will be added to the [Contacts] detail of the [Opportunities] section record edit page (Fig. 5).
Fig. 3. Adding multiple records to a detail

Fig. 4. Selecting necessary records from a lookup

Fig. 5. Case result: All selected records are added to a detail


