


The campaign page is represented by a campaign profile and several tabs.
The campaign profile
| Name | The name of the campaign. This is a required field. Specify the name to access the campaign designer. |
| Status | Campaign status can be:
This is a non-editable field. |
| Participants | The total number of campaign participants. |
| Reached the goal | The number of participants who reached the campaign goal. Reaching the goal for a participant means that they exited from the campaign on the [Exit from campaign] step where the [Campaign goal] checkbox was selected. |
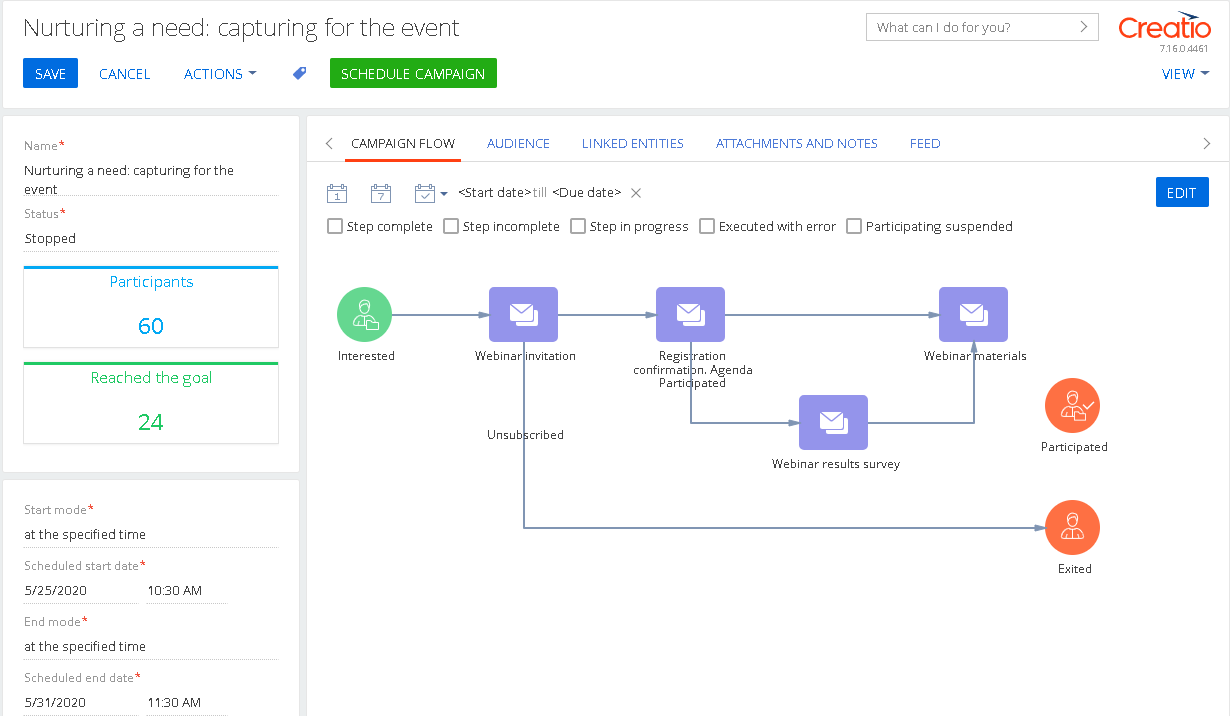
| Start mode | Campaign start/stop options: You can start and stop campaigns manually or set up automatic start and end of a campaign at the specified time.
Selecting this option enables additional [Scheduled start date]/[Scheduled end date] fields, where you can specify the scheduled start and end time. Click the [Schedule campaign] button to finalize planning the campaign time frame (Fig. 1). |
| End mode | |
| Scheduled start date | Actual date and time of the campaign start. This is a non-editable field. |
| Next run | Date and time of the next campaign execution. The time interval is indicated in the [Default campaign execution frequency] field in the campaign designer. It determines how often the campaign steps whose execution time is not specified will be executed. This is a non-editable field. Read more >>> |
| End date | Actual date and time of the campaign stop. This is a non-editable field. |
| Owner | Campaign responsible manager. |
| utm_campaign | The UTM-mark containing the campaign name. It is used to track the lead sources received as a result of the campaign. Read more >>> |
General information about the campaign.
Fig. 1 Scheduling automatic start and stop of a campaign
Note
If the “At the specified time” start mode is selected for a campaign, the start/end time of a campaign is displayed in the time zone of the user who created the campaign.
More information about additional campaign time frame settings is available in a separate article. Read more >>>
The [Campaign flow] tab
After you populate the [Name] field, click the [Create] button on the [Campaign flow] tab to open the campaign designer and create a new campaign flow.
Use the campaign designer to set up the campaign flow, including:
-
Campaign elements Read more >>>
-
Transitions between campaign elements Read more >>>
-
General campaign settings Read more >>>
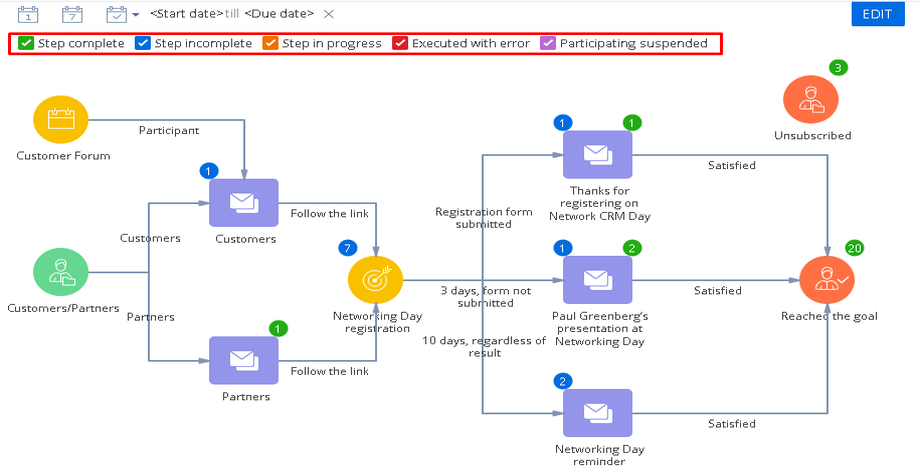
Once you create the campaign flow, the tab will display the campaign diagram with participant counters for every campaign element, as well as a set of checkboxes that enable different types of counters (Fig. 2).
Fig. 2 Participant counter filters in the [Campaign flow] tab
-
Step complete – select to view the number of participants on a step that completed successfully. These participants are queued to transfer to subsequent campaign step(s).
-
Step incomplete – select to view the number of participants on a step they were successfully transferred to, but are yet to complete. These participants are usually delayed by a conditional flow.
-
Step in progress – select to view the number of participants on the step which is being executed at the moment.
-
Executed with error – select to view the number of participants on a step in which the error occurred.
-
Participating suspended – select to view the number of participants on a step in which their participation was suspended. These participants are likely set to re-enter the campaign. Read more >>>
If you add new participants to a campaign at different time, use the filter by date to find out how many participants were added to the campaign at a specific period of time and what their current step is. The filters by date are available when the counters are enabled. The counters display only the contacts added during the specified period: “today” ( ), “current week” (
 ) or custom period (
 ).
).
To edit the campaign diagram, click the [Edit] button.
The tab displays all campaign participants (contacts), their current steps on the campaign diagram and status (Fig. 3).
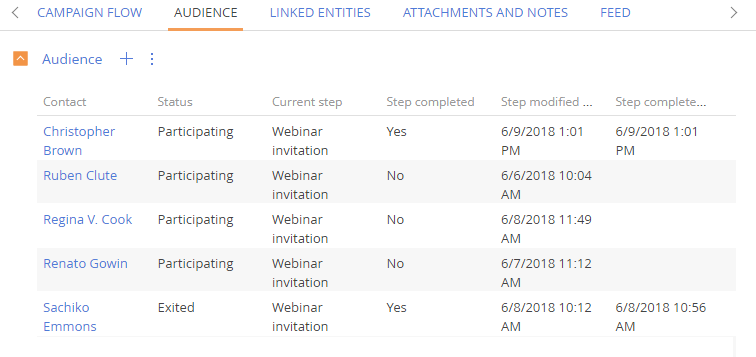
The [Audience] tab primary columns are available in the table:
| Contact | Full name of the campaign participant. |
| Status | The status of the campaign participant: “Participating” or “Exited”. The “Participating” status indicates that the contact continues to advance through the steps of the campaign. The “Exited the campaign” status indicates that the contact no longer participates in the campaign. |
| Current step | Campaign step (campaign element) the participant is currently on. |
| Step completed | “Yes” or “No”, depending on the participant’s execution of the corresponding step of the campaign. For example, clicked the email link or filled out the web-form. |
| Step modified on | The date and time when the participant advanced to the step, specified in the [Current step] column. |
| Step completed on | Date and time when the participant completed the step. |
The [Linked entities] tab
The tab displays information about the contact folders, trigger emails, landing pages and events involved in the campaign.
Contact folders
The detail displays all the [Contacts] section folders involved in the campaign. You can see the type of each folder (static or dynamic) and the campaign step at which the folder is used for adding participants to the campaign (via the [Add from folder] element) or exclude them from the campaign (via the [Exit from campaign] element).
Trigger emails
The detail displays all trigger emails used in the campaign. You can see the campaign step of every trigger email.
Landing pages
The detail displays all landing pages used in the campaign, their type and campaign steps at which these landings are involved.
Events
The detail displays all events organized as part of the campaign, their type and campaign steps at which these events are held.
The [Attachments and notes] tab
This tab contains additional information about the campaign as well as related files and Internet links. Read more >>>
The [Feed] tab
This tab displays feed messages connected with the campaign. You can post comments in the campaign feed or view other Creatio users’ comments. Read more >>>
See also