


Adding the modified HTML code to the landing page code
Attention
This article covers the process of editing HTML code for a lead registration form.
After editing the generated HTML code, add it to the code of the landing page on your website. To do this:
1.Copy the entire code that you modified earlier to the clipboard.
2.To place the source code on the landing page:
a.Open the location of the landing page file on the server (Fig. 1).
Fig. 1 Location of a landing page on server

b.Open landing page in a text editor.
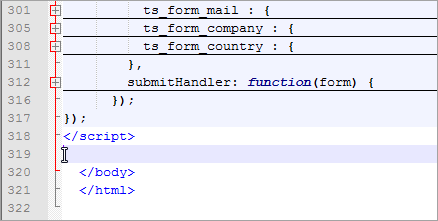
c.Paste the generated HTML code to the source code of the landing page before the ”</body>” tag (Fig. 2).
Fig. 2 Adding the modified generated HTML code to the source code of the landing page
d.Save the changes.
3.Add event that launches the ”CreateLead()” function to the code of the landing page. To do this, the following code is used: onSubmit=”createLead(); return false”. To place an event in the source code of the landing page:
a.Go to the “form action” tag in the source code:
<span class="registration">Register</span>
<form action="/webinar-creatio-7-6" method="post" id="ts-form-universal-form" accept-charset="UTF-8">
b.In the opening <form> tag, add the following code: OnSubmit=”createLead(); return false”
<span class="registration">Register</span>
<form action="/webinar-creatio-7-6" method="post" id="ts-form-universal-form" accept-charset="UTF-8" onSubmit=”createLead(); return false”>
c.Click [Save].
See also
•How to create a landing page on your website
•How to set up autofill for lead page fields not filled in by the customer
•Setting up redirects from landing page forms
•How to set up landing page using Creatio on-site