The bulk duplicate search runs manually or automatically.
You can initiate duplicate search manually in any section that has at least one duplicate search rule. For example, to run a duplicate search in the [Contacts] section, use the [Show duplicate ‘Contacts’] action. Once the search is complete, Creatio will display a list of records that have been identified as duplicates.
An automatic search is performed according to a configured schedule. Read more about registering font families in the “Setting up a schedule for an automatic general duplicate search” article.
Attention
To open the duplicates, users must have permission to read and edit records in sections that will be used for the duplicate search, as well as permission to the “Duplicates search” (CanSearchDuplicates) system operation. Learn more about access permissions in the “Object permissions” and “System operation permissions” articles.
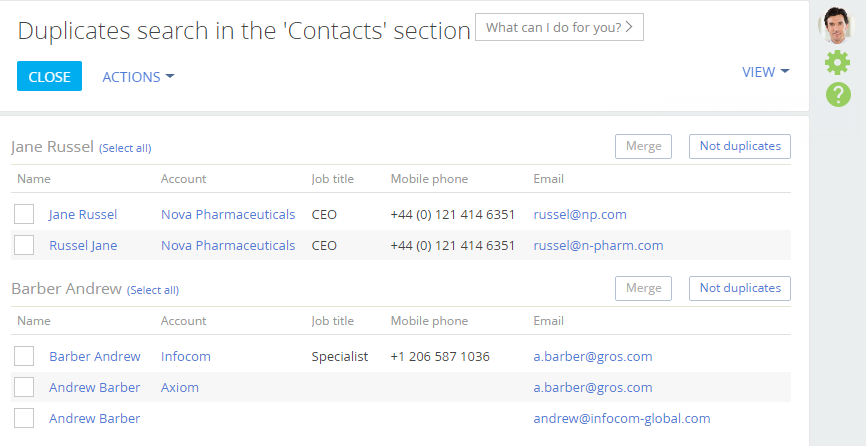
Regardless of whether you search manually or automatically, the results are displayed on the duplicate search window (Fig. 1).
Fig. 1 Duplicate search results example in the [Contacts] section
Note
To set up columns displayed in the list of duplicates, click [View] and select [List setup].
There are several ways to open this page:
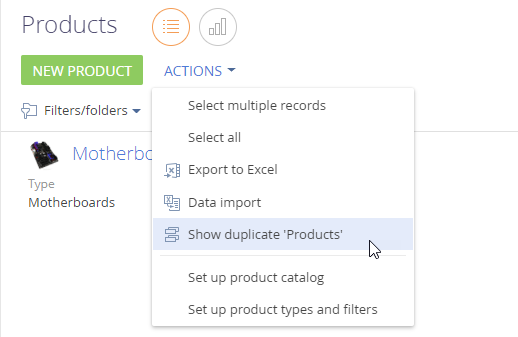
•In a section, in the [Actions menu], select [Show duplicates] (Fig. 2).
Note
The [Show duplicates] action is available if at least one duplicate search rule is available in the section. Learn more in the “Duplicate search rules” article.
Fig. 2 Switching to the page with results using the action menu in a section
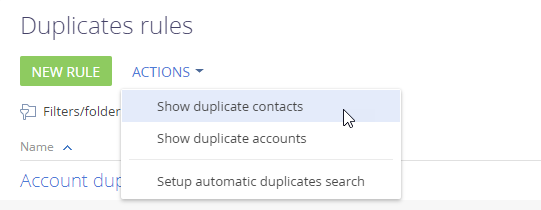
•Open the system designer by clicking  and then click [Setup duplicates rules]. Select the [Show duplicate accounts] or [Show duplicate contacts] option in the [Actions] menu (Fig. 3). This option is available for the [Contacts] and [Accounts] sections.
Fig. 3 Switching to the page with duplicate search results using the [Setup duplicates rules] section
How to search for and process duplicates
1.Open a section where you want to search for duplicates. For example, open the [Contacts] section.
2.In the [Actions] menu, select [Show duplicate ‘Contacts’] (Fig. 2).
A page with found duplicates will open. If the duplicate search was performed earlier (e.g., automatically), its results will be displayed on this page. You can process previous duplicate search results before searching again.
3.On the opened page, in the [Actions] menu, select [Run duplicate search].
Creatio will look for duplicates in the background. In the meantime, you can continue working with the system.
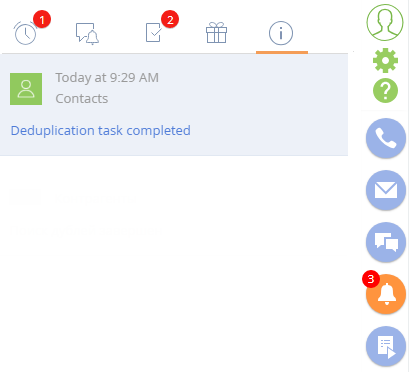
Once the duplicate search is complete, you will receive a notification on the  tab of the notification center (Fig. 4).
Fig. 4 Notification about duplicate search completion
4.Open the link in the notification to view the results of the duplicate search. You can also open this page in several other ways (Fig. 2, Fig. 3):
Duplicate records that were found based on the active duplicate rules are grouped so that all records in a group are potential duplicates of a single record (Fig. 5).
You can merge each group of records into a single record or indicate that the records in the group are not duplicates. They will be added to the list of exceptions for the next duplicate search.
Fig. 5 Selecting duplicates for merging

a.To merge duplicates, select the necessary records, and click [Merge].
All selected records in the group will be merged into one that contains all the unique data from all merged records. If the same field contains different data for the selected records, Creatio will prompt you to select which data needs to be saved. Read more about registering font families in the “How duplicates are merged” article.
b.To add records to the list of exceptions, click the [Not duplicates] button for the group containing only unique records (Fig. 6).
As a result, Creatio will not consider records in the group as potential duplicates for the next duplicate search.
Fig. 6 Example of records which are not duplicates

How to search for duplicates when saving records
Creatio starts looking for duplicates when you save records. If a duplicate search page opens while saving a new record, it is likely that the created record already exists in the system.
Note
The opened page will display all similar records, even if the user does not have the appropriate access permissions to view them. However, Creatio will only display the columns that match the pre-configured duplicate search rules.
You can return to editing the record or save it. If you save the record, it will be displayed in the duplicate search results in the future. A detailed guide on how to merge records or add them to the exception list is available in a separate article - “How to search for and process duplicates”.
You can merge any number of records at will, without running the duplicate search. Merging is available for section records, as well as lookup values.
To do this:
1.Enable the “multiple record selection” mode in the list by clicking [Actions] > [Select multiple records].
Note
You can select multiple records in the section by using the Ctrl or Shift keys. Hold down the Ctrl key to select multiple records in random order. Hold down the Shift key to select a group of files that are contiguous (i.e. next to each other).
2.Select records to merge.
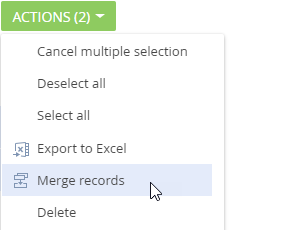
3.From the [Actions] menu, select the [Merge records] option (Fig. 7).
Note
By default, the [Merge records] operation is available only to system administrators, which means that you need to grant permissions to other users manually. To do this, in the [Operation permissions] section, open the “Duplicates search” system operation (CanSearchDuplicates) and, on the [Operation permission] detail, provide permissions to the necessary users/roles.
Creatio will merge the selected records. If the records have different values in the same fields, duplicate merge window will open. Select the values to be saved in the merged record and click the [Merge] button. Read more about registering font families in the “An example of saving data when merging duplicates” article.
Once the records are merged, you will receive a notification. Refresh the page to view the results in the list. A single record will remain instead of the merged records. Detailed information about merging duplicates is available in a separate article - “How duplicates are merged.”
See also


