The [Text] element (Fig. 1) is used to add message text. This element has two configuration areas: the setup area and the rich text toolbar on the [Text] element itself.
Fig. 1 Adding the [Text] element

Text setup area
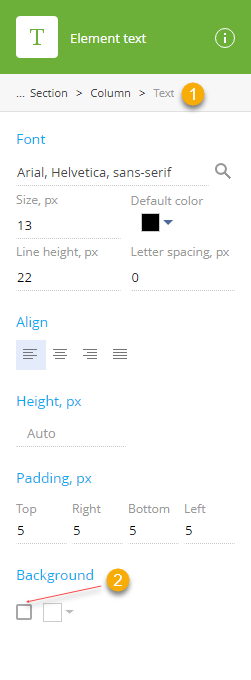
In the setup area, you can configure the baseline font settings and the style settings of the [Text] element.
Fig. 2 Text setup area

| Property | Function |
|---|---|
| Breadcrumb navigation (1) | Use “breadcrumbs” at the top of the setup area to navigate the parent (column, section, banner, block and template) elements. |
| Font | Use this settings group to configure the baseline font settings of the [Text] element. [Font family] – select the font family of the text from the list of registered font families. Read more about registering font families in the “Adding custom fonts” article. [Size, px] – specify the width and height of the font in pixels. Click [Line height, px] – specify the spacing between the lines and the borders of the button. The maximum line height is 250px; the minimum line height cannot be less than the size of the font. [Letter spacing, px] – specify the spacing between the characters in pixels. |
| Size, px | [Size, px] – specify the width and height of the button in pixels. |
| Align | Align the baseline text horizontally (left |
| Height, px | Specify the height of the text container (in pixels). This field is used to specify the fixed height of the text container. It will not stretch or shrink to fit the text inside. |
| Padding, px | Specify the distance (in pixels) between the text and each of the borders of the container. Padding is specified separately for each side. |
| Background | Set background color for the text. Background style settings are disabled by default. Select the checkbox (2) to enable them. Clear this checkbox to disable all background settings. Click |
To modify the list of fonts used in your template, update the “Content builder font set” lookup. To locate the lookup, click  –> [Lookups] in the main Creatio application.
To add a new font, click [New]. Specify the font family name and the font family value, which is a prioritized comma-separated list of main and fallback fonts, from most preferable to least preferable.
Note
Normally, the last font face in a font family list is a generic font family, like “serif,” “sans-serif,” “cursive,” “fantasy,” and “monospace”.
To edit an existing font, click the [Fonts] field of the font you want to edit. Press the [Enter] key to apply the changes.
Note
In most cases, there is no need to edit existing fonts. However, it may be necessary if you want to use a specific font in place of an existing fallback or add a fallback font.


 to open the color picker and select the background color.