


Set up version control for a development environment
Version control is required for deploying a development environment where several developers can commit, monitor, and merge the changes made to the Creatio configuration. The purpose of the version control system in Creatio is:
-
transferring of changes between configurations
-
storing multiple versions of configuration schemas
-
rolling back changes to return to one of the previous versions.
Creatio supports integration with the Subversion control system (SVN) of version 1.7 and higher. For more details on using SVN see Subversion control system documentation.
Note
Creatio native development tools work only with the Subversion version control system. However, you can disable version control integration and use any version control system, including Git, when developing in the “File system development mode”. Learn more about working with Git in Creatio in our SDK guide.
An SVN repository should be the only point of contact for different development environments. Otherwise, the development environment of each developer must be insulated and run on an independent application server connected to a database not used by other Creatio application instances.
More information on setting up a development environment is available in the Development Guide.
The general procedure for setting up and connecting SVN is as follows:
Deploy SVN and create a Creatio repository
To deploy Subversion for your Creatio application:
1. Install SVN server
You can install SVN on the application server, DBMS server or on a separate dedicated server.
To install the SVN server on a Windows operating system, use one of the publicly available SVN installers:
Installation instructions for other operating systems, including Debian, are available with Apache Subversion.
The SVN server can function independently or use an Apache web-server as a frontend (both the VisualSVN and CollabNet utilities can install it as a component).
If the SVN server is running independently, repositories are accessed through the SVN protocol. If a web server is used as a frontend, repositories are accessed through the HTTP and HTTPS protocols.
We recommend installing a web-server frontend and using the webserver protocols (HTTP and HTTPS) for integration with Creatio.
2. Create a user on the SVN server
To access the SVN server, add at least one SVN user. We recommend creating a separate user for each developer.
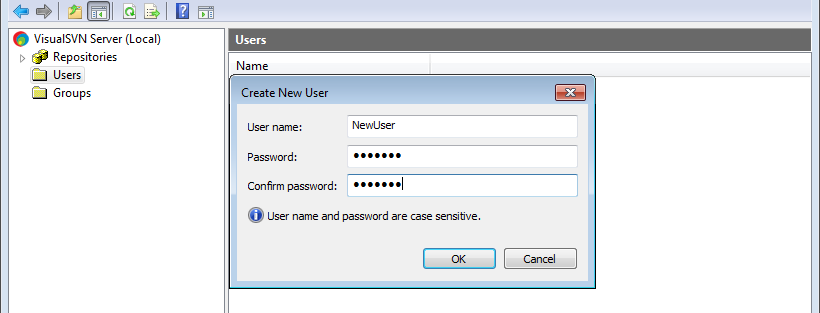
You can create an SVN server user with the standard tools supplied with the SVN server installation package, for example, VisualSVN (Fig. 1).
Working with the Creatio repository requires password-based authentication.
Fig. 1 Creating a new user in the SVN server (VisualSVN utility).
3. Create a repository on the SVN server
Create an SVN repository using the standard tools supplied with the SVN server installation package (i.e., VisualSVN and CollabNet).
Note
Creatio supports the simultaneous operation of several repositories that can be located on different SVN servers.
4. Install SVN client (optional)
You can optionally install an SVN client in the developer workplace, for example, TortoiseSVN.
Note
We recommend using TortoiseSVN client version 1.8 and up.
Installing an SVN client is not required since it does not affect the Creatio operation. Using an SVN client is convenient for viewing the local working copy, history, revert operations, review, etc.
Connect the repository to Creatio
To connect an SVN repository to Creatio:
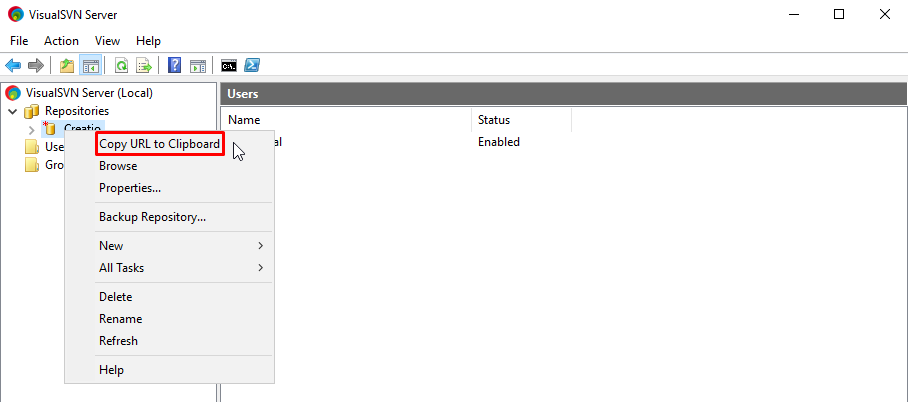
1.Copy the URL of your repository. For example, in VisualSVN, right-click the repository –> [Copy URL to clipboard] (Fig. 2).
Fig. 2 Copy the URL of the repository
2.Click  in the main Creatio application. The System Designer will open.
3.Click [Advanced settings] in the [Admin area] to open the [Configuration] section.
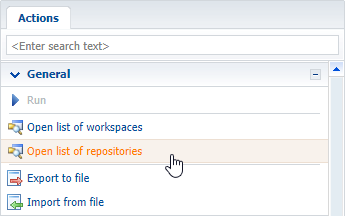
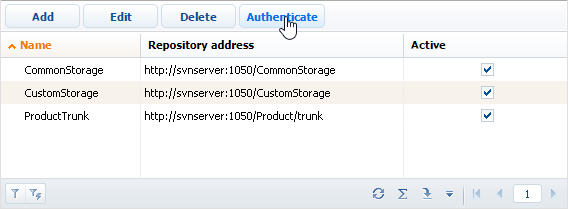
4.Click [Open list of repositories] on the [Actions] tab (Fig. 3).
Fig. 3 Opening the SVN repository list
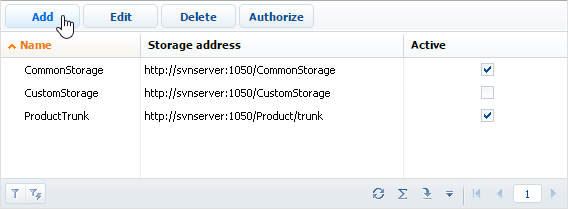
5.Click [Add] on the list toolbar (Fig. 4). A page for the new repository will open.
Fig. 4 Adding a new repository to the list of version control system repositories
6.In the new repository page, specify the repository data (Fig. 5).
Fig. 5 Entering the repository data in the repository page
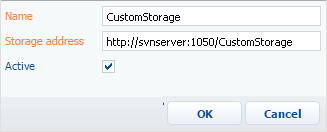
[Name] – repository name.
[Storage address] – the network address of an existing SVN repository. Insert the URL that you copied on step 1 of this instruction.
The HTTP protocol (standard network protocol), HTTPS protocol (standard network protocol secured with SSL encryption), and SVN protocol (own network protocol of the Subversion system) are all supported in repository addressing.
[Active] – select this checkbox to enable using the repository in the system operation. Each new repository is marked as active by default.
Note
You can work with active repositories only. Moreover, all repositories, from which the packages are updated, must be active. These include the repository from which the initial package is updated and the repositories from which all packages-dependencies of the initial package are updated.
7.Click the repository in the repository list –> [Authenticate] (Fig. 6).
Fig. 6 Authenticating a repository
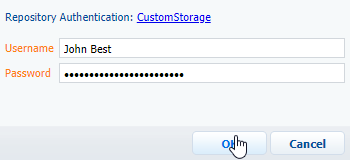
8.Authenticate to your SVN repository using one of the users you have created on your SVN server (Fig. 7).
Fig. 7 Providing SVN credentials
As a result, your SVN repository will be connected to Creatio. Use the new repository to create custom packages and install the created packages in the workspace.
Learn more about working with packages using SVN, transferring changes using SVN, and working with SVN in general in our SDK guide.