


Setting up Single Sign-On via OneLogin
You can use OneLogin SSO portal as a single sign-on point for all your services, including Creatio. For this, you need to configure a number of settings both on the OneLogin and Creatio side.
Settings on the Creatio side require access to the configuration files on the application server. Cloud customers will need to contact Creatio support with a request to perform the settings. The instructions for settings on the Creatio side in this guide are intended for on-site customers. We strongly advise on-site customers to perform setup under the guidance of a Creatio support specialist.
Attention
In the setup case below, we use https://site01.creatio.com/ as Creatio site address and “appid” as application id on the OneLogin. During the actual setup process, please be sure to replace these values with your site address and the id of corresponding application on OneLogin.
Settings on the OneLogin side
Start the procedure by logging in to OneLogin using an administrator account.
1.Click “Apps” and select “Add Apps”. Enter “Creatio” in the search string and select the Creatio application.
2.Change the value in the “Display name” field, if needed, modify application icons or clear the [Visible in portal] checkbox. These settings affect the website display on the OneLogin site.
3.Click “Save”.
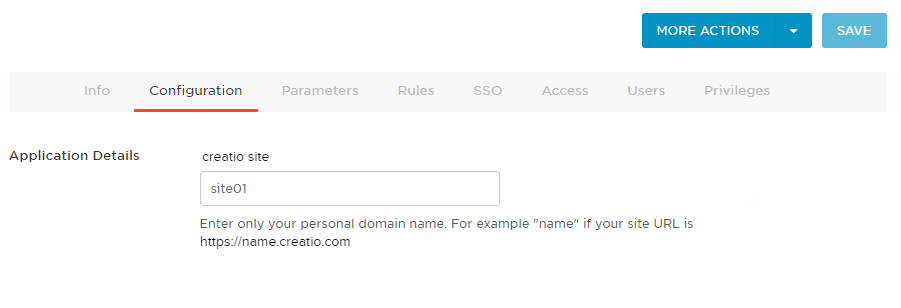
4.Go to the “Configuration” tab and enter your website domain name in the “Creatio site” field (Fig. 1).
Fig. 1 Website configuration page
Settings on the Creatio side (cloud)
If you use a cloud-based version of Creatio, contact our support and have our team configure Single Sign-On on your site via a remote connection.
Settings on the Creatio side (on-site)
If you use an on-site version of Creatio, perform the following settings in Creatio configuration files:
Attention
On-site customers are strongly advised to perform these settings under the guidance of Creatio support.
1.Specify identity provider information in the saml.config. In the Name parameter, specify your website’s FQDN, such as https://site01.creatio.com/.
Attention
The value of the ServiceProvider Name parameter must be identical to the Audience value specified on the identity provider’s side. This is how it verifies that the SAML Assertion was issued specifically for your application. We recommend using the FQDN of your website.
2.In the Partner Identity Provider section, specify identity provider settings. You can view these settings in the metadata file.
WantAssertionSigned=“false” – if an encryption certificate will not be used during SAML Assertion data exchange.
SingleSignOnServiceUrl – URL of the identity provider’s single sign-on. Can be taken from the SAML 2.0 Endpoint (HTTP) on a trusted application page.
SingleLogoutServiceUrl – URL of the identity provider’s single sign-off. Can be taken from the SLO Endpoint (HTTP) on a trusted application page.
An example of the saml.config for a test OneLogin:
<?xml version="1.0"?>
<SAMLConfiguration xmlns="urn:componentspace:SAML:2.0:configuration">
<ServiceProvider Name="https://site01.creatio.com/"
Description="Example Creatio Service Provider"
AssertionConsumerServiceUrl="~/ServiceModel/AuthService.svc/SsoLogin"
/>
<PartnerIdentityProviders>
<!--OneLogin Creatio -->
<PartnerIdentityProvider Name="http://adfs01.mysite.com/adfs/services/trust"
Description="OneLogin"
WantAssertionSigned="false"
SingleSignOnServiceUrl="https://ts-dev.onelogin.com/trust/saml2/http-post/sso/appid"
SingleLogoutServiceUrl="https://ts-dev.onelogin.com/trust/saml2/http-redirect/slo/appid"
PartnerCertificateFile="Certificates\onelogin.cer"/>
</PartnerIdentityProviders>
</SAMLConfiguration>
3.Modify the web.config file in the website root folder:
a.Enable using SSO AuthProvider:
SsoAuthProvider – identity provider for the primary application.
SSPSsoAuthProvider – identity provider for the customer portal.
You can enable one or both of the providers.
<terrasoft>
<auth providerNames="InternalUserPassword,SSPUserPassword,SsoAuthProvider,SSPSsoAuthProvider" autoLoginProviderNames="" defLanguage="en-US" defWorkspaceName="Default" useIPRestriction="false" loginTimeout="30000">
<providers>
b.Specify which IdP (of those specified in the saml.config) to use. In the web.config App Loader, specify the PartnerIdP parameter value from the Issuer URL string in saml.config, such as: “https://app.onelogin.com/saml/metadata/appid“
<appSettings> ... <add key="PartnerIdP" value="https://app.onelogin.com/saml/metadata/appid"/> ... </appSettings>
c.Enable using SSO by default. Edit the App Loader web.config: NuiLogin.aspx?use_sso=true
Note
A direct login link will be created: https://site01.creatio.com/NuiLogin.aspx
Use the following link to test the SSO operation before it is enabled by default: https://site01.creatio.com/NuiLogin.aspx?use_sso=true
Enable redirection to the identity provider when going to the website root:
<defaultDocument> <files> <add value="NuiLogin.aspx?use_sso=true" /> </files> </defaultDocument>
Enable redirection to the identity provider if no user session is available:
<authentication mode="Forms">
<forms loginUrl="~/NuiLogin.aspx?use_sso=true" protection="All" timeout="60" name=".ASPXAUTH" path="/" requireSSL="false" slidingExpiration="true" defaultUrl="ViewPage.aspx?Id=4e342d5e-bd89-4b79-98e2-22e433122403" cookieless="UseDeviceProfile" enableCrossAppRedirects="true" />
</authentication>
4.Enable Single Log Out in the web.config in the Terrasoft.WebApp folder:
<add key="UseSlo" value="true" />
5.Enable Just-In-Time User Provisioning in the web.config in the website root folder:
<add name="UseJit" value="true" />
6.Set up mapping between SAML Assertion fields and Creatio columns using the [SAML field name converter to contact field name] lookup. You need this to populate contact fields correctly when the system will create new users via Just-In-Time User Provisioning. If the field is empty or disabled in the identity provider data, it can be filled with the value specified in the [default value] field of the lookup. Next time you log in, the contact fields specified in the lookup will be populated with the values received from the provider or with actual default values.
Note
If the lookup is missing in the lookup list, it needs to be registered.
7.To use the Single Sign-On in a mobile application, please set the [default value] attribute in the [SSO in mobile application] system setting.
See also