


Setting up Single Sign-On via ADFS
You can integrate your Active Directory Federation Services (ADFS) instance to help manage seamless single sign-on for your members. For this, you need to configure a number of settings both in ADFS and Creatio.
Settings on the Creatio side require access to the configuration files on the application server. Cloud customers will need to contact Creatio support with a request to perform the settings. The instructions for settings on the Creatio side in this guide are intended for on-site customers. We strongly advise on-site customers to perform setup under the guidance of a Creatio support specialist.
Attention
In the setup example below, https://site01.creatio.com/Demo_161215/ is the Creatio website and http://adfs01.mysite.com/adfs/ is the ADFS site. Please be sure to replace these addresses with the corresponding addresses of your sites when you perform the actual setup.
Settings on the ADFS side
Begin this procedure by launching an ADFS instance.
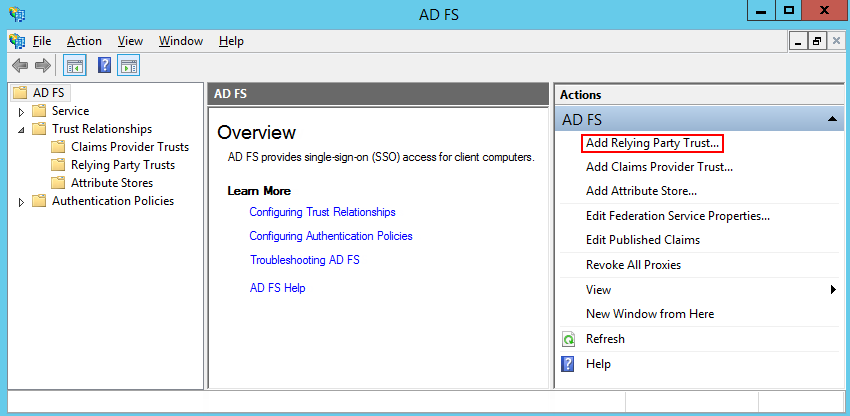
1.Add a new Trusted Relaying Party (Fig. 1).
Fig. 1 Adding a new Trusted Relaying Party
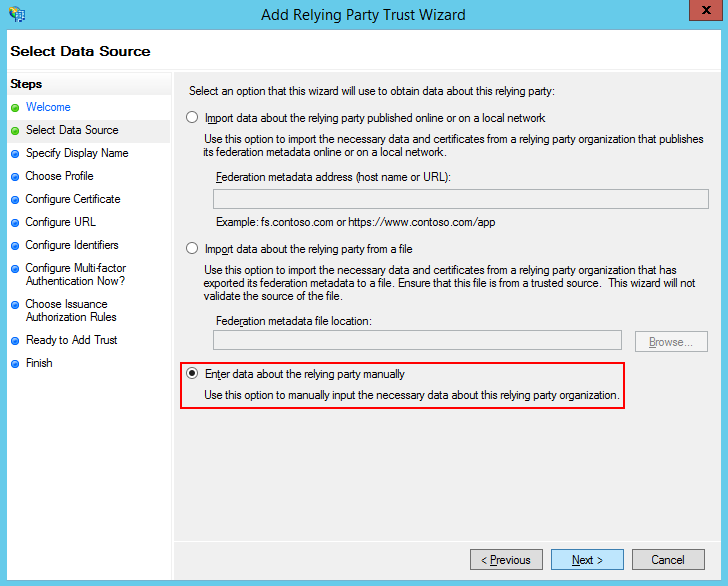
2.Select the “Enter data about the relying party manually” option (Fig. 2).
Fig. 2 Selecting the “Enter data about the relying party manually” option
3.Enter the relaying party name in the [Display name] field. This name is needed for a comprehensive list of trusted applications in ADFS and does not affect actual setup.
4.Keep the default ADFS profile. Click “Next”.
5.Click “Next” on the certificate selection step.
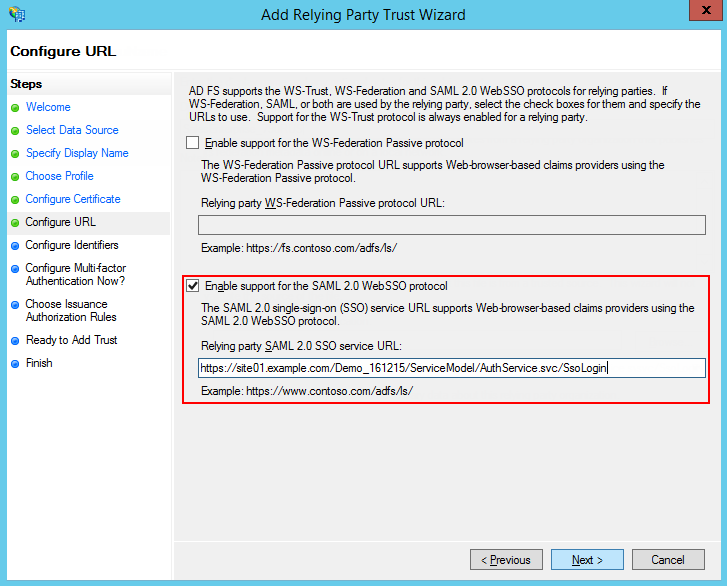
6.Enable SAML 2.0 protocol support. Specify the site address and add “/ServiceModel/AuthService.svc/SsoLogin“ to it (Fig. 3).
Fig. 3 Enabling SAML 2.0 protocol support
7.Specify the website root as the identifier and click “Add” (Fig. 4).
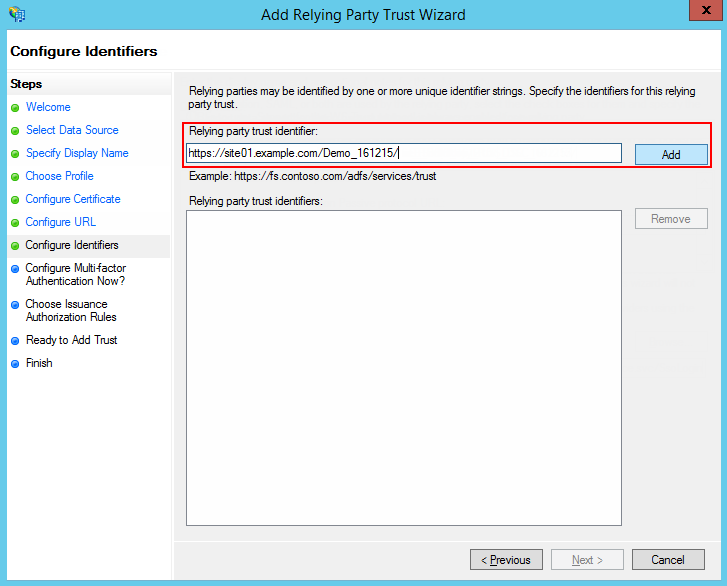
Attention
The identifier is used when verifying the authenticity of a source that requests authentication. The URL must completely match, including the “/” in the end.
8.Set up the rest of the parameters according to your security requirements. You can leave default values for test purposes.
9.Click “Finish”. In the opened window, click the “Add Rule” button and add a new SAML Assertion to SAML Response rule (Fig. 5).
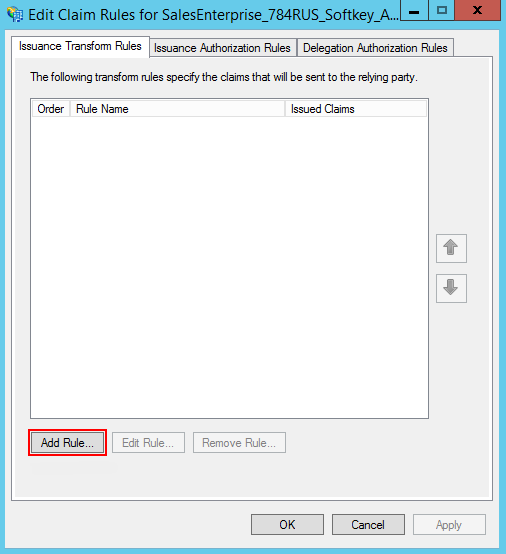
Note
The data generated according to the new rule will be used by Creatio to search for users and update their roles.
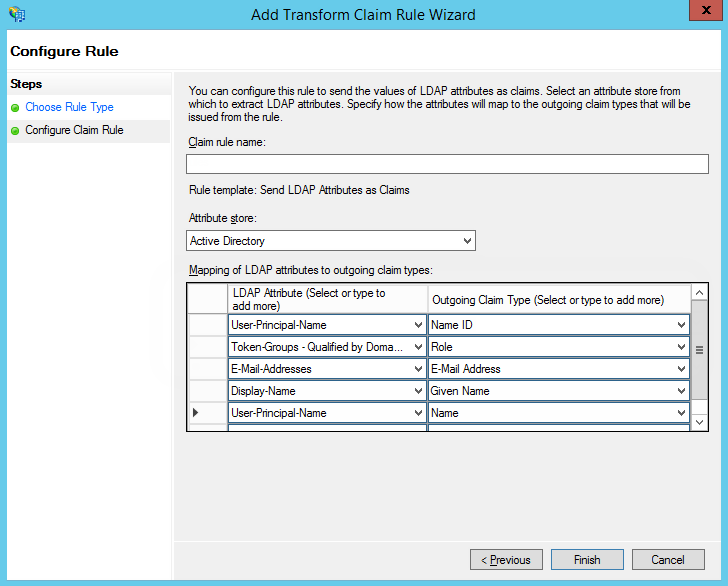
10.Keep default settings and click “Next” on the first step of the wizard. Set up a set of parameters that will be received from the user’s data (Fig. 6). In the current example, the user’s Name and a list of domain groups will be passed to SAML Assertion.
Fig. 6 Setting up rule parameters
11.Click “Save”.
12.Open the Trusted Relay settings and specify SHA-1 encryption according to the website certificate algorithm.
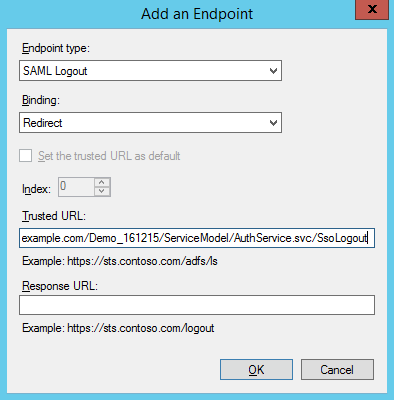
13.Add Logout endpoint on the Endpoints tab and set its parameters (Fig. 7).
Endpoint type: SAML Logout
Binding: Redirect
Trusted URL: https://site01.creatio.com/Demo_161215/ServiceModel/AuthService.svc/SsoLogout
Fig. 7 Setting up endpoint parameters
14.On the Signature tab, add a certificate for signing Logout Request (Fig. 8).
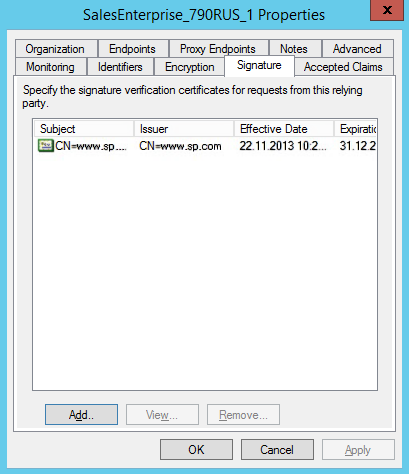
Attention
Single Sign-Out will not work without a certificate.
Settings on the Creatio side (cloud)
If you use a cloud-based version of Creatio, contact our support and have our team configure Single Sign-On on your site via a remote connection.
Settings on the Creatio side (on-site)
If you use an on-site version of Creatio, perform the following settings in Creatio configuration files:
Attention
On-site customers are strongly advised to perform these settings under the guidance of Creatio support.
1.Specify identity provider information in the saml.config. In the Name parameter, specify your website’s FQDN.
Attention
The value of the ServiceProvider Name parameter must be identical to the Identifier value specified on the ADFS identity provider’s side. This is how it verifies that the SAML Assertion was issued specifically for your application. We recommend using the FQDN of your website.
2.In the Partner Identity Provider section, specify IdP settings. You can view these settings in the metadata file.
WantAssertionSigned=“false” – if an encryption certificate will not be used during SAML Assertion data exchange.
SingleSignOnServiceUrl – URL of the identity provider’s single sign-on. Usually for ADFS this is: https://site01.creatio.com/Demo_161215/adfs/ls.
SingleLogoutServiceUrl – URL of the identity provider’s single sign-off. Usually for ADFS this is: https://site01.creatio.com/Demo_161215/adfs/ls.
PartnerCertificateFile – path to the security certificate in the file system on the Creatio application server. Specify this parameter if WantAssertionSigned=“true“.
SignLogoutRequest=“true” – specify for ADFS, since signing of LogoutRequest is required.
SignLogoutResponse=“true” – specify for ADFS, since signing of LogoutResponse is required.
OverridePendingAuthnRequest=“true” — this option helps in case of errors in IdP initiated login.
An example of the saml.config for test ADFS:
<?xml version="1.0"?>
<SAMLConfiguration xmlns="urn:componentspace:SAML:2.0:configuration">
<ServiceProvider Name="https://site01.creatio.com/Demo_161215/"
Description="Example Creatio Service Provider"
AssertionConsumerServiceUrl="~/ServiceModel/AuthService.svc/SsoLogin"
LocalCertificateFile="sp.pfx"
LocalCertificatePassword="password"
/>
<PartnerIdentityProviders>
<!-- ADFS Creatio -->
<PartnerIdentityProvider Name="http://adfs01.mysite.com/adfs/services/trust"
OverridePendingAuthnRequest="true"
Description="MVC Example Identity Provider"
SignAuthnRequest="false"
SignLogoutRequest="true"
SignLogoutResponse="true"
WantSAMLResponseSigned="false"
WantAssertionSigned="false"
WantAssertionEncrypted="false"
SingleSignOnServiceUrl="https://adfs01.mysite.com/adfs/ls"
SingleLogoutServiceUrl="https://adfs01.mysite.com/adfs/ls"
PartnerCertificateFile="Certificates\idp.cer"/>
</PartnerIdentityProviders>
</SAMLConfiguration>
3.Specify the certificate that will be signing the SAML Assertion. Make sure that the certificate file is available in the Terrasoft.WebApp folder in the website root.
LocalCertificateFile="sp.pfx"
LocalCertificatePassword="password"
4.Modify the web.config in the website root folder:
a.Enable using SSO AuthProvider:
SsoAuthProvider – identity provider for the primary application.
SSPSsoAuthProvider – identity provider for the customer portal.
You can enable one or both of the providers.
<terrasoft>
<auth providerNames="InternalUserPassword,SSPUserPassword,SsoAuthProvider,SSPSsoAuthProvider" autoLoginProviderNames="" defLanguage="en-US" defWorkspaceName="Default" useIPRestriction="false" loginTimeout="30000">
<providers>
b.Specify which identity providers in the saml.config need to be used. In the web.config App Loader, specify the PartnerIdP parameter value from the Issuer URL string in saml.config, such as:
<appSettings> ... <add key="PartnerIdP" value="http://adfs01.mysite.com/adfs/services/trust"/> ... </appSettings>
c.Enable using SSO by default. Edit the App Loader web.config: NuiLogin.aspx?use_sso=true
Note
A direct login link will be created: https://site01.creatio.com/NuiLogin.aspx
Use the following link to test the SSO operation before it is enabled by default: https://site01.creatio.com/NuiLogin.aspx?use_sso=true
Enable redirection to the identity provider when going to the website root:
<defaultDocument> <files> <add value="NuiLogin.aspx?use_sso=true" /> </files> </defaultDocument>
Enable redirection to the identity provider if no user session is available:
<authentication mode="Forms">
<forms loginUrl="~/NuiLogin.aspx?use_sso=true" protection="All" timeout="60" name=".ASPXAUTH" path="/" requireSSL="false" slidingExpiration="true" defaultUrl="ViewPage.aspx?Id=4e342d5e-bd89-4b79-98e2-22e433122403" cookieless="UseDeviceProfile" enableCrossAppRedirects="true" />
</authentication>
5.Enable Single Log Out in the web.config in the Terrasoft.WebApp folder:
/Terrasoft.WebApp/web.config
<add key="UseSlo" value="true" />
6.Enable Just-In-Time User Provisioning in the web.config in the application root:
<add name="UseJit" value="true" />
7.Set up mapping between SAML Assertion fields and Creatio columns using the [SAML field name converter to contact field name] lookup. You need this to populate contact fields correctly when the system will create new users via Just-In-Time User Provisioning. If the field is empty or disabled in the identity provider data, it can be filled with the value specified in the [default value] field of the lookup. Next time you log in, the contact fields specified in the lookup will be populated with the values received from the provider or with actual default values.
Note
If the lookup is missing in the lookup list, it needs to be registered.
8.To use the Single Sign-On in a mobile application, please set the [default value] attribute in the [SSO in mobile application] system setting.
See also