


This chapter describes the non-standard lookups used in Creatio.
Contents
•The [Accounts in external resources] Lookup
Video tutorials
The lookup is available in Creatio marketing, sales enterprise, sales commerce, sales team, sales team, bank sales, bank customer journey, lending and CRM bundles.
This lookup contains a list of currencies used in mutual payments with customers, partners, suppliers, and the like.
| Name | [Name] – indicate the name of the currency, for example, “US Dollar” or “Euro”. |
| Code | Specify a banking code that is used for a specific currency, for example, US dollar code is 840. |
| Short name | Shortened currency name, such as “USD” or “EUR”. |
| Symbol | Currency symbol, such as “$” or “€”. |
| Ratio | Specify the currency amount for which the exchange rate will be calculated (for example, 1, 10, 100). |
| Description | Additional information about the currency. |
| Show currency sign | Choose the appropriate option from the drop-down list. Choose [on the left] or [on the right] options to display the sign before or after the amount. |
[Exchange rate] detail
Information about exchange rates is stored on the [Exchange rate] detail.
| Start | The starting date for the exchange rate. The start date of a new exchange rate is considered the end date of the previous exchange rate. |
| Exchange rate | Value of the base currency in relation to that of the conversion currency. Enter a value according to the currency ratio, specified in the currency card. The value for the base currency in the exchange rate card must be set to “1”. |
| End | The ending date for the exchange rate. Filled automatically with the starting date of new exchange rate. This is a non-editable field. |
Note
The base currency is used to calculate the financial performance indicators, for example, it can be “US Dollar”. Use the “Base currency” system setting to select a certain base currency.
See also
The [Accounts in external resources] Lookup
This lookup contains a list of accounts that are used to collect information in external web-resources, such as social networks.
| Name | Used for identification in the list of user accounts. |
| User | Select a system user from lookup. If you add a corporate account, you can leave this field empty. |
| Type | Select a social network or email service for the user account. |
| User login | User account name in external resource. |
| Public | Select this checkbox to grant access to this account to other users. This is relevant for corporate user accounts. |
| Description | Additional information about the user account. |
The lookup is available in Creatio sales enterprise, service enterprise, customer center, bank customer journey and CRM-bundles. The [Calendars] lookup is not bound to organizational and functional roles of Creatio users.
Use the [Calendars] lookup (Fig. 1) to set up different calendar types used by helpdesk as per customer service agreements in Creatio service enterprise, customer center and bank customer journey products. If your customers and helpdesk staff are scattered across different timezones, using a proper calendar will help streamline case processing. The lookup is used for populating the service page in Creatio customer center and bank customer journey, while in Creatio service enterprise it is used to populate the service agreement page.
In Creatio sales enterprise, you can use the [Calendars] lookup to set up different types of calendars for planning sales reps’ visits to customers. The lookup is used by the Field force and Pharma applications (they are available in Creatio marketplace) when populating the contact (doctor) page.
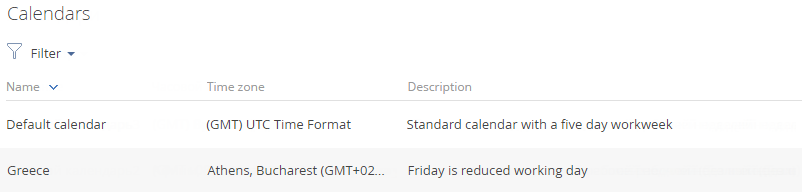
By default, the lookup contains default UTC calendar with a five day working week.
When you create a new calendar the working week settings are inherited from a default calendar. Also you can copy one of previously configured calendars. In this case, all settings, except the data on the [Days off] tab will be inherited in the new calendar.
To add a new blank calendar, click the [Add] button. Fill the fields in the added list string:
-
Specify the calendar name. This is a required field.
-
Select a time zone from the lookup. This is a required field. The time zones are selected from the corresponding system lookup that is connected to Windows regional settings.
Attention
It is not recommended to add and to delete records in [Time zones} lookup.
-
[Description] – specify any additional information about the calendar.
To configure the calendar press the  . button. The calendar page will open (Fig. 2).
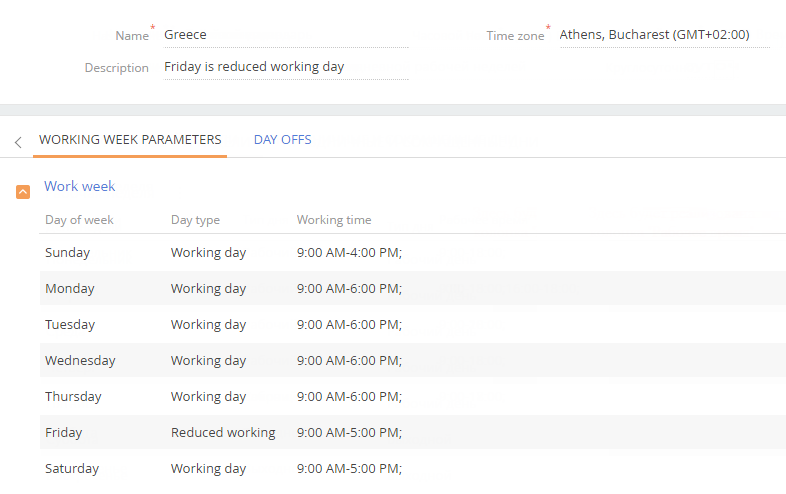
Specify work days, work time and days off on the [Work week parameters] and [Day offs] tabs.
To edit an existing calendar, select it and click the  button.
The [Work week parameters] tab
On the [Work week parameters] tab, you can:
-
Set the first and last days of the work week
-
Specify the type of each of week days (work day or day off)
-
Set work hours
The weekday names and order cannot be edited. You can specify the work hours for each work day separately.
Work time
Specify working hours for each work day. By default, the work hours are copied from the base calendar. Working hours intervals are set up only for working days. You can specify multiple intervals, for example, “09:00 – 13:00“ and “14:00 – 18:00“. To add the working interval click the  button. All intervals will be sorted chronologically after adding.
Note
When you change the day type from “Working day” to “Day off” the working time will be hidden but not deleted. If you change the day type back from “Day off” to “Working day”, the working time will become available in the field again.
Note
To specify round-the-clock work set the interval from 0:00 AM till 11:59 PM.
After specifying an interval, click the  button to confirm it.
The [Days off] tab
You can specify all holidays on the [Days off] tab.
Click the  to add a day off. Set the day parameters: [Date], [Day type] and [Working time] for reduced working day. Use the calendar control in [Date] field to specify a date. Click the
  button.
Note
Passed holidays or reduced working days cannot be added or deleted.
The [Email templates] lookup is used to create email templates for business processes and customer communications. You can use these templates for bulk emails in Creatio marketing and CRM-bundles.
| Template name | The title of a template. The field is required. In localized templates, the template name is followed by abbreviations of the used languages. |
| Macro source | Creatio object (section or detail), whose fields will be used in the template as macros. For example, specify the “Contact” object as a macro source for using the sender’s full name and job title in the text. |
Template area
The template displays the template text If the template is localized, different tabs are used to display its text in different languages.
The  button in the top right area of the template enables adding new language tabs.
Each tab contains:
-
the [Edit] button, which is used for opening the content designer;
-
the [Subject] field. This field value is automatically populated in the [Subject] field of the message page, when you select a bulk email (in Creatio marketing) or a lookup template.
See also
•Setting up sending localized emails
Video tutorials