Creating and registering lookups
You can create and register your own lookups in Creatio and populate the fields of a new or existing section with necessary data.
The lookup creation and registration process depends on whether Creatio already contains an object which needs to be linked to the lookup or not.
-
If Creatio does not contain the necessary object when you add a new lookup field to the page, the lookup will be created and registered automatically upon saving section wizard. The lookup object will also be created.
Note
Lookup registration means adding a new lookup to the [Lookups] section, where it can be populated with values.
-
If Creatio does not contain the object, you need to create it and afterwards register its lookup. You can create objects manually via built-in developer tools.
-
If Creatio contains the object, you need to register a corresponding new lookup in the [Lookups] section.
Creating lookups via section wizard
A lookup is created automatically upon selecting the [Add new lookup] option when you add a new lookup field in section wizard.
Case
The [Requests] custom section has been configured in Creatio. Add a field displaying the request type to the request page. The field will be populated from a lookup.
To implement the case:
1.In the [Requests] section, open a record and click the [View] —> [Open section wizard].
2.Set up the necessary field in page designer:
a.On the left side of the page, select the [Lookup] column in the [New column] selection area and drag it to the record page.
b.In the opened window, populate the required fields. If you want your lookup field to be required, select the [Is required] checkbox.
Note
Detailed information about “Lookup” column parameters is available in a separate article. Read more >>>
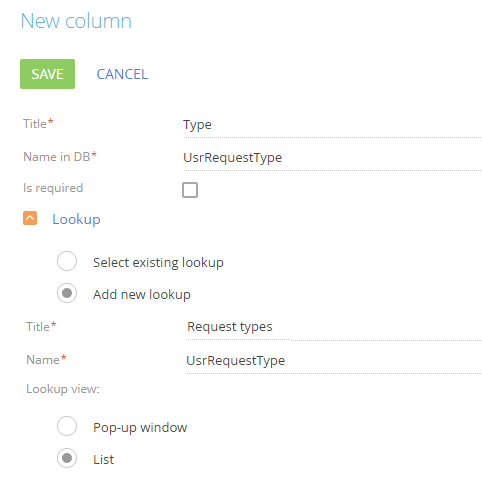
c.In the [Lookup] field group, select the [Add new lookup] option and specify the title and name of the lookup you want to create (Fig. 1). The [Title] field corresponds to the lookup title in Creatio and the object title, while the [Name] field corresponds to the object name and table name in the database.

d.Click the [Save] button.
3.Save the changes in the section wizard.
As a result, after you save the changes in section wizard, the created lookup will automatically be registered in Creatio and bound to the package where the wizard saves changes.
After that, you need to populate the lookup and specify the request types. To do this:
1.Open system designer by clicking the  button in the left top corner of the application and select the [Lookups] link in the [System setup] block.
2.Find the created [Request types] lookup via the quick filter by title and open its content.
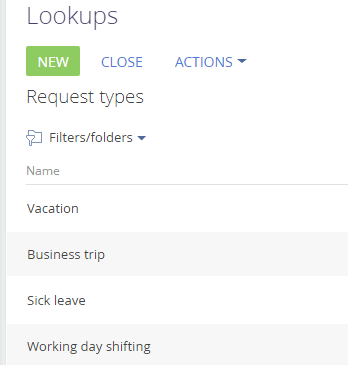
3.To create the request types in the lookup, click the [New] button (Fig. 2).
Fig. 2 The [Request types] lookup population

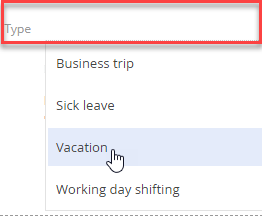
As a result, you will be able to use the lookup information from the created [Request types] lookup when populating the [Type] field on the request page (Fig. 3).
Fig. 3 The [Type] lookup field

Registering a lookup if there is no object in Creatio
If you want to register a lookup for the object which does not exist in Creatio yet, you will have to create this object first. Custom object (entity) schema creation is covered in a separate development guide article. Read more >>>
Note
If you need a lookup to populate a new field, the section wizard will create a new object and register a lookup automatically upon adding the field. If you select the “Add new lookup” option, the lookup and its object will be created automatically, and the lookup will be registered in Creatio.Read more >>>
Registering a lookup if Creatio contains the object
If you want to register a lookup for an existing object in Creatio, do the following:
1.Open system designer by clicking the  button in the left top corner of the application and select [Lookups] in the [System setup] block.
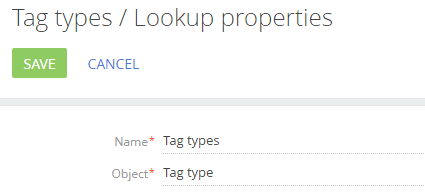
2.Click the [New lookup] button and specify the lookup name and the object containing the lookup data structure (Fig. 4).
Fig. 4 – Registering a lookup for the existing object

Note
Detailed information about the lookup properties is available in a separate article. Read more >>>
As a result, the lookup will be registered and populated with the data in correspondence with the object structure.
See also


