Use the Perform task ![]() case element to create an activity for the user to complete as part of the case.
case element to create an activity for the user to complete as part of the case.
Set up the [Perform task] element
Specify the task parameters in the element setup area (Fig. 1).
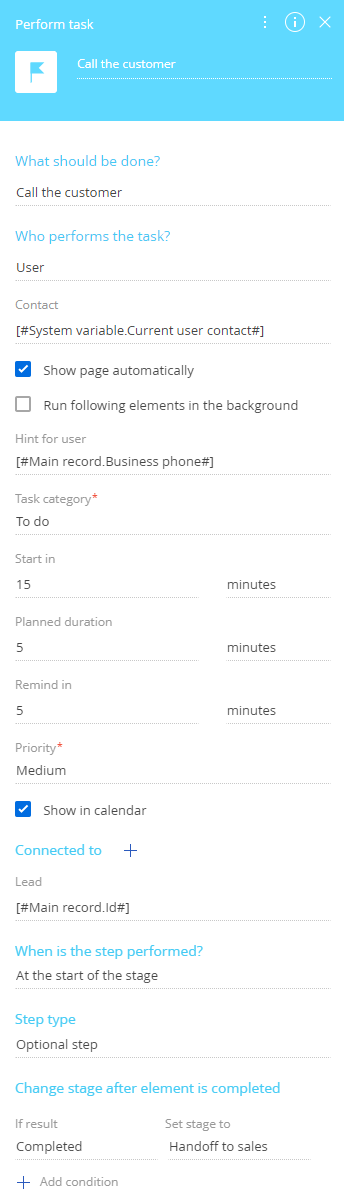
Most element parameters, such as Task category, Priority, correspond to activity page fields. If you specify a parameter, Creatio will populate the corresponding field on the activity page when creating a case task. If you do not specify a parameter, the corresponding field on the activity page will remain empty. You will be able to fill it out manually.
The element caption is displayed at the top of the setup area. This makes the element easy to find on the case diagram.
Fill out the following fields:
-
What should be done? – enter the task title. The subject briefly summarizes the task for the user to perform. This is a required field. To display the task title in the assignee's language, make sure the “Create business process tasks in the owner's language” (“UsePerformerCultureInUserTask” code) system setting is enabled and the Translation section includes the translation. Learn more: Localize UI via the Translation section.
- Who performs the task? – select one of the options and fill out the field that opens:
- “User” – specify the user responsible for the task in the Contact field.
- “Employee's manager” – specify the user whose manager is responsible for the task in the Contact field.
-
“Role” – specify the role associated with the users who can perform the task in the Role field.
You can specify a dynamic parameter value or select a constant value in the parameter value box.
- Show page automatically – select the checkbox to display the task page automatically as soon as the case initiates the task.
- Run following elements in the background – select the checkbox to run the subsequent elements in the background.
- Hint for user – enter additional information about the task. Click the
 button on the activity page to view the hint.
 - Task category – select the task category. For example, “To do” or “Meeting.” This is a required field.
- Start in – specify the period after which the activity must start, in minutes, hours, days, weeks, and months. The countdown starts after the case activity is created. Creatio uses this parameter to populate the Start field of the activity page.
- Planned duration – enter the activity duration, in minutes, hours, days, weeks, or months. Creatio uses this parameter to populate the Due field of the activity page.
- Remind in – the period that ends before the activity starts. After this period, the notification for the owner or the role will be created automatically.
- Show in calendar – select the checkbox to display the task in the Calendar view of the Activities section.
- Connected to – connect the task to other Creatio entities and the main record column. For example, an account and the account's primary contact. Creatio will display the task on the Activities detail of the connected record. By default, the element setup area displays connections to the case section record. For example, the task of the Lead section case will be connected to the corresponding lead. Click the
 button to connect the task to other Creatio entities.
 - When is the step performed? – indicates whether to activate the element at the start of the stage or after a case step. Select “At the start of the stage” to create activity at the start of the case stage. Select “After the previous step is complete” if the activity must be created after the previous step in the case stage. Specify the step in the Perform after step field.
- Step type – specify if the task is required. Select “Required step” if the task must be completed to transition to the next stage. Select “Optional step” if the user can advance to the next case stage without completing this task.
- Change stage after element is completed – configure stage transitions depending on activity results. Click the
 button to add fields for configuring the conditions of case transition. Select the completion result of the Perform task element after which the case must be transferred to a different stage in the If result field. Specify the destination stage in the Set stage to field.