During case execution, the Open edit page ![]() case element will display the edit page of a new or existing Creatio section record. For example, open an account page to view or edit the account information as part of the case.
case element will display the edit page of a new or existing Creatio section record. For example, open an account page to view or edit the account information as part of the case.
Set up the Open edit page case element
Specify the edit page parameters in the element setup area (Fig. 1).
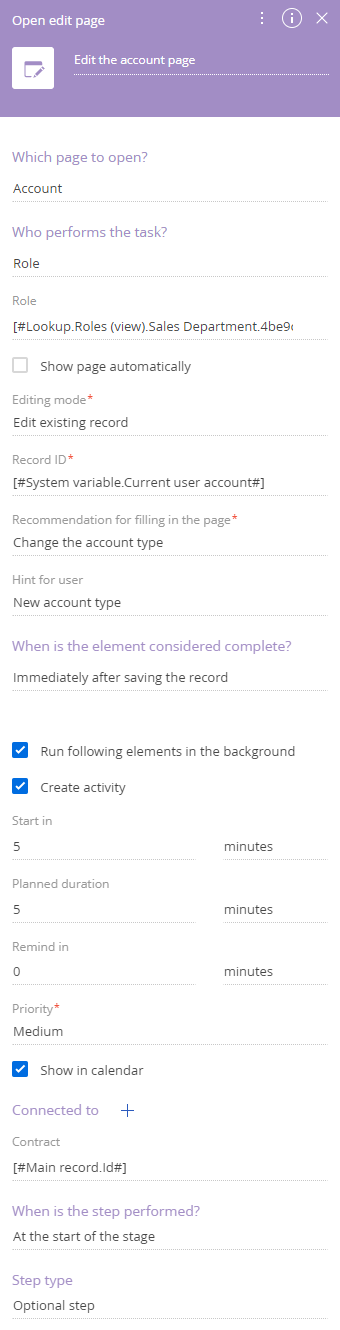
The name of the element is displayed at the top of the setup area. This makes the element easy to find on the case diagram.
Fill out the following fields:
- Which page to open? – select the edit page that the element will display to the user. This is a required field.
- Who performs the task? – select one of the options and fill out the field that opens:
- “User” – specify the user who will see the edit page in the Contact field.
- “Employee's manager” – specify the user whose manager will see the edit page in the Contact field.
-
“Role” – specify the role associated with the users who will see the edit page in the Role field.
You can specify a dynamic parameter value or select a constant in the parameter value box.
-
Show page automatically – select the checkbox to display the page automatically as soon as the case initiates the action.
- Editing mode – select one of the options: This is a required field.
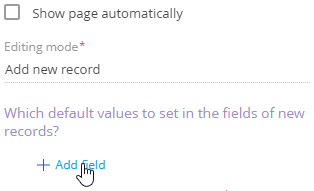
- “Add new record” – select this option to open the edit page of a new record. If you select this option, the Which default values to set in the fields of new records? field will become available. Click the Add field button to select the fields Creatio will populate automatically (Fig. 2).
Fig. 2 Select the fields Creatio will populate as part of the case
You can map default field values to those of the primary case record quickly using the Main record column option in the
 menu. For example, map the Country field of the new account page to the Country field of the connected contact.
 - “Edit existing record” – select this option if you need to open the page of an existing record. If you select this option, the Record ID field will become available. For example, if you need to make changes to an account record as part of a lead qualification case, specify the “Id” column of the connected “Account” object in the Record ID field.
- “Add new record” – select this option to open the edit page of a new record. If you select this option, the Which default values to set in the fields of new records? field will become available. Click the Add field button to select the fields Creatio will populate automatically (Fig. 2).
-
Recommendations for filling in the page – enter the recommendations to display on the edit page. This is a required field. To display the recommendation in the assignee's language, make sure the “Create business process tasks in the owner's language” (“UsePerformerCultureInUserTask” code) system setting is enabled and the Translation section includes the translation. Learn more: Localize UI via the Translation section.
- Hint for user – enter additional information about the step. Click the
 button on the record page to view the hint. Creatio will display the hint button if you fill out the field.
 - When is the element considered complete? – select the conditions for completing the element.
- “Immediately after saving the record” – the step will be considered complete once the user clicks the Save button on the opened page.
- “If the record matches conditions” – the step will be considered complete if one or more fields match the filter. For example, the “Lead qualification” case step will be considered complete if you specify the approximate budget on the lead page. Set a filter by the columns of the selected object or one of its connected objects.
- Run following elements in the background – select the checkbox to run the elements connected to the outgoing flows in the background.
- Create activity – select the checkbox to create a corresponding activity as part of this case step. If you select the checkbox, the following fields will become available:
- Start in – specify the period after which the activity must start, in minutes, hours, days, weeks, or months. The countdown starts as soon as the activity is created. Creatio uses this parameter to populate the Start field of the activity page.
- Planned duration – enter the activity duration, in minutes, hours, days, weeks, or months. Creatio uses this parameter to populate the Due field of the activity page.
Note. The value of the activity page's Due field is the sum of the Start and Planned duration field values.
- Remind in – specify the period that ends before the activity starts. After this period, the notification for the owner or the role will be created automatically.
- Show in calendar – select the checkbox to display the task in the Calendar view of the Activities section.
- Connected to – connect the task to other Creatio entities. For example, an account or lead. Creatio will display the task on the Activities detail of the corresponding record. Click the
 button to connect the task to other Creatio entities.
- When is the step performed? – indicates whether to activate the element at the start of the stage or after a case step. Select “At the start of the stage” if the edit page needs to be opened at the start of the case stage. Select “After the previous step is complete” if the edit page needs to be opened after the previous step in the case stage. Specify the step in the Perform after step field.
- Step type – specify if the step is required. Select “Required step” if the user must complete the task to transition to the next stage. If the user does not have to complete the task to transition to the next stage, select “Optional step.”