You can send emails during process execution. Depending on the setup, you can do it in the following ways:
-
Send emails manually. The user will see a new email page that has pre-populated fields upon reaching this step of the process.
-
Send emails automatically.
Use the Send email element to send emails both manually and automatically in your business processes.
Send emails manually
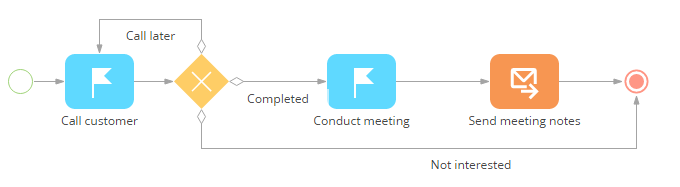
Use manual email sending if you need to make changes (additions) to the email body or add attachments to it. Let's take a look at sending emails manually as part of a meeting process workflow (Fig. 1).
- Drag the Send email element of the User actions group to the business process diagram. Specify the parameter values on the Send email element setup area (Fig. 2):
Fig. 2 Send email element setup area
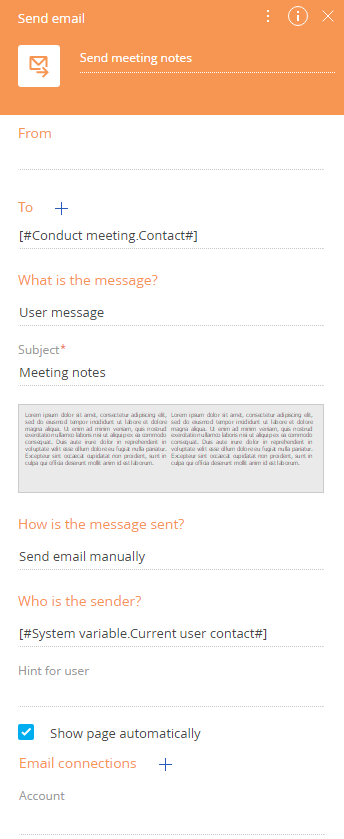
- Select Lookup value in the From field to send the email from a corporate mailbox. Select the corporate mailbox account in the window that opens. If you leave the From field empty, the user who runs the process has to specify the sender email address in the From field on the edit page of the email.
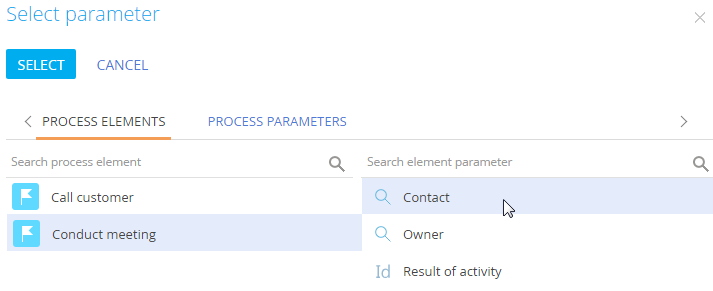
- Specify the recipient's email address in the To field. Select Contact → Process parameter in the parameter value menu. Specify the recipient's email address in the To field. Select Process parameter in the Contact menu. Select the Conduct meeting element and its parameter – Account (Fig. 3).
Fig. 3 Select the recipient’s email address
-
If you need to send the meeting minutes to several contacts, click the
 button and add the Cc and Bcc fields. Specify the necessary recipients in the fields.
 -
Select “Custom message” in the What is the message? field.
-
Enter the email content.
-
Click the
 button in the email body area.
 -
Create your email in the Content Designer.
-
Save the changes.
-
Enter “Meeting minutes” in the Subject field.
-
Select “Send email manually” in the How is the message sent? field.
-
Select “Current user contact” in the Who is the sender? field to open the email edit page for the person responsible for the task.
-
Select the Show page automatically checkbox so the page appears for the responsible individual once they reach this part of the process. If the checkbox is cleared, the email is saved as a draft and not sent.
-
Specify the account from the “Conduct meeting" activity in the Account field. Click the field and select Process parameter in the parameter value menu. Select the Conduct meeting element and its Account parameter. The sent email will be displayed on the History tab of the customer's account record.
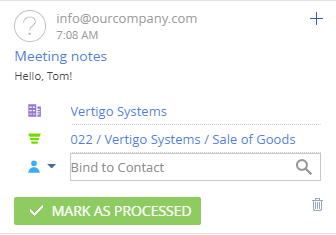
As a result, a new email page will open where you can enter needed changes and add the meeting minutes (Fig. 4).
Fig. 4 Edit an email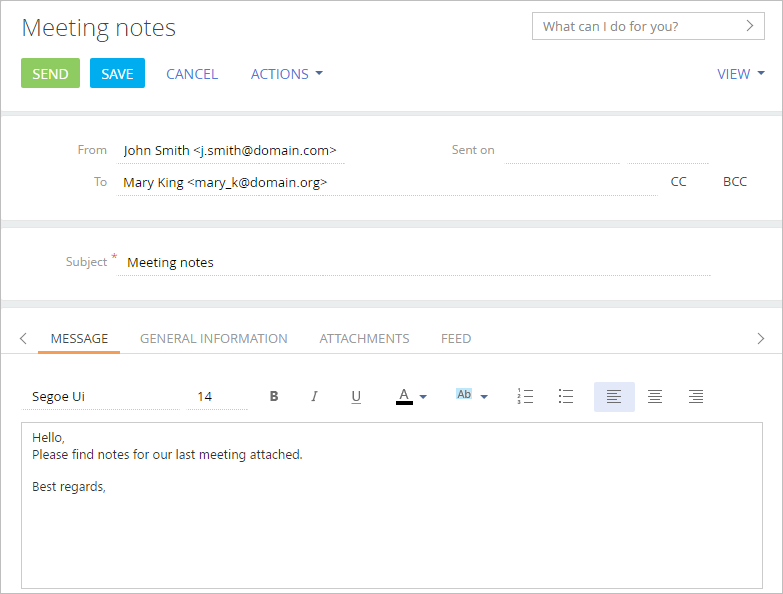
-
Send emails automatically
While configuring a process that contains the Send Email element, you can choose to send emails automatically whenever a record is added, modified or deleted in Creatio. For example, each time a new contact is created, Creatio can send a “welcome email” to that contact (Fig. 5).

Use Signal start event to run business processes automatically, upon changes in Creatio records. Use the Send email element to send an email as part of a business process. If the email text must contain data from specific Creatio records, such as the data of the added contact, use the Read data element to retrieve that data in the process.
To send emails on cue:
-
Add the start event to the process diagram:
-
Use the Start timer event to trigger the email sending either once at a specified time, or regularly with a specified frequency.
-
Use the Signal start event to trigger the sending process on certain changes in Creatio, such as adding a contact (Fig. 6).
Fig. 6 Start event properties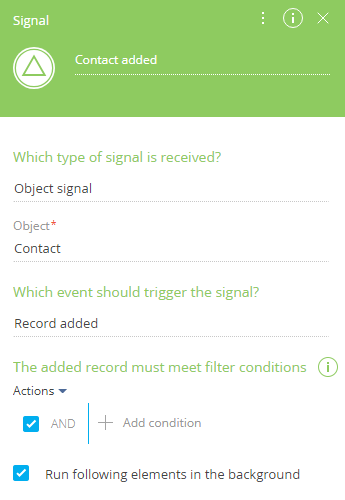
In this case, the Signal start event is used to trigger the process once a contact is added to Creatio.
-
-
Add the Send Email element to the process diagram and fill out its fields (Fig. 7).
Fig. 7 Set up the Send Email element properties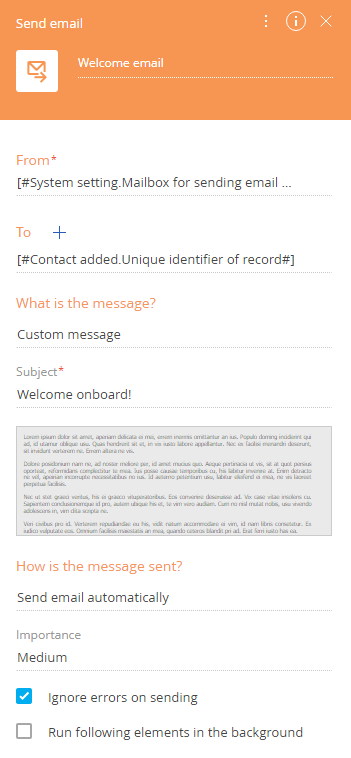
In this case, you can map the To field to the Id of created record parameter of the Signal start event, and send emails to the newly created contacts. To do this, hold the pointer over the To field and click
 , then select Contact → Process parameter. In the menu that appears, select Process parameter. In the window that appears, select the “Unique identifier of record” parameter of the Signal start event (Fig. 8).Fig. 8 Map the To field to the ID of a contact record that triggered the Signal start event
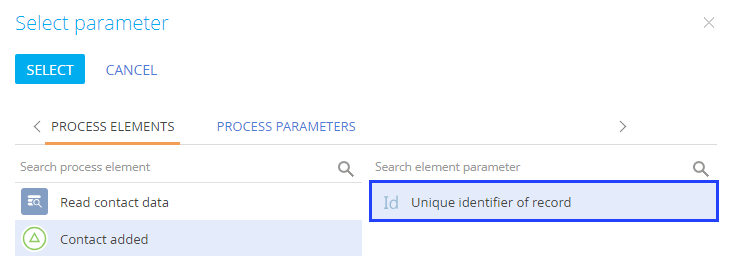
-
Select one of the following options depending on the desired outcome:
-
If you choose to send a message that uses process parameters or macros, add the element that can get these values from the Creatio database.
-
If you choose to send an email that does not use macros or other process parameters, simply connect the Signal element to the Send Email element.
For example, if you need the name and email address of the newly added contact, place the Read Data element (Fig. 9) on the diagram and read the data of the contact who triggered the process. The data will be recorded into the element’s outgoing parameters, which you can then use as macros in the email body.
Fig. 9 Set up the Read Data element properties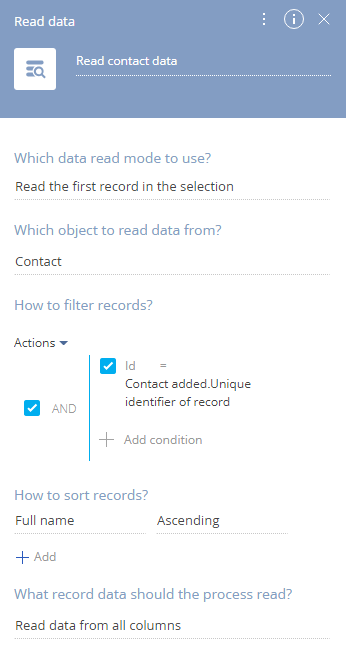
-
-
Save the process diagram.
As a result, the email will be sent upon certain changes / user actions in Creatio. In this case, all newly added contacts will receive a welcome email.
-
Use process parameters in the email body
While setting up the Send Email element, you can use process parameters to personalize custom emails. This lets you include specific information in the email body, such as the first name or the phone number of a contact created as part of the process workflow (Fig. 10).
Fig. 10 First name and phone number parameters used in the email body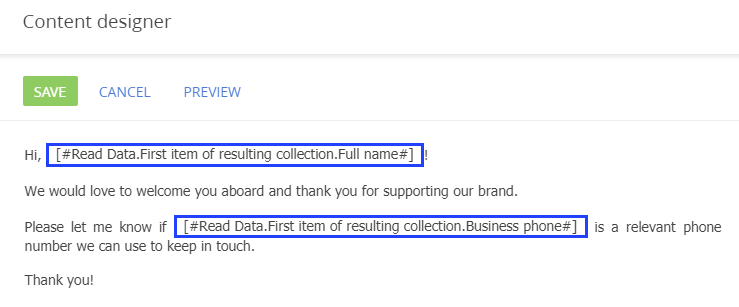
Parameters are displayed in the email body as macros, i. e., codes that gets replaced with information specific to each recipient. For example, the #Read Data.First item of resulting collection.Full name# macro (Fig. 10) represents the Full name parameter of the Read contact data element (Fig. 11). In the actual email this macro will be replaced with the first name of the contact created as part of the process workflow. Learn more about macros: Personalize email content with macros.
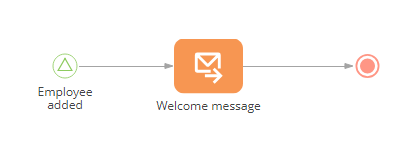
Any process parameter of the text, date/time, integer, and boolean types can be used to form macros in a custom message. This lets you use virtually any process parameter in the email body. For example, you can create a welcome email (Fig. 11) for all new contacts added to Creatio, and get their full name and business phone as macros in the email body.
Fig. 11 Business process diagram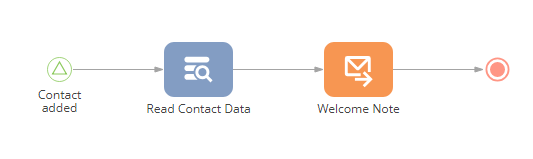
To add process parameters to a custom message:
-
Add the elements whose parameters you are going to need to the process diagram. To get the field values of existing records, use the Read Data element.
To get the name and the business phone of the created contact, use the Signal start event together with the Read Data element.
-
Add the Send email element and fill out its From and To parameters.
-
Select “Custom message” in the What is the message? field of the Send Email element.
-
Hold the pointer over the area under the Subject field and click
 to open the Content Designer.
 -
Add the necessary blocks to the custom message. For example, add a “Text” block.
-
Click anywhere in the working area of the Content Designer, and click the
 button on the toolbar. (Fig. 12):Fig. 12 Opening the parameter selection window in the Content Designer
-
Select the necessary parameter in the selection window. In this case, add the “First name” and the “Business phone” (Fig. 13) parameters of the Read Data element to add their values to the email template body. The parameter will be placed at insertion point.
Fig. 13 Select a parameter to use as an email text macro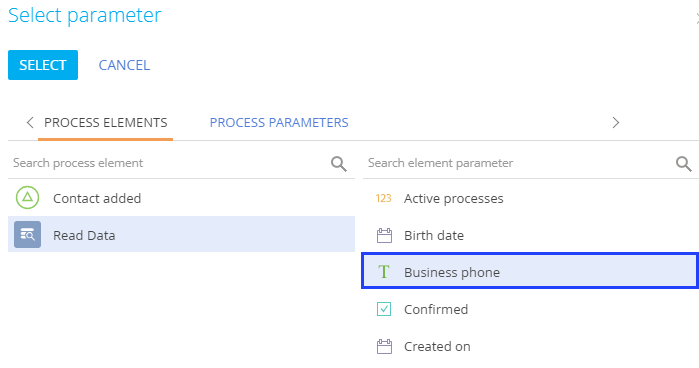
-
Save the changes in the Content Designer.
-
Fill out other fields in the Send Email element and save the process.
As a result, the process will send emails whose text will contain values of the corresponding parameters. In this case, contact first name and the business phone will be dynamically received from all created contacts in Creatio.
Use email templates in business processes
Creatio lets you send emails based on the templates from the Email templates lookup as part of a business process flow. In Creatio, email templates are created using the Content Designer. When designing a business process, you can select templates in the Send Email element. For example, you can send a “Welcome on board” email template to all new employees at your company (Fig. 14).
To send a template-based email as part of a business process:
-
Add the Send Email element to the process diagram and fill out its fields (Fig. 15).
Fig. 15 Set up the Send Email element properties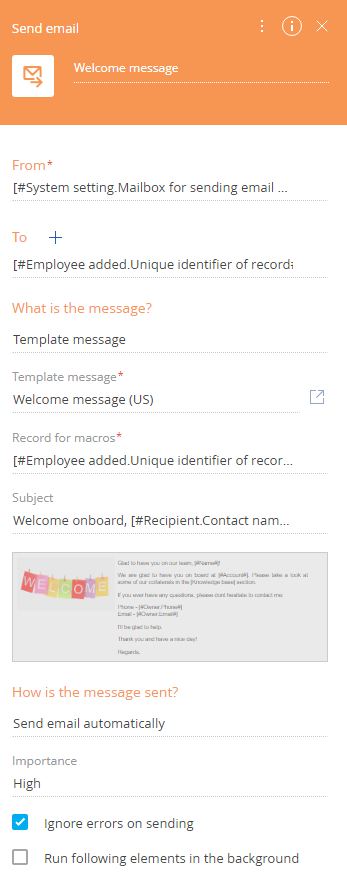
-
Fill out the To field. In this case, you can map the To field to a parameter that stores the ID of the added employee record, which you can retrieve from the Signal start event (Fig. 16).
Fig. 16 Properties of the Signal start event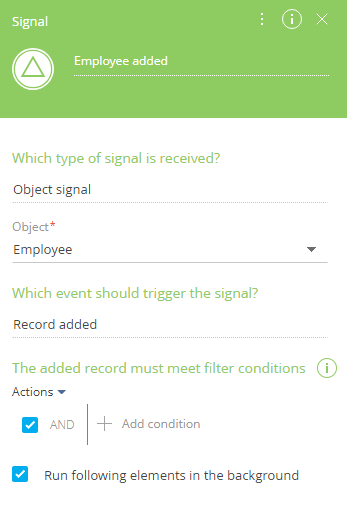
To do this, hold the pointer over the To field and click
 , then select Contact → Process parameter. In the menu that appears, select Process parameter. In the window that appears, select the “Unique identifier of record” parameter of the Signal start event (Fig. 17).Fig. 17 Select the ID of the employee record
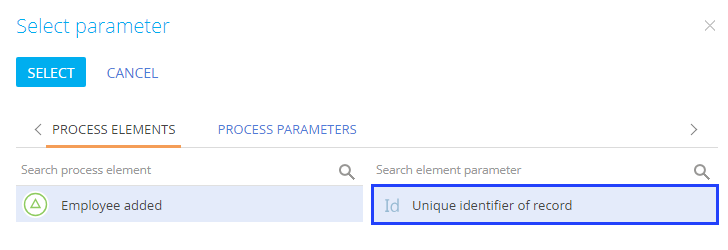
-
Select “Template message” in the What is the message? field.
-
Select a pre-configured template in Template message field. In this case, select a “Welcome on board” template.
-
Specify the record whose field values will be used as macros in the selected template in the Record for macros field. The type of record depends on the object specified in the Macro source field on the email template edit page (Fig. 18).
Fig. 18 Macro source field on the email template edit page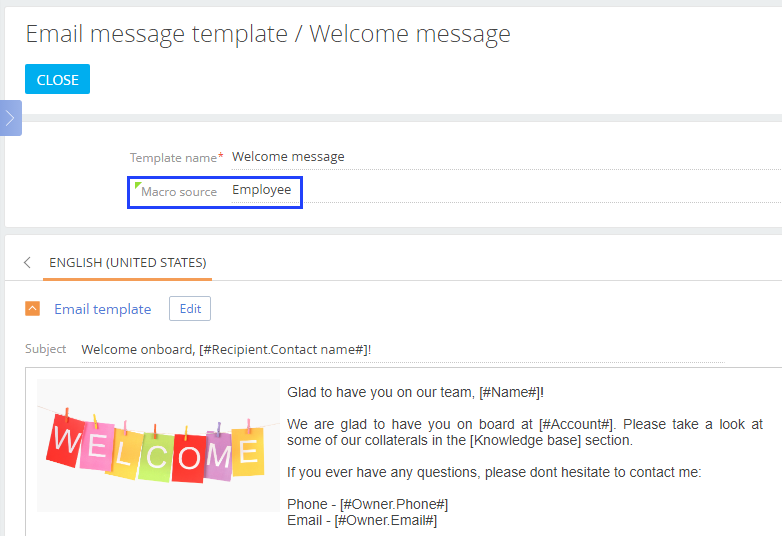
In this case, since the template uses the “Employee” object, specify the ID of the employee record similarly to the To field.
-
Save the process diagram.
As a result, an email template will be sent as part of a business process. In this case, a “Welcome on board” email will be sent to all new employees after they are added in Creatio.
Specify recipients or senders in the Send email element
In the Send Email element, the values of the From and To fields are specified similarly to any other element or process parameter. You can select any available value or process parameter by clicking  in these fields. However, there are certain specifics when it comes to selecting senders and recipients or using process parameters as values of these fields.
Select the email sender
The value of the From field is a mailbox. You can select any of the mailboxes synchronized with your Creatio application, i. e., any mailbox registered in Creatio with login and password data. For example, you can set up a separate mailbox that sends notifications as part of a business process, then select it in the From field (Fig. 19).

Additionally, you can map any process parameter whose value is selected from the Mailbox synchronization settings lookup to the From field. Learn more: Use process parameters.
Select email recipients
You can specify the email recipients in the To field using the following methods:
-
Enter the email manually. For example, “johnbest@gmail.com.” Note that you cannot specify several addresses in one field this way. To add another recipient, click + and enter the new address in the new field.
-
Map another parameter of the lookup type that uses Account or Contact lookup. To do this, click
 in the To field and select Contact/Account → Process parameter. For example, you can select a “Contact” parameter from a preceding Activity process element (Fig. 20). The email of this contact will be pulled from its Communication options detail.Fig. 20 Selecting a contact from the Activity process element
-
Select a specific account or contact. To do this, click
 in the To field and select Contact/Account → “Lookup value,” then select the needed account or contact from the list.
 -
Map a text parameter that contains an email address. For example, you can select a manually created “Email” text parameter from the Auto-generated page process element (Fig. 21). In this case, the parameter is filled out by a user once the auto-generated page opens, and can be used in the To field as a recipient’s email address.
Fig. 21 Selecting an email from the Auto-generated page process element
-
Select system settings whose values are email addresses (text), accounts, or contacts. For example, “1st-line support.”
-
Select an account or contact email address of the user who runs the process. To do this, click
 in the To field and select Contact/Account →“Current user account” / “Current user contact.”
Depending on the selected option, the Send Email element will use the mailbox specified in the From field to send an email to the recipient(s) specified in the To field.
Auto-link emails to existing Creatio records
In Creatio, each email or draft created on execution of the Send Email element can be linked to other Creatio objects, meaning that an email can be linked to an account, contact, document, etc.
By default, the emails are linked to account or contact specified in the To field of the Send email element. If you specify a contact record whose Account field is populated, the email will be linked to the corresponding account as well.
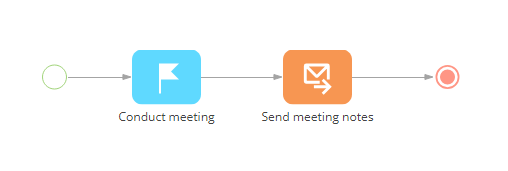
For example, during a process of meeting with the customer (Fig. 22) a “Meeting minutes” email must be sent after the meeting. In addition to the customer contact and account, which will be linked by default, you can also link the email to the opportunity related to the meeting.
To link an email to other Creatio records:
-
Select the Send Email element on the diagram.
-
Click
 in the Email connections area and select one or more types of records to link to the sent email (Fig. 23). For example, to link the email to opportunity, select the Opportunity field.Fig. 23 Select the record type
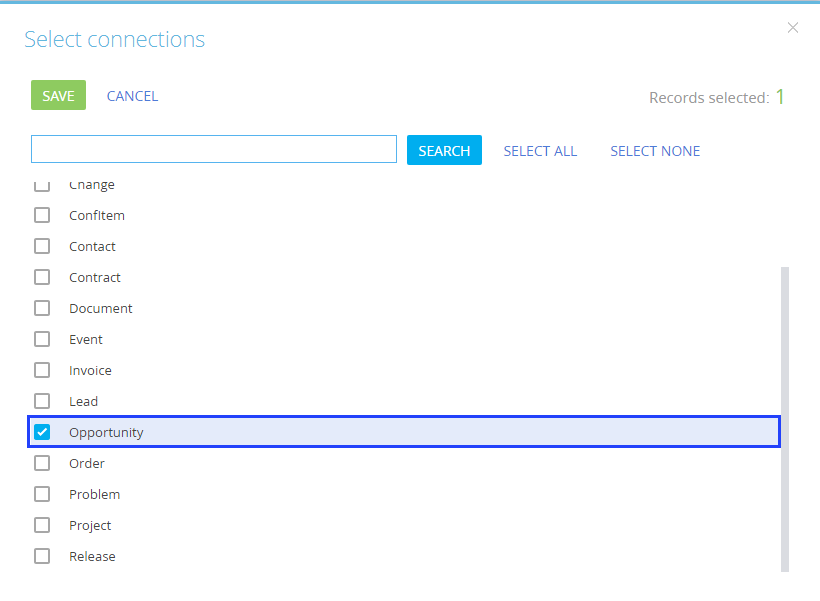
-
Fill out one or more fields in the Email connections block. You can link the email to a specific record or map the field to another parameter of the corresponding type. To do this:
-
Click
 in the Email connections field next to the connected record type field and select Process parameters from the list.
 -
Select the needed parameter in the window that opens. For example, to connect the “Meeting minutes” email to the opportunity that was specified in the meeting activity, select that activity in the Process element column, and its Opportunity parameter (Fig. 24).
Fig. 24 Select the opportunity parameter of a process element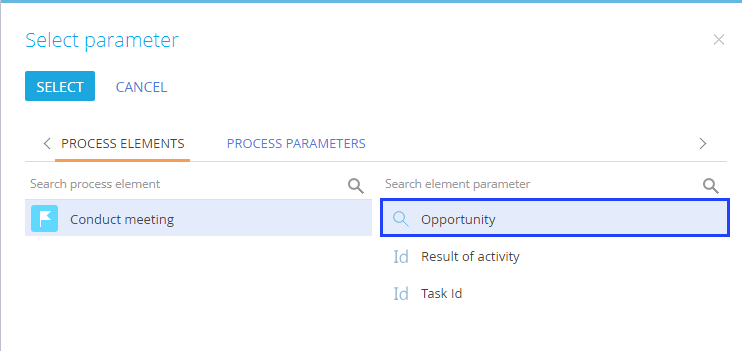
-
As a result, whenever an email is sent according to this process, the corresponding fields in the Connected to field block of the email page will be populated automatically. Additionally, email links will be displayed on the Email tab of the communication panel (Fig. 25).