Chat workflow
Creatio routes every omnichannel chat — from the chat widget on your company website, WhatsApp, SMS, Telegram, or Facebook Messenger — into the Agent Inbox, the panel where agents accept, read, and reply to conversations without leaving whatever section of Creatio they're working in. This article covers the Agent Inbox: its layout, where each action lives, and what happens to a chat as an agent moves it through its lifecycle.
Creatio creates a new chat for an incoming private message from a new customer, or for a new message from an existing customer with no current active chat; otherwise, the message lands in the already active chat.
Creatio auto-creates or matches contacts based on the incoming channel, except for web chat, where visitors always start anonymous:
- A customer sent their first message using a company page, Telegram bot, WhatsApp, or SMS, and no Creatio contact has a matching Facebook user ID, Telegram user ID, or phone number from the incoming message.
- Creatio populates the new contact's name, profile picture, and ID (Facebook, Telegram) or phone number (WhatsApp, SMS).
- Web chat visitors aren't matched to a contact automatically. Their chats show "Unknown contact" instead of a contact name until you link the chat to a contact — see Link the chat to another contact below.
Messages from the same Creatio contact, sent from different contact IDs within the same channel, are combined into a single chat — for example, if a customer messages support from multiple WhatsApp accounts listed under the same Creatio contact, you see the entire communication history in one place.
This routing logic happens before a chat ever reaches an agent and isn't part of the Agent Inbox interface itself; see Set up chat routing for the underlying configuration.
Creatio also lets existing customers continue processing chats in the older communication panel, for backward compatibility. We recommend using the Agent Inbox instead — new chat functionality is added here going forward, not to the communication panel.
Open the Agent Inbox and change your status
The Agent Inbox is available from its own icon in the top toolbar, next to the AI assistant icon. It opens as a docked side panel with the following tabs:
- Real-time — chats currently awaiting a reply or being worked on.
- Queued tasks — records distributed through Creatio's queue mechanism, such as cases or orders — not chats.
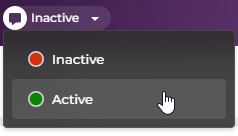
Your agent status determines whether you can receive and process chats. This toggle controls only your chat availability — a separate toggle controls your availability for inbound calls.
- "Active" — you can see new messages and chats, process them, and send responses.
- "Inactive" — you can only see previously received chats, process them, and send responses. Creatio doesn't distribute new chats to inactive agents.
Out of the box, your status is "Inactive" right after login — switch it to "Active" from the dropdown next to your avatar in the top panel to start receiving chats. When you log out and close the session, Creatio automatically switches your status back to "Inactive."
Find chats in the Agent Inbox
Inside the Real-time tab, the Agent Inbox groups chats into the following collapsible sections:
- New items — chats awaiting acceptance. Each tile shows the contact's avatar, name, the time of the last message, a preview of that message, and an unread-message counter. Hover over a tile to reveal the Accept button.
- In progress — chats you've already accepted and own. Click a tile to open the full conversation in the same panel.
When a new message arrives, the Agent Inbox panel opens automatically and plays a sound notification; if you've allowed browser notifications, you also get a desktop notification.
Administrators can customize this behavior for your team:
- Which panel opens by default for chat processing, via the "Default panel for chat processing" (
DefaultPanelForChatProcessingcode) system setting. - The notification sound and alert style. Learn more: Set up chat routing.
Response overdue indicators
A real-time timer appears directly on a chat tile in the Agent Inbox once a response is overdue, based on queue-specific settings:
- First response time, minutes — time allowed before the first agent reply.
- Ongoing response time, minutes — time allowed between subsequent replies.
Learn more: Set up chat routing.
The overdue timer counts how long the response has been overdue since the customer's last message and resets once you reply.
Accept a chat
Click Accept on a tile in New items to become the chat's owner and move it into In progress. The chat opens in the panel with:
-
A header row with Back (return to the chat list), a transfer icon, a quick action icon, and a Complete button.
-
The contact's name next to a chevron. Out of the box, the contact block is collapsed; click the chevron to expand it and see (in addition to a link to the full contact page):
- Link to another contact button
- Chat channel
- Business phone
- Mobile phone
Administrators can customize which fields appear here.
-
The message thread with text messages and shared files.
-
The message input field at the bottom.
Reply in the chat
Type a reply or attach files directly from the message input field at the bottom of the chat. You can attach up to 10 files per message. What you can attach is limited by:
- the "File extensions DenyList" (
FileExtensionsDenyListcode) and "Attachment max size" (MaxFileSizecode) system settings - channel-specific restrictions
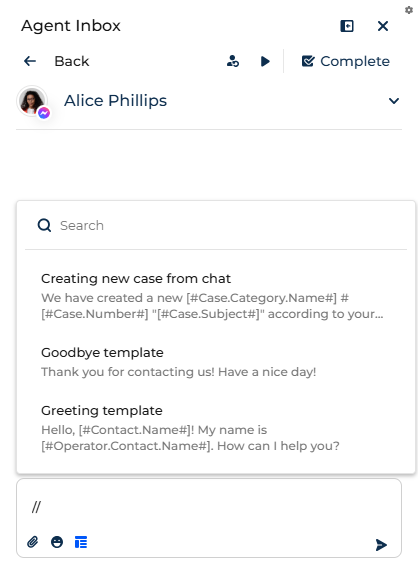
To insert a message template without leaving the input field, click the template icon, or type // and enter the name or text of the template. A search list of matching templates opens above the input field, showing each template's name and a preview of its text — select the one you need. The template you last used moves to a Recently used group at the top of the list next time you open it.
If you navigate away from a chat before sending your reply, Creatio saves it as a draft automatically. The draft reappears in the input field the next time you open that chat in the Agent Inbox.
Link the chat to another contact
If you identify the real customer behind a chat — most commonly a web chat conversation, since visitors always start anonymous — you can relink the chat without losing its history:
-
Open the chat in the Agent Inbox.
-
Expand the contact block (click the chevron next to the contact name) and click Link to another contact. This opens the Select: Contact window.
-
Select the required contact.
-
Confirm linking.
Creatio asks you to confirm with the "All chats of the current contact will be linked to the selected contact, and the current contact will then be deleted. Do you want to proceed?" message.
As a result:
- Creatio links the chat to the selected contact.
- All messages in the chat are associated with the selected contact's profile.
- The previously linked contact record is removed.
- The contact block and the messages in the chat update without refreshing the page.
Administrators can customize relinking behavior in the "Link chat to contact" business process.
Transfer the chat to another agent or queue
If a chat needs different expertise or should be handled by another team, transfer it from the chat header:
-
Open the chat in the Agent Inbox.
-
Click the transfer icon in the chat header. This opens a window with a search field and the following tabs.
-
Select one of the tabs:
- Agent tab — lists individual agents with their current status ("Active," "Inactive," or "Chats exceeded") next to each name.
- Queue tab — lists queues with the number of available agents in each, excluding you.
noteCreatio sets the "Chats exceeded" status automatically if the number of chats an agent is processing equals the value of the "Simultaneous Chats" (
SimultaneousChatscode) system setting. Out of the box, this is 5 chats. This status only appears in the agent list during chat transfer and can't be set manually. -
Select the required agent or queue.
As a result, Creatio completes the current chat for you and creates a child chat automatically. The chat becomes read-only and disappears from your In progress area once you deselect its tile. What happens next depends on how you transferred it:
- Transferred to a specific agent: the chat lands directly in that agent's In progress area with status "In progress."
- Transferred to a queue: the chat gets status "Waiting for processing" and appears in New items for the queue's agents until someone accepts it, based on the queue's routing rules; once accepted, its status becomes "In progress." Whoever opens the new chat can scroll up to see the parent chat's messages and continue the conversation with full context.
Run quick actions from the chat
The quick action icon in the chat header lets you trigger a predefined business process using data from the current chat, without switching away from the conversation:
- Open the chat in the Agent Inbox.
- Click the quick action icon in the chat header. This opens a list of configured actions — or, if none are configured for the channel, a message: No actions available. Please add chat actions on the Chat setting page.
- Select the required action.
As a result:
- Creatio launches the corresponding business process, using the current chat's data as input parameters.
- The chat stays open in the Agent Inbox so you can continue the conversation.
Administrators configure the available actions on the Chat Routing tab. Learn more: Set up chat routing.
Create a case from a chat
"Create case" is a preconfigured quick action — trigger it the same way as any other action described above. It's available for Creatio Service and Bank.AI.
Running it adds a new case with the following fields populated:
- Subject — text of the first chat message.
- Description — text of all incoming messages received before the agent's first reply.
- Source — "Chat."
- Registration date — the case creation date.
- Status — "New."
- Contact — the chat's contact.
- Account — the contact's account.
- Assignee — the chat agent.
View chats and analytics
Users with permission to read the "Chats" object can view both live and completed chats in the Chats section — useful, for example, for managers who need to assist without escalation, or to understand the context of an issue that spans multiple chats. All sent messages and files are also available on the Timeline tab of the corresponding contact page.
The Chats section also lets you view detailed chat information, group chats by different parameters, review customer communication history, analyze case dynamics for a specific period, and view agent workload and chat processing rate.
The Closure reason column shows how a chat was completed:
- "Completed by timeout" — the queue timeout or AI timeout completed the chat automatically.
- "Completed by agent" — an agent completed the chat manually.
- "Completed by end user" — a web chat visitor completed the chat from the chat widget by starting a new chat.
- "Transferred" — the chat was completed because it was transferred to another agent or queue.
Chats completed before this column was introduced have no closure reason. To view the closure reason, add the Closure reason column to the list in the Chats section.
Translate chat messages
If your administrator has enabled translations, a translate icon becomes available in the chat header so you can converse with customers across languages without leaving the Agent Inbox.
Creatio detects the language of incoming messages automatically when a chat arrives. You see both the detected and target languages in the chat header; the target language comes from your profile, but you can change either manually.
To enable translation for the chat you're viewing:
- Open the chat in the Agent Inbox.
- Click the translate icon in the chat header. This opens the chat translation panel with the source language auto-detected and the target language pre-filled with your own language — both are editable.
- Click Translate in the panel.
As a result, all new incoming messages in the chat are translated automatically, and your outgoing messages are translated automatically before being sent.
To translate an earlier incoming message, point to it and click Translate; the button changes to Show original so you can switch back. For outgoing messages, click Translate in the message input field to translate what you've typed, or, once automatic translation is active, click Send without translation to send a message in your original language.
From the Agent Inbox's translation panel, you can also:
- Turn off automatic translation for the current chat with Cancel.
- Toggle any message between its original and translated text.
- Choose whether to translate each outgoing message before sending it.
- Show or hide the translation panel in the chat header.
Complete the chat
Click Complete in the chat header to close a conversation you're done with, or let the queue's Chat timeout, minutes setting complete it for you automatically after a period of inactivity. You can complete a chat at any time without waiting for the timeout.
As a result:
- The chat becomes read-only.
- The chat disappears from your In progress area once you deselect its tile.
- A system message confirming completion is added to the chat.
- The chat's closure reason is "Completed by agent" or, if the timeout completed the chat, "Completed by timeout."
- If the customer sends a new message after completion, Creatio creates a new chat and adds it to the corresponding processing queue.
For web chat specifically, the visitor can also end the conversation from their side by clicking  in the chat widget header. Creatio completes the previous chat with the "Completed by end user" closure reason, and the visitor's next message shows up in your Agent Inbox as a separate, new chat rather than a reopened one.
Monitor message delivery status
Every outgoing message you send from the Agent Inbox shows a delivery status right in the conversation, updated automatically as the channel's provider reports back. Point to the status indicator on any message for a tooltip: successful statuses show the status name, failed ones show the failure reason.
Available statuses depend on the channel:
- Telegram: "Sending," "Sent," or "Failed."
- WhatsApp and SMS: "Sending," "Sent," "Delivered," "Read," or "Failed."
Creatio keeps the status and, where relevant, the failure reason for every message you send.
See also
Inbound customer communications
Get started with the Contact Center app
Handle sensitive data shared by customers during chat sessions (developer documentation)
Integrating custom translation providers for chats (developer documentation)