Call workflow
Voice interactions require structured handling to ensure accurate identification, smooth communication, and proper documentation.
Receive an inbound call
When a call is routed to you, it appears at the top of the In progress area on the Real-time tab of Agent Inbox. The call tile displays the following:
- caller name if identified
- phone icon
- timestamp
- time indicator
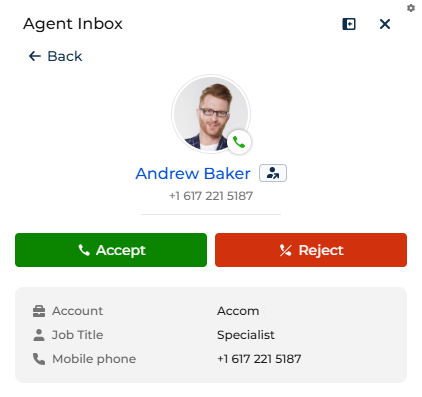
The following happens until you accept the call:
- The time indicator shows waiting time (time to connect to the agent).
- The caller is waiting in queue.
- No additional calls are routed to you.
If the caller number matches:
- A single contact: Creatio displays the contact name.
- Multiple contacts: Creatio displays the phone number and you can select the contact manually.
- No match: Creatio displays only the phone number.
Accept the call
Once a call comes through, Creatio opens the call control automatically. Click Accept to accept the call. As a result:
- Creatio connects you to the customer.
- Creatio switches the timer to conversation length.
- The call remains pinned at the top of the In progress area.
- Voice capacity becomes locked, i.e., you cannot have any other active calls.
Identify or change the contact
Creatio attempts to match the phone number to a contact or account automatically. If identification is incorrect or incomplete, you can modify it by clicking  . For example, update the contact when:
- Creatio matched the wrong person.
- The caller uses a shared company number.
- The caller represents a different department.
Use Creatio.ai during the call
You can use Creatio.ai while speaking with the caller. This lets you reduce manual navigation, personalize the conversation, and improve resolution speed. Creatio.ai has access to the following call metadata:
- call ID
- caller number
- contact
- account
You can use prompts in natural language, for example:
Show previous cases for this customer.Summarize recent interactions.List open issues for this account.What was discussed in the last call?
AI assistance does not replace documentation entirely. Wrap-up actions are still required.
Transfer a call
You can transfer calls if they must be handled by another agent or department, for example, as part of an escalation. To transfer a call:
- Click
 in the call control.
 - Search for another agent or queue (if supported).
- Click the agent or queue.
As a result, the call leaves your In progress list. Ownership of further conversation moves to the receiving party. Interaction history remains stored.
Depending on telephony configuration, the transfer might be:
- blind, i.e., immediate
- attended, i.e., consultation takes place before transfer
End the call
Click  when the conversation is complete. This stops the live timer and begins the wrap-up phase.
Wrap up the call
Wrap-up ensures structured documentation of the interaction. You can do the following during wrap-up:
- Link the call to an existing case.
- Update call result.
- Add comments or notes.
- Adjust contact information.
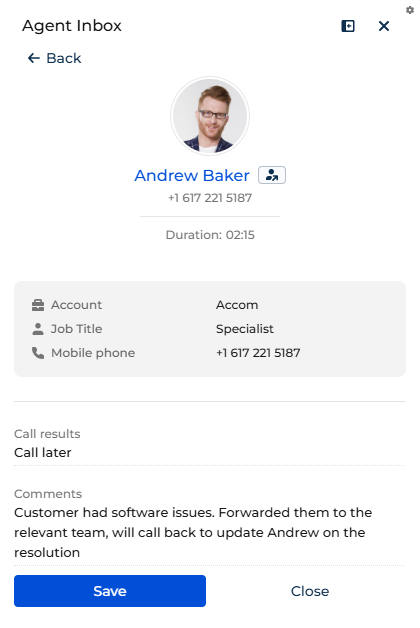
When you start filling out call result or call notes, the wrap-up mode is changed to manual wrap-up to give enough time to finish the work. Otherwise, the automatic wrap-up timer is 30 seconds out of the box. System administrators can adjust it in the "Call wrap up period" (CallWrapUpPeriod code) system setting. Learn more: Manage system settings. After the timer expires, Creatio ends the session automatically.