


How to add custom logic to the existing controls
Glossary Item Box

Introduction
Controls are objects used to create an interface between the user and a Creatio application. For example, buttons, fields, checkboxes, etc,
All controls in Creatio are inherited from the Terrasoft.controls.Component class. Full list of classes that implement Creatio components is available by link in the “JavaScript API for platform core”.
According to the Open–closed principle, you cannot add custom logic to the existing control. For this you need to create a new class that inherits functions of the existing class of the control. And implement new functions in the successor class.
Steps to add new functions:
1. Create new client module.
2. In the client module, declare a class that inherits the existing control. Implement necessary functions in the class.
3. Add a new item to the Creatio interface.
Case description
Create control which enables to enter only integer values in the specified range. Perform the checking of the entered value by pressing the Enter key and display the corresponding message if the number is outside the range. Use the Terrasoft.controls.IntegerEdit control as parent.
Source code
You can download the package with case implementation using the following link.
Case implementation algorithm
1. Create a client module
The procedure for creating a custom schema is covered in the “Creating a custom client module schema”.
Run the [Add] – [Module] menu command on the [Schemas] tab of the [Configuration] section.
Specify following properties of the schema:
- [Name] – “UsrLimitedIntegerEdit”
- [Title] – "UsrLimitedIntegerEdit"
Add the following source code to the schema:
// Declaration of the module.
define("UsrLimitedIntegerEdit", [], function () {
});
2. Create a class of the control
Modify the source code according to the example below.
define("UsrLimitedIntegerEdit", [], function () {
    //  Declaration of the class of the control.
    Ext.define("Terrasoft.controls.UsrLimitedIntegerEdit", {
        // Base class.
        extend: "Terrasoft.controls.IntegerEdit",
        // Alias (abbreviated name of the class)..
        alternateClassName: "Terrasoft.UsrLimitedIntegerEdit",
        // The smallest allowed value.
        minLimit: -1000,
        // The highest value allowed.
        maxLimit: 1000,
        // A method for checking for an occurrence in the range of valid values.
        isOutOfLimits: function (numericValue) {
            if (numericValue < this.minLimit || numericValue > this.maxLimit) {
                return true;
            }
            return false;
        },
        // Override the method of the event handler for pressing the Enter key.
        onEnterKeyPressed: function () {
            // Call the basic functionality.
            this.callParent(arguments);
            // Get the entered value.
            var value = this.getTypedValue();
            // Reduction to a numberic type.
            var numericValue = this.parseNumber(value);
            // Check for occurrence in the range of acceptable values.
            var outOfLimits = this.isOutOfLimits(numericValue);
            if (outOfLimits) {
                // Form the warning message.
                var msg = "Value " + numericValue + " is out of limits [" + this.minLimit + ", " + this.maxLimit + "]";
                // Modify the configuration object to display a warning message.
                this.validationInfo.isValid = false;
                this.validationInfo.invalidMessage = msg;
            }
            else{
                // Modify the configuration object to hide the warning message.
                this.validationInfo.isValid = true;
                this.validationInfo.invalidMessage ="";
            }
            // Call the logic for displaying the warning message.
            this.setMarkOut();
        },
    });
});
NOTE
You can use the logic of the onEnterKeyPressed() method in the in the onBlur() event handler.
Save the schema.
Ecxept the extend and alternateClassName standard properties, the minLimit and maxLimit properties that specify the range of allowed values are added to the class. Default values are used for these properties.
The required control logic is implemented in the onEnterKeyPressed override method After calling the base logic in which the generation of the value change events is performed, the entered value is checked for validity. If the number is not valid, the corresponding warning message is displayed in the input field. The isOutOfLimitsmethod is provided to check the occurrence of the entered value in the range of allowed values.
ATTENTION
With this implementation, despite the output of the corresponding warning, the entered value is still stored and transferred to the schema view model in which the component will be used.
3. Add the control to the Creatio interface
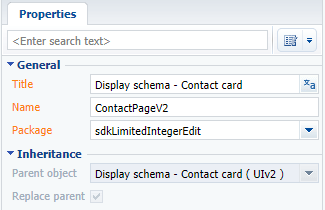
To add the created control to the Creatio, create the replacing schema, for example, the contact record page. Create a replacing client module and specify the [Display schema – Contact card] (ContactPageV2) schema as parent object (Fig. 1). Creating a replacing page is covered in the “Creating a custom client module schema” article.
Fig. 1. Properties of the replacing edit page
Add the following source code to the schema:
// Declaration of the module. Be sure to specify the dependency // of the module in which the class of the control is declared. define("ContactPageV2", ["UsrLimitedIntegerEdit"], function () { return { attributes: { // Attribute associated with the value in the control. "ScoresAttribute": { // Attribute data type is integer. "dataValueType": this.Terrasoft.DataValueType.INTEGER, // Attribute type is a virtual column. "type": this.Terrasoft.ViewModelColumnType.VIRTUAL_COLUMN, // The default value. "value": 0 } }, diff: /**SCHEMA_DIFF*/[ { // The type of operation is the addition. "operation": "insert", // The name of the container to which the control is added. "parentName": "ProfileContainer", // The name of the property in the container to which you want to add // instance of the control. "propertyName": "items", // The name of the control. "name": "Scores", // Header. "caption": "Scores", // Values passed to the properties of the control. "values": { // The type of the control is the component. "itemType": Terrasoft.ViewItemType.COMPONENT, // The name of the class. "className": "Terrasoft.UsrLimitedIntegerEdit", // The value property of the component is associated with the ScoresAttribute attribute. "value": { "bindTo": "ScoresAttribute" }, // Values for the minLimit property. "minLimit": -300, // Values for the maxLimit property. "maxLimit": 300, // The location of the component in the container. "layout": { "column": 0, "row": 6, "colSpan": 24, "rowSpan": 1 } } } ]/**SCHEMA_DIFF*/ }; });
Save the schema.
The added ScoresAttribute attribute contains the value connected to the value entered in input field of the control. You can use an integer column of the object connected to the view model of the record edit page instead of the attribute.
The configuration object determining the values of the properties of control entity is added to the diff array. The value of the “value” property is connected to the ScoresAttribute attribute. The values that specify a valid input range are assigned to the minLimit and maxLimit properties.
ATTENTION
If the minLimit and maxLimit properties are not explicitly specified in the configuration object, the default range (-1000, 1000) will be applied.
As a result, the integer field will be added to the contact record page (Fig. 2). The warning message will be displayed in the field if the invalid message will be entered (Fig. 3).
Fig. 2. Case result

Fig. 3. Displaying of warning message
