Creating a new section
Glossary Item Box

Introduction
One of typical development tasks in Creatio is that of adding a new section. Use section wizard to implement this. The section wizard enables you to set up base properties of sections, pages, business rules and DCM cases.
The result of the performed settings will be object and section page schemas, added to the current custom package (table 1.2).
Table 1. Object schemas created by the section wizrad
| Naming rules | Purpose | Parent |
|---|---|---|
| [Section object name] | Primary section object | Base object (BaseEntity) |
| [Section object name] Folder |
Object group. Utility object for the correct groupage of section records. Forms the overall section folder tree. |
Base folder (BaseFolder) |
| [Section object name] InFolder |
Object in the group. Utility object for the correct operation of section record groupage. Defines links between the section records and folders they belong to. |
Base element in the group (BaseItemInFolder) |
| [Section object name] File | Object for the [Attachments] detail. | File (File) |
| [Section object name] Tag | Section tag. | Base tag (BaseTag) |
| [Section object name] InTag | Tag in the section object. | Base tag in the base object (BaseEntityInTag) |
Table 2. Client schemas created by the section wizard
| Naming rules | Purpose | Parent |
|---|---|---|
| [Section object name] Section | Section schema |
Base section schema (BaseSectionV2) |
| [Section object name] Page | Section edit page schema | Section edit page base schema (BaseModulePageV2) |
Section wizard and the [Custom] package
Section wizard does not only create different schemas but also links data to the current package. However, it is almost impossible to transfer the linked data to another custom package if your current package is the [Custom]. The [Custom] package is not used for committing to the version control system and transferring the changes to other environments. That is why the [Custom] package is not recommended to use as the current custom package. Learn more about the [Custom] package in the “Package [Custom]” article.
NOTE
To change the current package, use the [Current package] system setting (CurrentPackageId). We recommend you to check this system setting value before you run the section wizard.
Sequence of actions for adding a section
- Create a section using the section wizard and add the necessary workplace.
- Add the necessary columns to the section object schema and display them on the record list, on the edit page and in details.
Case description
Add a [Car showroom] workplace to the application. Add a [Trucks] custom section to the created workplace. The “trucks” object schema must contain the following obligatory fields:
- Name – a string.
- Owner – the [Contact] lookup.
- Organization – the [Account] lookup.
- Price – a string.
Case implementation algorithm
1. Create a section using the section wizard and add it to the necessary workplace.
Creating a workplace is covered in the "Workplace setup” article. Indicate the [Name] – “Car showroom” for the new workplace and add a group of users who will have access to the created workplace.
Section wizard operation is covered in the "Section wizard” article. Use the first section wizard step to create a new section. The [Name] column with the“string’ type and columns inherited from the base object will be added to the primary section object. For the initial section setup, populate the following values at the first wizard step:
- [Code] – "UsrTruck";
- [Title] – “Trucks”.
ATTENTION
The section object name populated in the [Code] field of the section wizard should not contain prefixes "Base", "Sys" and "Vw". Neither should it contain suffixes "InFolder", "Lcz", "Lookup" and "Settings". Otherwise, you will not be able to set up import from Excel for this object..
NOTE
If you work with Creatio default settings, you will receive a notification that the value should start with the “Usr” prefix when you populate the [Code] field. The prefix value is indicated in the [Prefix for object name] system setting (SchemaNamePrefix). You can customize the prefix value if needed. We do not recommend to use an empty string as a prefix because of possible name matches with other base configuration elements.
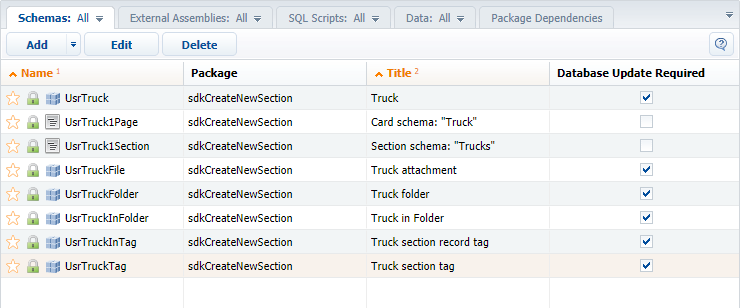
As a result, you will create all schemas that are necessary for section operation in the custom package (fig.1).
Fig. 1. – The [Trucks] section schemas in the custom package

2. Add the necessary columns to the section object schema and display them.
There are two ways to add new columns to the object schema:
1. Create a new column via the section wizard and add it to the edit page immediately. The column will be automatically added to the section primary object schema. Setting up the section record edit page fields is covered in the "How to set up page fields” article.
2. Add a column to the section primary object schema via object designer in the [Configuration] section. Add columns to the page via the section wizard. You can learn more about the [Configuration] section capabilities in the "Built-in IDE. The [Configuration] section” article.
Since the section wizard is involved in any case, using the first way is more convenient.
The [Name] column is created and added to the section pages automatically by the section wizard.
Populate the following properties for the rest of columns:
| Column | Type | Title | Name in DB |
|---|---|---|---|
| Owner | The [Contact] lookup | Owner | UsrOwner |
| Organization | The [Account] lookup | Organization | UsrOrganization |
| Price | Decimal | Price, USD | UsrPrice |
Select the [Is required] checkbox for all columns.
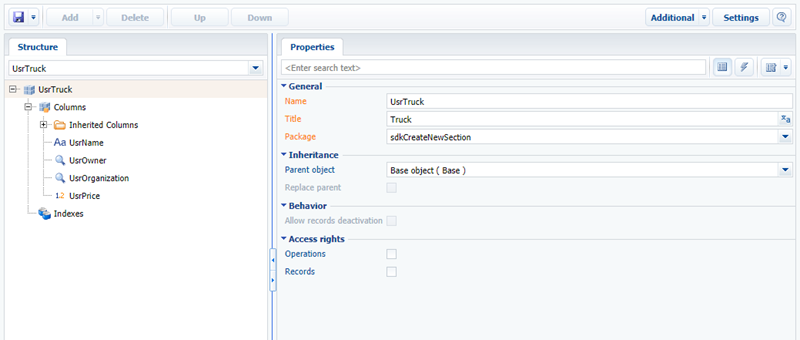
New columns will be added to the UsrTruck object schema after you save the changes in the section wizard (fig.2) and the corresponding configuration objects will be added to the diff modification array of the UsrTruckPage edit page schema.
Fig. 2. – The [Trucks] section primary object schema.

Display the columns on the section record list. Select the [Select fields to display] command in the list’s [View] menu to open the column setup page. Section column setup is covered in the "Setting up columns” article.
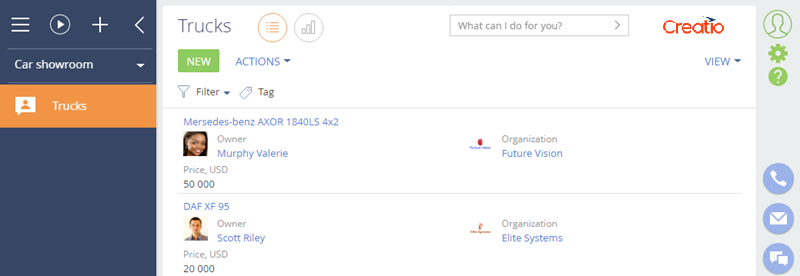
After you add new records, the section will look as follows (fig.3):
Fig. 3. – The [Trucks] section in the [Car showroom] workplace.


