ClientMessageBridge. The client-side WebSocket message handler
Glossary Item Box

General information
The ClientMessageBridge schema is used to broadcast messages received via WebSocket. If additional logic in the extending ClientMessageBridge schemas wasn't specified for each message received via WebSocket, a broadcast is used to send messages within the system through the SocketMessageReceived sandbox. After subscribing to a message, you can easily process the data received through WebSocket.
For additional message handling, it is necessary to implement an extending schema before publishing and changing the message name. Using the available API, you can configure specific message types in the extending schema.
Setting up a new subscriber example
Case description
When a contact is saved, you need to publish a message with the NewUserSet name that contains information about the contact's birth date and name on the server side. On the client side, you must implement the NewUserSet messaging within the system. Additionally, before messaging, you must process the birthday message property received through WebSocket, and you must invoke the afterPublishUserBirthday utility class method after messaging. Finally, you need to implement the subscription to a message sent on the client side, for example, in the schema of the contact edit page.
Case implementation algorithm
1. Create the replacing [Contact] object
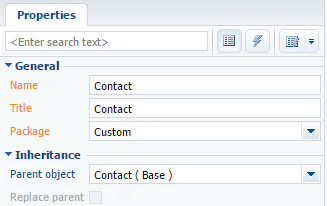
Before adding message publishing via WebSocket, you have to create a replacing object and set the [Contact] as a parent (Fig. 1).
Fig. 1. Creating the replacing [Contact] object
2. Create the "Record saved" event
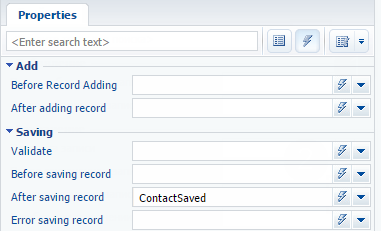
Next, you need to add message publishing via WebSocket after the contact record has been saved. To do this, go to the tab with the object events (Fig. 2, 1) and click the "Record saved" button (Fig. 2, 2).
Fig. 2. Creating the "Record saved" event
3. Implement event subprocess in the "Record saved" event
In the Record Saved event handler, implement the event subprocess which is run by the ContactSaved message. To do this:
- Add an event subprocess element (Fig. 3, 1);
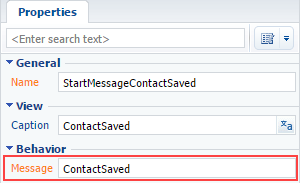
- Add a message element (Fig. 3, 2), setting ContactSaved as the message name (Fig. 4);
- Add a script element (Fig. 3, 3);
- Connect the message object and script (Fig. 3, 4).
Fig. 3. Creating message handler subprocess
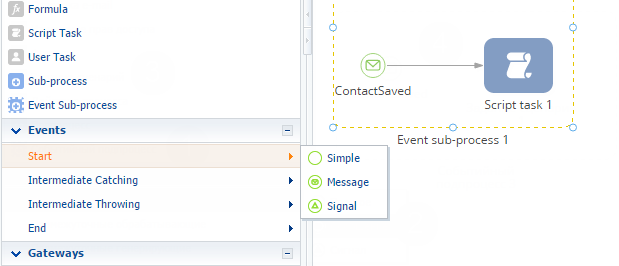
Fig. 4. Initial message properties
4. Add message publication logic through WebSocket
To do this, double-click to open the [Script-task] event subprocess and add the following source code:
// Receiving contact name
string userName = Entity.GetTypedColumnValue<string>("Name");
// Receiving contact birth date.
DateTime birthDate = Entity.GetTypedColumnValue<DateTime>("BirthDate");
// Forming message text.
string messageText = "{\"birthday\": \"" + birthDate.ToString("s") + "\", \"name\": \"" + userName + "\"}";
// Setting message name.
string sender = "NewUserSet";
// Publishing message through WebSocket.
MsgChannelUtilities.PostMessageToAll(sender, messageText);
return true;
After that, save and close the tab containing the [Script-task] element source code, and then save and publish the whole event subprocess.
5. Implement message sending inside the application
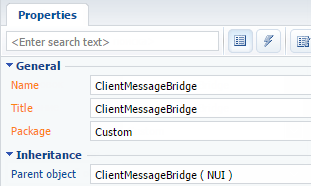
To do this, create a replacing client module in a custom package(Fig. 5) and set the ClientMessageBridge of the NUI package as a parent object (Fig. 6).
Fig. 5. Creating a replacing client module
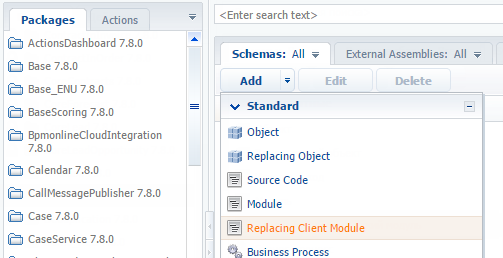
Fig. 6. Client module properties.
Read more about replacing client modules in the "Creating a custom client module schema" article.
To implement the distribution of messages NewUserSet within the system, it is necessary to add the following source code in the schema:
define("ClientMessageBridge", ["ConfigurationConstants"],
    function(ConfigurationConstants) {
        return {
            // Messages.
            messages: {
                // Message name.
                "NewUserSet": {
                    // Message type — broadcasting, without a specific subscriber.
                    "mode": Terrasoft.MessageMode.BROADCAST,
                    // Message direction — publication.
                    "direction": Terrasoft.MessageDirectionType.PUBLISH
                }
            },
            methods: {
                // Schema initialization.
                init: function() {
                    // Parent method calling
                    this.callParent(arguments);
                    // Adding new configuration object to the configuration object collection.
                    this.addMessageConfig({
                        // Name of the message received via WebSocket.
                        sender: "NewUserSet",
                        // Name of the message sent within the system.
                        messageName: "NewUserSet"
                    });
                },
                // Method executes after the message publication.
                afterPublishMessage: function(
                    // Name of the message sent within the system.
                    sandboxMessageName,
                    // Message contents.
                    webSocketBody,
                    // Message result
                    result,
                    // Message configuration object.
                    publishConfig) {
                    // Check whther the message matches the one added to the configuration object.
                    if (sandboxMessageName === "NewUserSet") {
                        // Saving the content to local variables.
                        var birthday = webSocketBody.birthday;
                        var name = webSocketBody.name;
                        // Displaying content in the console.
                        window.console.info("Published message: " + sandboxMessageName +
                            ". Data: name: " + name +
                            "; birthday: " + birthday);
                    }
                }
            }
        };
    });
Go the messages section and bind the NewUserSet broadcast message, which can only be published within the system. Go to the the methods section and restart the Init parent method to add the messages received via WebSocket in the configurational schema message object. To track messaging launch time, reload the afterPublishMessage parent method.
After the schema has been saved and the application page has been refreshed, the NewUserSet messages received via WebSocket will be sent within the system. Read more about debugging in the browser in the "Client code debugging" article.
6. Implement message subscription
To obtain an object transmitted via WebSocket, you must subscribe to NewUserSet messages in any scheme, for example, "Page contact V2". To do this, you need to create a replacing client module (see section 5), specifying the "Contact page display schema" as a parent object. To do this, add the following source code:
define("ContactPageV2", [],
    function(BusinessRuleModule, ConfigurationConstants) {
        return {
            //entitySchemaName: "Contact",
            messages: {
                // Message name.
                "NewUserSet": {
                    // Message type — broadcasting, without a specific subscriber.
                    "mode": Terrasoft.MessageMode.BROADCAST,
                    // Message direction — subscription.
                    "direction": Terrasoft.MessageDirectionType.SUBSCRIBE
                }
            },
            methods: {
                // Schema initialization.
                init: function() {
                    // Init() parent method calling.
                    this.callParent(arguments);
                    // Subscription to receiving the NewUserSet message.
                    this.sandbox.subscribe("NewUserSet", this.onNewUserSet, this);
                },
                // Receiving NewUserSet message event handler.
                onNewUserSet: function(args) {
                    // Saving the message content to local variables.
                    var birthday = args.birthday;
                    var name = args.name;
                    // Displaying content in the console.
                    window.console.info("Message received: NewUserSet. Data: name: " +
                        name + "; birthday: " + birthday);
                }

            }
        };
    });
Go the messages section and bind the NewUserSet broadcast message, which can only be published within the system. Go to the methods section and restart the Init parent method to subscribe to the NewUserSet message and indicate the onNewUserSet, method-handler that processes in the message and displays the result in the browser console.
After you have added the source code, you must save the schema and refresh the application page in the browser.
The result of the case is two informational messages in the browser console after you save the contact (Fig. 7).
Fig. 7. Browser console


