How to add a field with an image to the edit page
Glossary Item Box

Introduction
There are certain peculiarities of adding a field with image (contact’s photo, product picture, account logo, etc. ) to an edit page:
- The object column used for a field with image should have the “Link to image” type. Specify it as the [Image] system column of the object.
- Add the default image to the edit page image schema collection.
- A field with image is added to the diff edit page schema array with usage of the additional image-edit-container CSS-class container-wrapper.
- The values property of the configuration object containing settings of a field with image must include the following properties:
- getSrcMethod – method receiving image by link
- onPhotoChange – method called upon image modification
- Readonly – property defining the capability of image editing (changing, deleting)
- Generator – control element generator. Indicate the ImageCustomGeneratorV2.generateCustomImageControl for the field with image
- beforeFileSelected – method called before opening the image selection dialog box
- Add the following to the edit page schema collection:
- method receiving image by link
- method called upon image modification
- method saving the link to a modified image in the object column
- method called before opening the image selection dialog box
Case description
Adding a field with logo to the knowledge base article edit page.
Source code
You can download the package with case implementation using the following link..
Case implementation algorithm
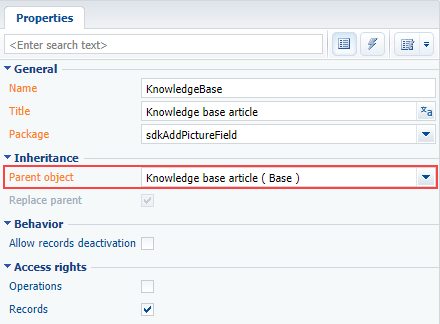
1. Creating the [Knowledge base] replacing object.
Create the [Knowledge base article] replacing object (Fig.1). Learn more about creating a replacing object in the “Creating the entity schema” article.
Fig. 1. Properties of the object replacing schema
2. Adding a new column to the replacing object.
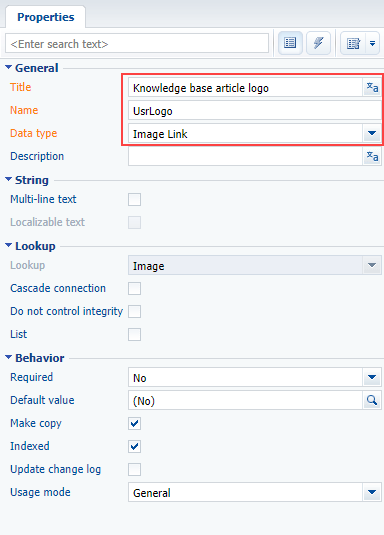
For the created column specify (Fig. 2):
- [Title] – "Knowledge base article logo”
- [Name] – "UsrLogo”
- [Data type] – "Image Link"
Fig. 2. Adding a custom column to the replacing object
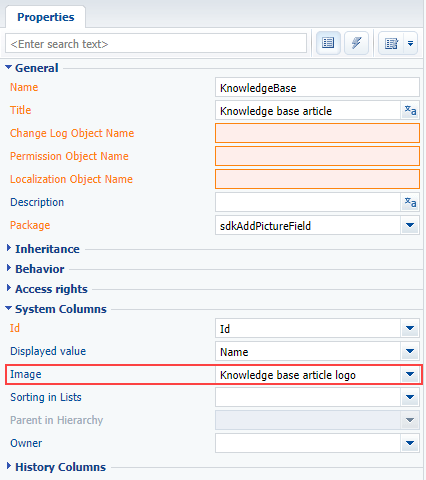
Indicate the created column as the [Image] object system column (Fig.3).
Fig. 3. Setting up the created column as the system column
 |
NOTE To view all object properties, switch to the object property advanced view mode. You can learn more about object designer capabilities in the "Workspace of the Object Designer” article. |
Save and publish the object schema after you set up all properties.
3. Creating a replacing client module for the edit page.
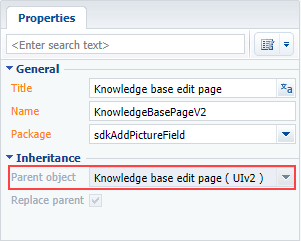
Create a replacing client module and specify the [Knowledge base edit page] (KnowledgeBasePageV2) as the parent object in it (Fig. 4). The procedure of creating a replacing page is covered in the“Creating a custom client module schema” article.
Fig. 4. Properties of the replacing edit page
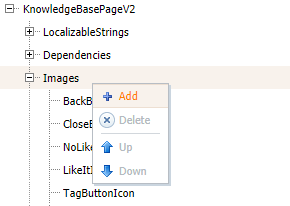
4. Adding a default image to the [Images] resources of the edit page schema.
Add the default image to the page replacing schema image collection (Fig.5).
Fig. 5. Adding default image to the image schema resources
For the created image specify (Fig. 6):
- [Name] – "DefaultLogo"
- [Image] – file containing the default image (Fig.7)
Fig. 6. Schema resource properties
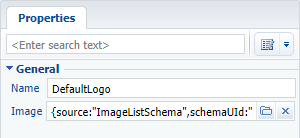
Fig. 7. Default image for the knowledge base article

5. Setting up displaying of a field with logo on the edit page
The field with logo should be placed in the upper part of the account edit page. In the base implementation the fields are placed in such a way that adding a logo can violate the page interface. That is why you need to rearrange the location of existing fields when locating a new field.
Add the configuration object of the filed with logo with the necessary parameters to the diff array property of the view model (see the source code below) and describe the modifications of the fields located in the upper part of the page: [Name], [ModifiedBy] and [Type].
The field with image is added to the page by using the additional PhotoContainer container-wrapper with the ["image-edit-container"] class.
6. Adding implementation of the following methods to the page view model method collection:
- getPhotoSrcMethod() – receives image by link
- beforePhotoFileSelected() – is called before opening the image selection dialog box
- onPhotoChange – is called upon image modification
- onPhotoUploaded() – saves the link to a modified image in the object column
The replacing schema source code is as follows:
define("KnowledgeBasePageV2", ["KnowledgeBasePageV2Resources", "ConfigurationConstants"],
    function(resources, ConfigurationConstants) {
        return {
            // Name of the edit page object schema.
            entitySchemaName: "KnowledgeBase",
            // Edit page view model methods.
            methods: {
                // Called before opening the image selection dialog box.
                beforePhotoFileSelected: function() {
                    return true;
                },
                // Receives image by link.
                getPhotoSrcMethod: function() {
                    // Receiving a link to the image in the object column.
                    var imageColumnValue = this.get("UsrLogo");
                    // If the link is set, the method returns the url of the image file.
                    if (imageColumnValue) {
                        return this.getSchemaImageUrl(imageColumnValue);
                    }
                    // If the link is not set, it returns the default image.
                    return this.Terrasoft.ImageUrlBuilder.getUrl(this.get("Resources.Images.DefaultLogo"));
                },
                // Processes the image modification.
                // photo — image file.
                onPhotoChange: function(photo) {
                    if (!photo) {
                        this.set("UsrLogo", null);
                        return;
                    }
                    // The file is uploaded to the database. onPhotoUploaded is called when uploading is finished.
                    this.Terrasoft.ImageApi.upload({
                        file: photo,
                        onComplete: this.onPhotoUploaded,
                        onError: this.Terrasoft.emptyFn,
                        scope: this
                    });
                },
                // Saves the link to a modified image.
                // imageId — Id of the saved file from the database.
                onPhotoUploaded: function(imageId) {
                    var imageData = {
                        value: imageId,
                        displayValue: "Image"
                    };
                    // The image column is assigned a link to the image.
                    this.set("UsrLogo", imageData);
                }
            },
            //
            diff: /**SCHEMA_DIFF*/[
                // Container-wrapper that the component will be located in.
                {
                    // Adding operation.
                    "operation": "insert",
                    // Parent container meta-name, where the component is added.
                    "parentName": "Header",
                    // The image is added to the component collection of the
                    // parent container.
                    "propertyName": "items",
                    // Schema component meta-name, involved in the action.
                    "name": "PhotoContainer",
                    // Properties passed to the component structure.
                    "values": {
                        // Element type — container.
                        "itemType": Terrasoft.ViewItemType.CONTAINER,
                        // CSS-class name.
                        "wrapClass": ["image-edit-container"],
                        // Locating in the parent container.
                        "layout": { "column": 0, "row": 0, "rowSpan": 3, "colSpan": 3 },
                        // Child element array.
                        "items": []
                    }
                },
                // The [UsrLogo] field — the field with account logo.
                {
                    "operation": "insert",
                    "parentName": "PhotoContainer",
                    "propertyName": "items",
                    "name": "UsrLogo",
                    "values": {
                        // Method receiving image by link.
                        "getSrcMethod": "getPhotoSrcMethod",
                        // Method called upon image modification.
                        "onPhotoChange": "onPhotoChange",
                        // Method called before opening the image selection dialog box.
                        "beforeFileSelected": "beforePhotoFileSelected",
                        // Property defining the capability of image editing (changing, deleting).
                        "readonly": false,
                        // Control element view-generator.
                        "generator": "ImageCustomGeneratorV2.generateCustomImageControl"
                    }
                },
                // Rearranging the location of the [Name] field.
                {
                    // Merge operation.
                    "operation": "merge",
                    "name": "Name",
                    "parentName": "Header",
                    "propertyName": "items",
                    "values": {
                        "bindTo": "Name",
                        "layout": {
                            "column": 3,
                            "row": 0,
                            "colSpan": 20
                        }
                    }
                },
                // Rearranging the location of the [ModifiedBy] field.
                {
                    "operation": "merge",
                    "name": "ModifiedBy",
                    "parentName": "Header",
                    "propertyName": "items",
                    "values": {
                        "bindTo": "ModifiedBy",
                        "layout": {
                            "column": 3,
                            "row": 2,
                            "colSpan": 20
                        }
                    }
                },
                // Rearranging the location of the [Type] field.
                {
                    "operation": "merge",
                    "name": "Type",
                    "parentName": "Header",
                    "propertyName": "items",
                    "values": {
                        "bindTo": "Type",
                        "layout": {
                            "column": 3,
                            "row": 1,
                            "colSpan": 20
                        },
                        "contentType": Terrasoft.ContentType.ENUM
                    }
                }
            ]/**SCHEMA_DIFF*/
        };
    });
The default logo will be displayed on the knowledge base article edit page after you save the schema and update the application page. When you hover over the image, you will see an action menu appear. You can use it to delete the image or set up a new one for a specific knowledge base article (Fig.9).
Fig. 8. Default logo

Fig. 9. Custom logo


