How to use process parameters in the email body
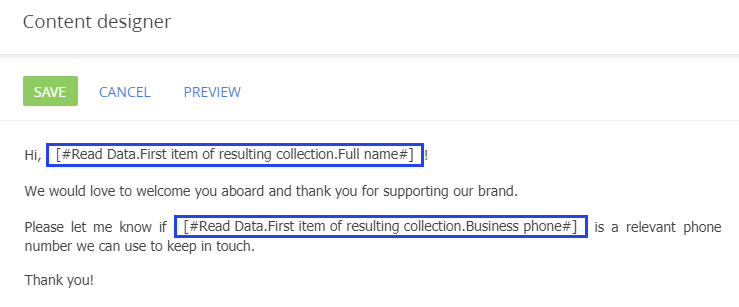
While setting up the [Send Email] element, you can use process parameters to personalize custom emails. This enables you to include specific information in the email body, such as the first name or the phone number of a contact created as part of the process workflow (Fig. 1).
Fig. 1 First name and phone number parameters used in the email body

Parameters are displayed in the email body in the form of macros, i.e. a code that gets replaced with information specific to each recipient. For example, the [#Read Data.First item of resulting collection.Full name#] macro (Fig. 1) represents the [Full name] parameter of the [Read contact data] element (Fig. 2). In the actual email this macro will be replaced with the first name of the contact created as part of the process workflow. Please refer to the following article to learn more about macros.
Note
In the [Send Email] element, process parameters can only be used if “Custom message” is selected in the [What is the message?] field, i.e. you cannot use them in email templates created outside of the [Send Email] element.
Any process parameter of the “text”, “date/time”, “integer” and “boolean” types can be used to form macros in a custom message. This enables you to use virtually any process parameter in the email body. For example, you can create a “welcome” email (Fig. 2) for all new contacts added to Creatio, and get their full name and business phone as macros in the email body.
Fig. 2 Business process diagram

To add process parameters to a custom message:
1.On the process diagram, add the elements whose parameters you are going to need. To get the field values of existing records, use the [Read Data] element. For example, read the data of the created contact.
To get the name and the business phone of the created contact, use the start [Signal] start event in connection with the [Read Data] element.
2.Add the [Send email] element and populate its [From] and [To] parameters.
3.In the [What is the message?] field of the [Send Email] element, select “Custom message”.
4.Hover your cursor and over the area under the [Subject] field and click  to open the content designer.
5.Add the necessary blocks to the custom message. For example, add a “Text” block.
6.Click anywhere in the working area of the content designer, and click the  button on the toolbar. (Fig. 3).
Fig. 3 Opening the parameter selection window in the content designer
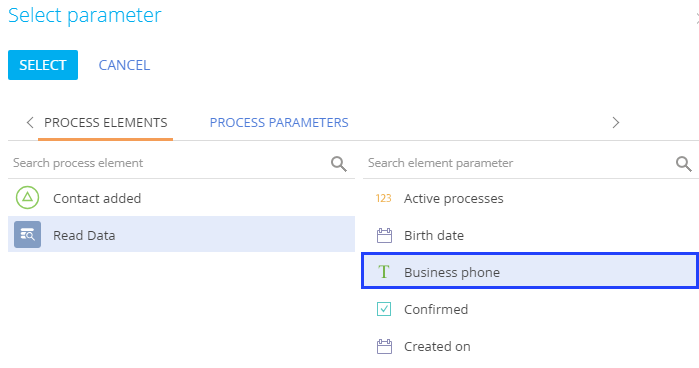
7.Select the necessary parameter in the selection window. In this case, add the “First name” and the “Business phone” (Fig. 4) parameters of the [Read Data] element to add their values to the email template body. The parameter will be placed at insertion point.
Fig. 4 Selecting a parameter to use as an email text macro

8.Save the changes in the content designer.
9.Populate other fields in the [Send Email] element and save the process.
As a result, the process will send emails whose text will contain values of the corresponding parameters. In this case, contact first name and the business phone will be dynamically received from all created contacts in Creatio.
See also


