


Once you add a [Block] element to a template and populate its sections and columns with other content designer elements, you can save this block in the Content block library for future use. The list of blocks from the content block library is displayed on the left side of the Content Designer. Drag&drop ready-made blocks from the library to the working area to add them to your email or edit them.
Fig. 1 Content block library
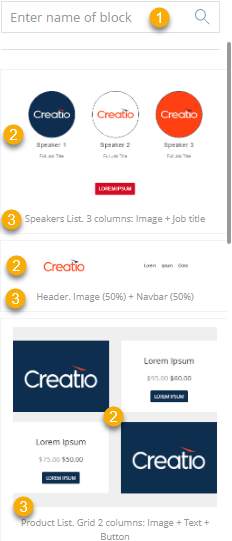
(1) – search field. Use it to filter blocks by name.
(2) – content blocks. The thumbnail of each content block displays the entire layout of the block and not just a portion of it.
(3) – block names. The names of the default blocks describe their purpose and structure.
Every content block in the library is a saved [Block] element, populated with other elements:
1.Open the template that contains the needed block in the Content Designer.
2.If necessary, modify an existing block or create a new one.
3.Make sure that the desired [Block] element is selected.
4.Click  in the context menu on the right. A prompt box will pop up.
5.Populate the [Block name] field. This name will display under this content block in the block library.
Note
We recommend naming the blocks in a way that would describe their contents and purpose of the content block. Such an approach helps find the content block when you work with templates in the Content Designer.
6.Click [Save].
Fig. 2 Saving a new block
The new block will appear in the library of the Content Designer.
Editing an existing block from the Content Library
To edit a block, drag&drop it into the working area. Edit and save the block. Delete the old versions of the block if no longer needed.
Deleting a content block from the content library
To delete a block from the library, hover the mouse pointer over the block you want to delete. A frame will appear around the element. Click  in the top right corner (Fig. 3).
Fig. 3 Deleting a content block
See also
•Configuring an email template
You can add translations of email templates to ensure that your recipients receive notifications in their preferred language. The translations are stored on separate Content Designer tabs.
When sending automated notifications using a localized template, Creatio will use the translation that corresponds to the language specified in the [Preferred language] field on the contact page. If this field is not populated, Creatio will send notifications in the language specified in the “Default language for messages” (DefaultMessageLanguage) system setting.
Note
Learn more about specifying the language when sending email notifications in the “Setting up sending localized emails” article.
To add localizations to a template (Fig. 1):
Fig. 1 Adding localization to an email template

1.Open a template in the Content Designer: go to [Studio] > [Email templates], open the needed template, then click [Edit].
2.Click  –> [Add language]. A menu with a list of languages will open. Select a template language you want to add.
Note
The list of email template languages is stored in the [Customer languages] lookup. The menu displays active languages only (the ones, where the [Is used] checkbox is selected in the lookup). If there are no active languages in Creatio yet or you want to add a tab with the language that has not been activated, select the [Add language] menu option and select a new language from the lookup. The [Is used] checkbox for this language will be selected automatically.
3.After you select a language, Creatio will prompt you to copy the content of an existing template to the new tab. Copying an existing template will help you save time on creating the layout of the localized template.
Repeat steps 1 and 2 for each additional language. As a result, several tabs for creating emails in the selected languages will be displayed on the template page.
4.Use the Content Designer to set up localized content on each new tab.
5.To preview how your email will look for the recipients, use the preview mode. To do this, open the template in the Content Designer, click the tab with the localization you want to preview and click  in the right top corner of the working area.
Note
The preview mode displays the template in the language of the currently selected tab. To preview another language, select the necessary tab before opening the preview mode.
6.Save the changes.
Note
When you copy a localized template, all its translations will be copied as well.
Note
In emails with localized templates, macros take the recipient’s preferred language into account. For example, if a contact’s preferred language is English, such contact will receive an English version of the template. All data displayed in the text via macros will also be in English, regardless of which language was originally used to specify this data in Creatio.
See also