


How to translate the interface and system elements in bpm’online
You can localize custom bpm'online elements, e.g., sections, lookups, into languages available in the [Languages] section. The translation is performed in the [Translations] section of the System Designer (you can also open the [Languages] section by clicking the [Go to translation] button).
The records in the [Translation] section represent a list of strings requiring translation. You can enter translations directly in the list, without opening new pages.
Note
Strings from the non-customizable interface (most of it is located on the “Advanced settings” page) are called “Core” resources. Core strings are not available in the [Translation] section. Core resources are stored in the form of MS Visual Resources (.resources files) along with bpm’online executable files on the application server. The .resources files are localized using specialized localization tools (for example, Passolo, Catalyst, etc.).
The translation is performed using the following columns:
-
[Key] – a system string name that shows the context of the string. This is a non-editable column. Read more >>>
-
[English (United States) - Default] – the default language in bpm’online is English.
-
You can add a separate set of columns for each additional language. Use the [View] > [Select fields to display] command to set up the displayed languages in the translation section (usually, adding the target translation columns is enough).
-
[Verified] – use this column for translation review. The checkbox will be automatically cleared for new translation strings and strings where source has changed since the translation verification.
-
[Modified on] – standard bpm’online column showing the date and time when the current record was last modified.
If the untranslated text is short and fully displayed in the [Translations] section string, translate it right in the editable list. More complex texts are easier to translate in the translation string edit window (Fig. 1).
Fig. 1 Translation string edit window
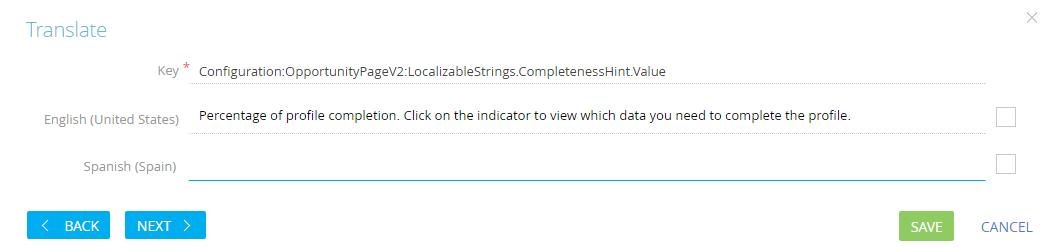
1.Use the standard filters to select records for translation.
2.Click the string to modify, then click the  button to switch to edit mode.
3.Translate the text and save the changes.
4.Click the [Next >] button to display next sting in the edit window and the [< Back] button to display the previous string in the list.
5.When the translation is complete, close the translation edit window and click the [Apply translations] button. The newly translated strings will be displayed in the system next time a user with the corresponding language selected in their profile logs in.
Note
The [Translation] section is designed for localization of custom functions. To translate the whole system to a new language, we recommend exporting translation strings and using professional localization tools.
Contents
•How to identify a translation string by a key
•How to select specific translation strings using filters
•How to display untranslated strings