You can add contents to bpm’online emails manually or use customizable email templates. Templates are especially useful when sending emails as part of business processes or when configuring automatic notifications.
There are two types of email templates in bpm’online:
-
Common email templates, including email notification templates. These templates are used in business processes, cases, approvals and common correspondence. Common email templates can be localized – bpm’online will send the message in the user’s preferred language if the corresponding translation is available for the corresponding template. Common email templates are stored in the [Email templates] lookup. In this article, we will cover how to create common templates.
-
Marketing email templates are used in bpm’online marketing. Unlike common templates, marketing email templates support dynamic content, which enables you to personalize your emails for different segments of your bulk email audience. All bulk email information is stored in the [Email] section. Read more on how to work with the marketing emails in the bpm’online marketing documentation.
Email templates are created in the Content Designer. It is a WYSIWYG HTML editor that can create content with texts or images, as well as other elements supported by email clients. These elements are grouped in “content blocks” that you can add and arrange on a template page using drag&drop. For example, a content block can consist of a piece of text, a button or a table with contact data. These blocks are stored in the [Content block library] lookup.
There are several ways you can open the Content Designer:
-
From the [Email] section page (available in bpm’online marketing products). To do this, go to the [Email] section, open an email with the “Planned” and click [Edit] on the [Template] tab.
-
From the email template page. To do this, find the [Email templates] lookup in the [Lookups] section of the System Designer, open any of its records and click [Edit] on the [Email template] detail.
-
From the [Send email] element in the Process Designer. The Content Designer opens when you click either
 or
or  , depending on how you create the email body: using custom means or ready-made templates.
Note
Learn more about the Content Designer in the “Content Designer” article (available in the bpm’online marketing product).
How to create an email notification template
To create an email template using the Content Designer:
-
Make a template in the bpm’online base language. Read more >>>
-
Add translations of the template to the corresponding Content Designer tabs. As a result, whenever a user’s preferred language is known, bpm’online will be sending notifications in that language to the user. Read more >>>
Example
In this article, we will cover creating a template of an email notification about the date/time of a meeting.
How to configure a template in bpm’online base language
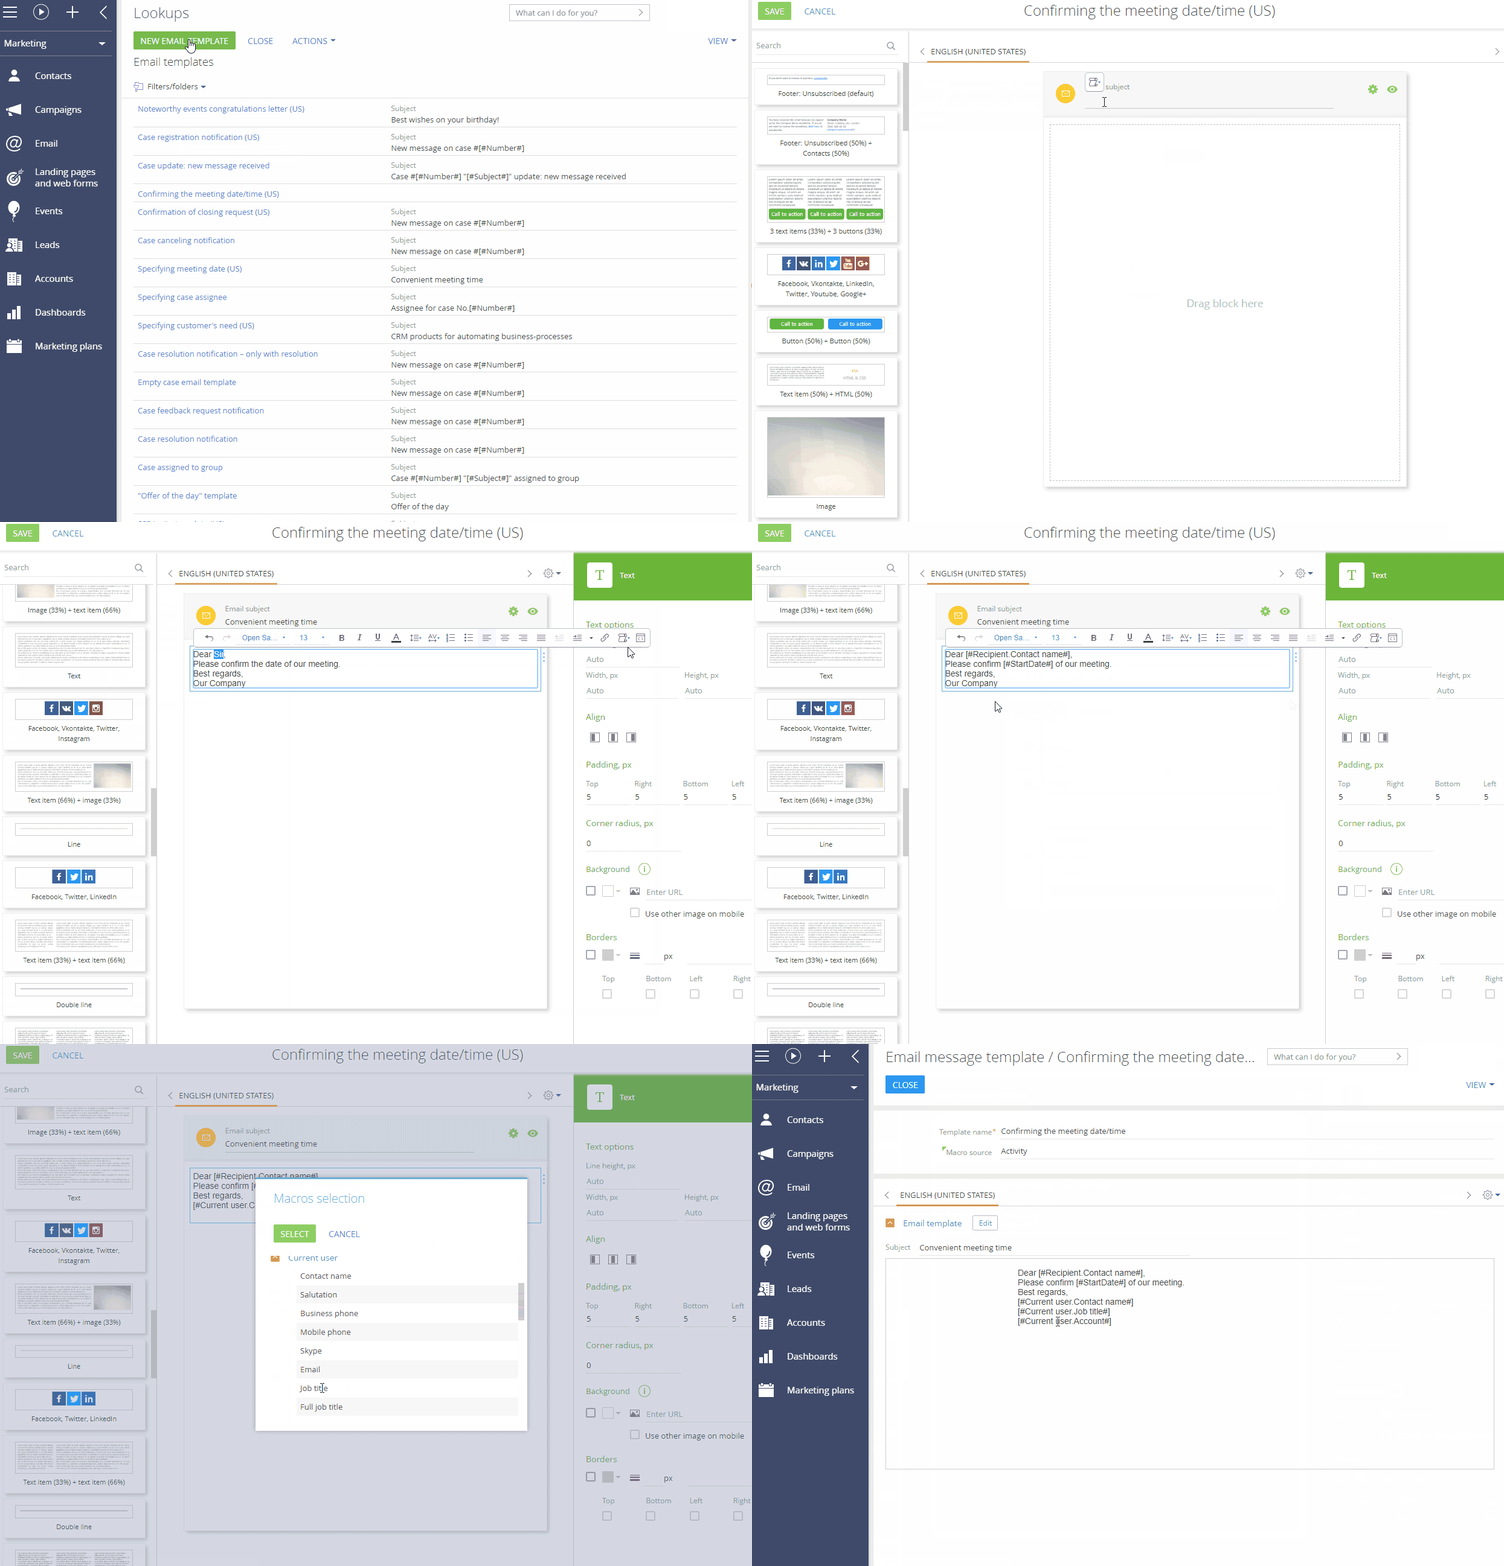
The templates of email notifications used in bpm’online are stored in the [Email templates] lookup. To create a new template (Fig. 1):
Fig. 1 Configuring a template in bpm’online base language

1.Open the [Email templates] lookup. You can do it either from the [Lookups] section of the System Designer or from the “Studio” workplace.
Note
To work with the [Lookups] section, you need permission to perform the [Access to “Lookups“ section] system operation.
2.Click the [New email template] button.
3.On the opened page, specify the template name, e.g., “Confirming the meeting date/time” and select “Activity” in the [Macro source] field, since you will need to use data from the [Activities] section in your template macros.
4.Click the [Edit] button next to the [Emil template] block to open the Content Designer.
Note
The template contains one [English (United States)] tab by default. If you want to use the same layout for all localizations, start with configuring the template on this tab. When you start adding localization tabs, you will be able to copy the settings to the new tabs.
5.Populate the [Email subject] field.
6.In the block library, find the content block named “Text” and drag&drop it to the Content Designer working area.
7.Replace the sample text in the content block with the text that you need to send to the customer.
8.Use template macros to personalize the notification. Basic macros enable adding data bound to the email sender and recipient, e.g., full name, title, etc. Use custom macros to add information about the object specified in the [Macro source] field (in our example, “Activities”) to the email template.
Note
In emails with localized templates, macros take the recipient’s preferred language into account. For example, if a contact’s preferred language is English, such contact will receive an English version of the template. All data displayed in the text via macros will also be in English, regardless of which language was originally used to specify this data in bpm’online.
Note
If no object was specified in the [Macro source] field, bpm’online will notify you that you need to specify an object after you select the [Custom macro] command.
9.Save the template.
How to add localizations to email templates
To ensure that your recipients receive notifications in their preferred language, configure localization for the corresponding template. Translations are stored on separate Content Designer tabs. Bpm’online will use the translation that corresponds to the language specified in the [Preferred language] field on the contact page. If this field is not populated, bpm’online will send notifications in the language specified in the “Default language for messages” (DefaultMessageLanguage) system setting. Learn more how to determine the language when sending email notifications in the “Setting up sending localized emails” article.
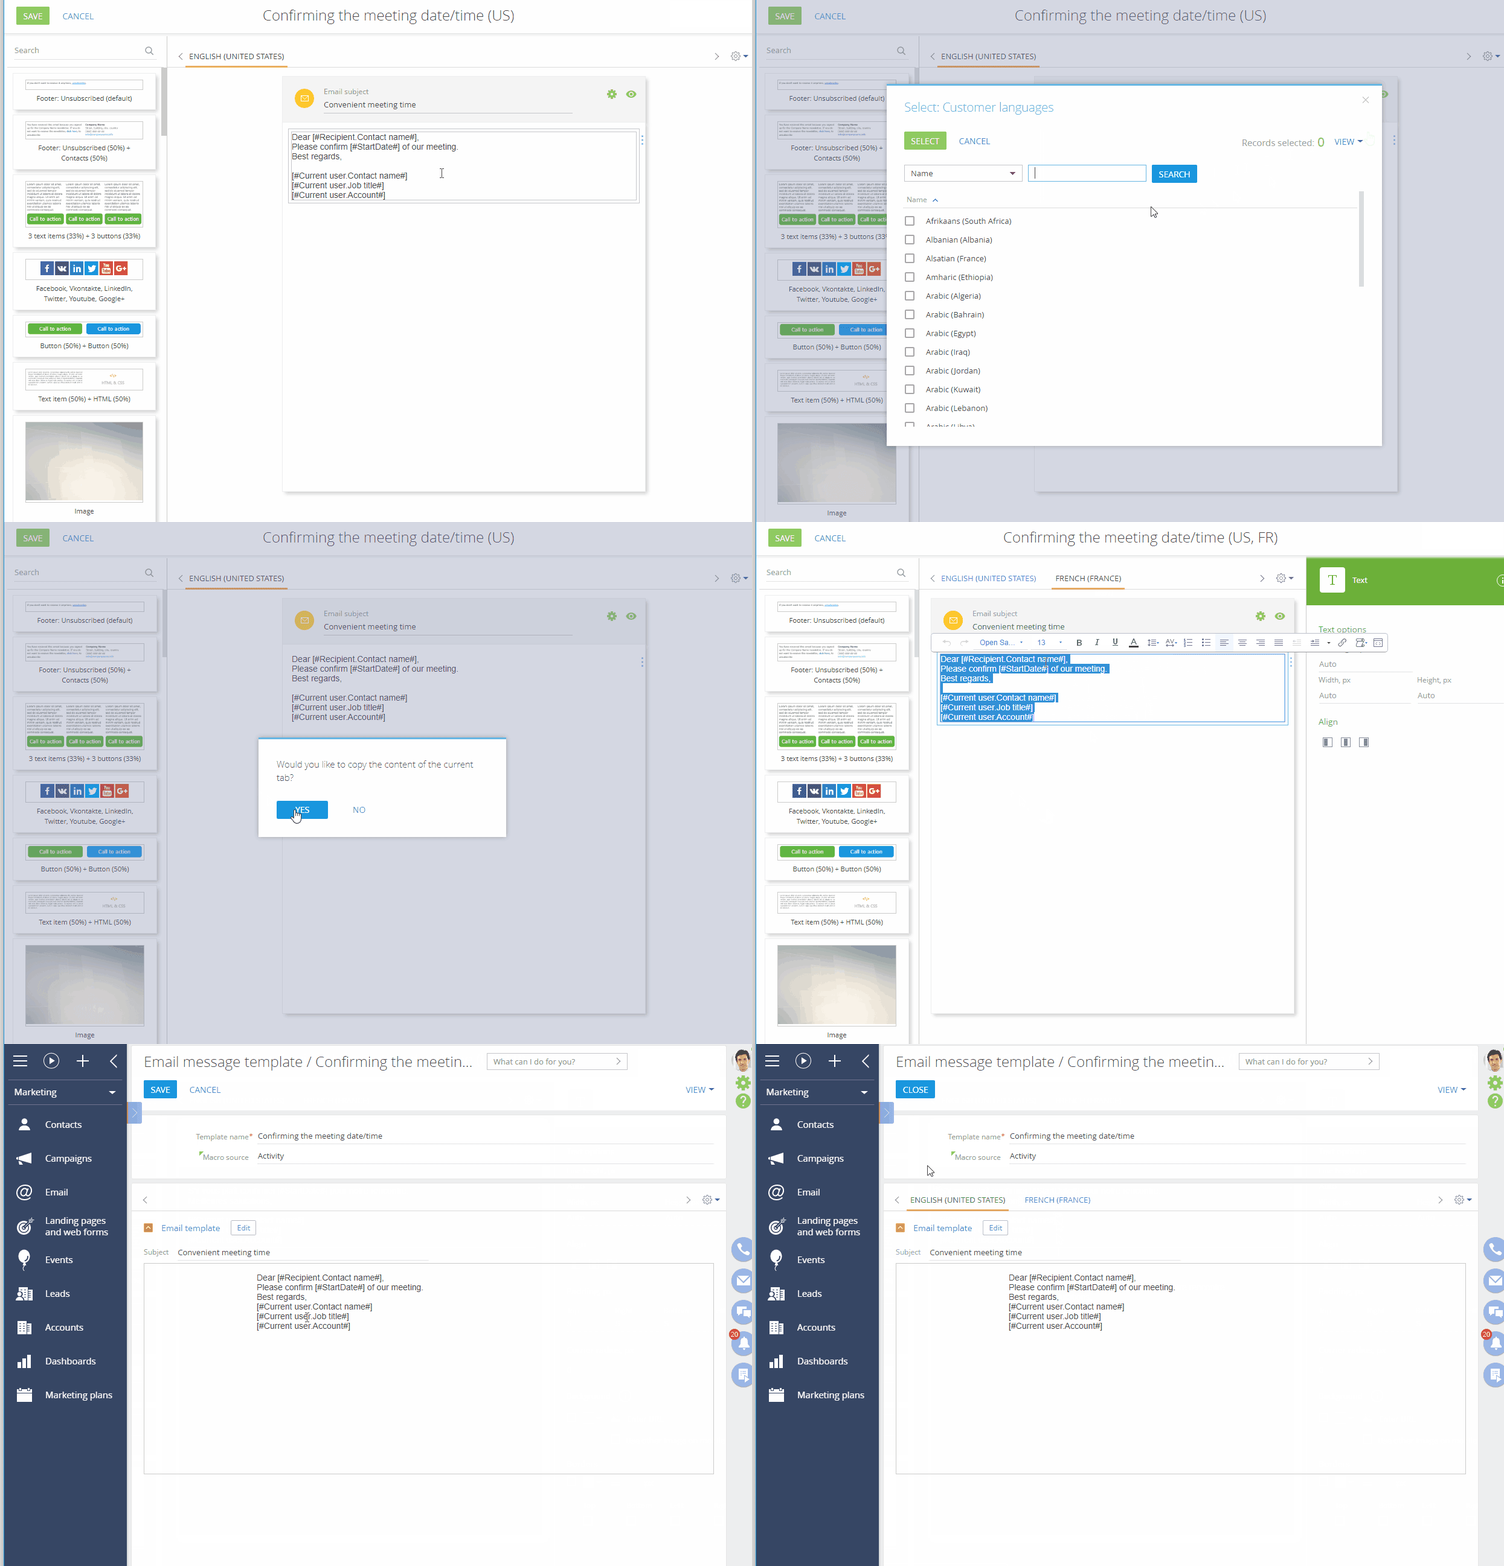
To add localizations to a template (Fig. 2):
Fig. 2 Adding localization to an email template

1.Open a template in the Content Designer.
2.Click  on the right side of the Content Designer working area. A menu with a list of languages will open. Select a template language you want to add.
Note
The list of email template languages is stored in the [Customer languages] lookup. The menu displays active languages only (the ones, where the [Is used] checkbox is selected in the lookup). If there are no active languages in bpm’online yet or you want to add a tab with the language that has not been activated, select the [Add language] menu option and select a new language from the lookup. The [Is used] checkbox for this language will be selected automatically.
3.After you select a language, bpm’online will prompt you to copy the content of an existing template to the new tab. Copying existing template will help you save time on creating the layout of the localized template. As a result, a new tab with the copied contents will appear in the template working area.
If you need to add several languages to a template, repeat steps 1 and 2 for each language. As a result, several tabs for creating emails in the selected languages will be displayed on the template page.
4.Use the Content Designer to add or modify the localized content on each new tab.
5.To preview how your email will actually look for the recipients, use the preview mode. To do this, open the template in the Content Designer, click the tab with the localization you want to preview and click  in the right top corner of the working area.
Note
The preview mode displays the template in the language of the currently selected tab.  . To preview another language, select the necessary tab before opening the preview mode.
6.Save the changes.
Note
When you copy a localized template, all its translations will be copied as well.
See also
•Setting up sending localized emails


