


Registering the application to synchronize with Google (on-site only)
On-site users need to register their bpm’online application in Google before synchronization.
Registration procedure can be divided into two steps:
-
First, register a Google account and set it up, enable access for to the Calendar API, and generate the keys (“Client ID” and “Client Secret”) needed for integration.
-
Second, enter the received “Client ID” and “Client Secret” keys in bpm’online for the values of the [Google Service Access Key] and [Google Secret Access Key] system settings respectively.
Setting up an account and receiving Google keys
To configure your Google account:
1.Follow the https://code.google.com/apis/console/ link.
2.Log in to your Google account.
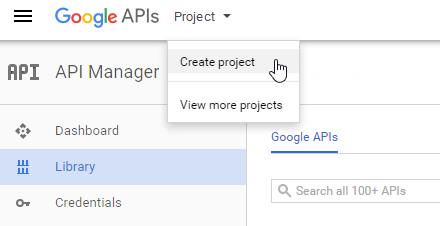
3.From the [Project] menu, select the [Create project] option (Fig. 1).
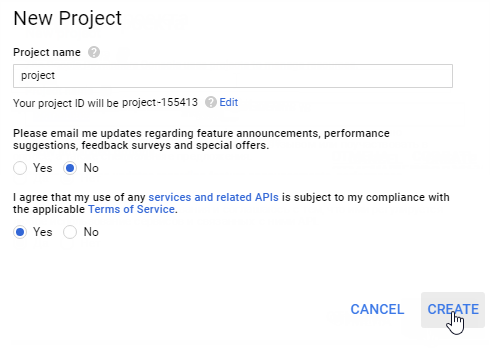
4.Enter the project name and click [Create] (Fig. 2).
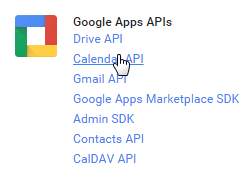
5.In the [Google Apps APIs] group, click [Calendar API] (Fig. 3).
Fig. 3 Selecting API to enable access
6.Click [Enable] (Fig. 4).
Fig. 4 Activating Calendar API

7.Add [Contacts API] and enable it, just like you did with the [Calendar API]. As a result, the Calendar API is added to the list of available APIs of the project (Fig. 5).
Fig. 5 The list of available project API

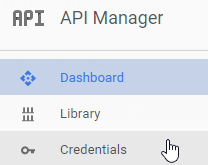
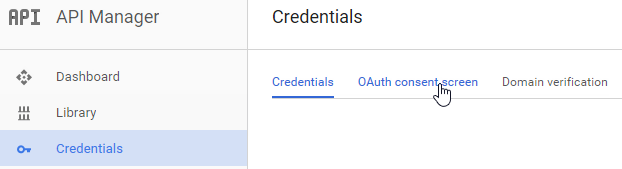
8.Specify the information about the product to create the client ID. In the [API Manager] menu, click [Credentials] (Fig. 6).
Fig. 6 Opening the credentials setup page
9.Click the [0Auth consent screen] tab (Fig. 7).
Fig. 7 Opening the credentials setup page
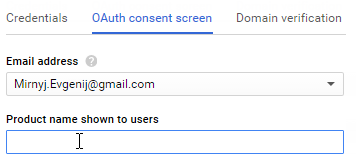
10.Fill in the [Product name shown to users] field (Fig. 8) and click [Save]. This name will be shown to the users during bpm’online authorization for using Google accounts.
Fig. 8 Filling in the [Product name shown to users] field
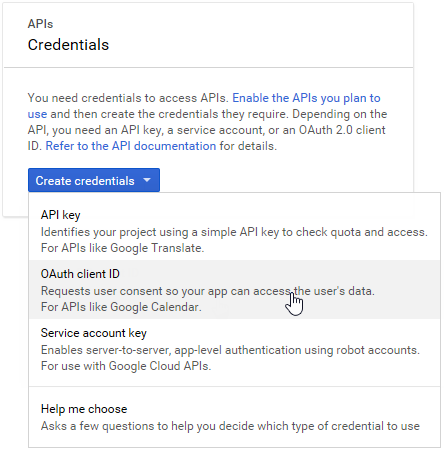
11.To create an ID, open the [Credentials] tab and in the [Create credentials] menu, select [0Auth client ID] (Fig. 9).
Fig. 9 Creating 0Auth client ID
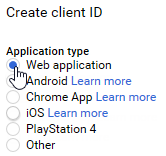
12.Specify the application type. Select [Web application] (Fig. 10).
Fig. 10 Selecting the connection type
13.In the [Authorized JavaScript origins] field, enter your bpm'online website address.
14.In the [Authorized redirect URLs] enter the url of the application to which the data will be sent to. The page address has to contain this prefix “/0/ViewPage.aspx?Id=3b22f0ff-034a-48da-8758-a0660e5a26ff”. For example, https://bpmonlineapp.com/0/ViewPage.aspx?Id=3b22f0ff-034a-48da-8758-a0660e5a26ff.
Attention
For on-site applications, deployed on a dedicated domain and accessible only by a specific IP or from the internal network, enter “localhost” in the [Authorized JavaScript origins] field. In the [Authorized redirect URLs] enter the IP and server port, on which the application is deployed, and a special prefix. For example, ip:port/0/ViewPage.aspx?Id=3b22f0ff-034a-48da-8758-a0660e5a26ff
15.Click [Create]. A pop-up message with your client ID and client secret will be displayed.
16.Enter your Google keys in the corresponding system settings in bpm'online.
Attention
For the Google APIs projects added after 05/11/2017 you have to additionally verify the application . Without this step, the “invalid_scope” error will be thrown to a user at integration attempt.
How to enter a Google key into bpm’online
Second, enter the received “Client ID” and “Client Secret” keys in bpm’online for the values of the [Google Service Access Key] and [Google Secret Access Key] system settings respectively. To do this:
1.Open the bpm’online application.
2.Open the system designer by clicking the  button in the top right corner of the application window.
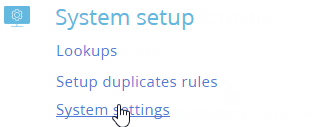
3.Click the [System settings] link in the [System setup] block (Fig. 11).
Fig. 11 The [System settings] section
4.Select the [Google Service Access Key] system setting in the list and click [Open].
5.In the [Default value] field of the system setting card, enter the “Client ID” key (the text in the [Here is your client ID] field of the Google message) you received during the bpm’online registration in Google and click [Save] and then [Close].
6.Select the [Google Service Access Key] system setting in the list and click [Open].
7.In the [Default value] field of the system setting card, enter the “Client secret” key (the text in the [Here is your client secret] field of the Google message) you received during the bpm’online registration in Google and click [Save] and then [Close].
As a result, users will be able to synchronize their tasks and contacts with their Google calendar and Google contacts.
Next
•Synchronizing bpm'online contacts and activities with Google contacts and calendar
•How to synchronize bpm'online with Google contacts
•How to synchronize bpm'online activities with Google calendar