
A detail is a UI element on the record page that displays records of an object bound to the current record. For example, the contact page stores data about contact activities, addresses, documents, etc. in details. Most details have a dedicated list. Some details, for example, Communication options, are not displayed as a list. Visually, a detail and a field group are different in that the former has a data management toolbar. The available actions include adding and editing records, sorting, filtering, setting up the detail, and more.
The purpose of a detail is to display additional data relevant to the main section object. Creatio displays section details on tabs of the section record page in the tab container.
Detail structure and types
A detail includes the following components:
- Detail object schema. Connected to the section object. For example, the ContactAddress object schema of the Base package corresponds to the Addresses detail of the contact page. The detail is connected to the section object via the required Contact column of the detail object.
- Set up the structure, position, and behavior of detail UI elements in the detail view model schema. For example, set up the Addresses detail on the contact page in the ContactAddressDetailV2 view model schema of the detail that inherits the Uiv2 package's BaseAddressDetailV2 schema.
- Set up the detail page in the view model schema of the detail record page. For example, set up the properties of the Addresses detail page on the contact page in the ContactAddressPageV2 view model schema of the detail record that inherits the Uiv2 package’s BaseAddressPageV2 schema.
Creatio provides the following detail types:
- Editable list detail
- Add page detail
- Lookup detail
- Field detail
- Attachments type detail
The detail type depends on the input and display method.
Implement a detail
The BaseDetailV2 schema of the NUI package implements the functionality of a base detail.
Implement a detail using the following tools:
- Detail Wizard
- Creatio IDE
The Detail Wizard is insufficient to implement certain detail types. In those cases, use both the Detail Wizard and Creatio IDE. Cases of implementing various detail types are covered below.
The general procedure to implement a detail in the Detail Wizard is as follows:
- Create a custom detail. To do this, follow the guide in the user documentation: Create a detail.
- Add the custom detail to a record page. To do this, follow the guide in the user documentation: Add an existing detail on a record page.
- Set up the appearance of the custom detail (optional). To do this, follow the guide in the user documentation: Add an existing detail on a record page.
The general procedure to implement a detail in Creatio IDE is as follows:
-
Create a custom detail.
- Create a detail object schema. To do this, follow the guide in a separate article: Develop configuration elements.
- Create a view model schema of the detail. To do this, follow the guide in a separate article: Develop configuration elements.
- Add custom detail styles (optional).
- Register the detail in the database (optional).
-
Add the custom detail to a record page.
Create a replacing view model schema of the record page to place the detail. To do this, follow the guide in a separate article: Develop configuration elements.
- Set up the appearance of the custom detail (optional). To do this, follow the guide in the user documentation: Add an existing detail on a record page.
Implement an editable list detail
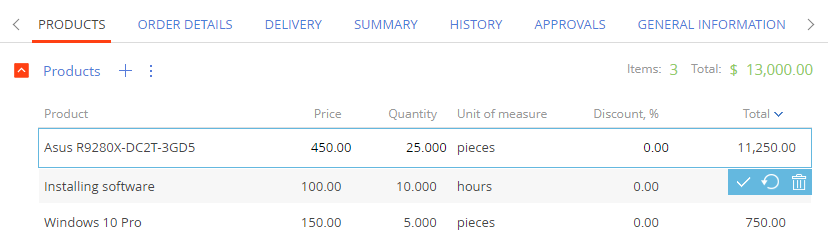
An editable list detail lets you enter and edit data in the detail list. The data is displayed as a list. An editable list detail is a subtype of a list detail. The BaseGridDetailV2 schema of the NUI package implements the functionality of a base list detail. For example, the Products detail on the order page is an editable list detail. You can edit the data of each product on the order page.
Implement an editable list detail in the Detail Wizard
-
Create a custom detail.
- Set up the editable list. To do this, select the Make the list editable checkbox. Otherwise, the Wizard will create an add page detail.
- Set up multi-line text (optional). If you want to display data in multiple lines, select the Multi-line text checkbox. The multi-line option is available only for String type columns.
- Take step 2 of the general procedure to implement a detail in the Detail Wizard.
Implement an editable list detail in Creatio IDE
To implement an editable list detail in Creatio IDE:
-
Create a custom detail.
-
Create a detail object schema.
- Select BaseEntity as the parent object.
- Add a String type column and other required columns to the object schema.
-
Create a view model schema of the editable list detail.
- Select BaseGridDetailV2 as the parent object.
- Select the Caption localizable string in the context menu of the Localizable strings node on the toolbar and specify the detail name in the Value property.
-
Implement an editable list.
- Add the ConfigurationGrid, ConfigurationGridGenerator, ConfigurationGridUtilities module schemas as dependencies.
- Add the ConfigurationGridUtilities mixin to the mixins property.
- Add the IsEditable attribute to the attributes property. Set the value property of the attribute to true.
- Implement multi-line text (optional). To do this, add a String type column to the attributes property. Set the contentType column property to Terrasoft.ContentType.LONG_TEXT.
View the example of the ContactPageV2 view model schema of the UsrCourierServiceDetail editable list detail that has multi-line text in the UsrDescription column below.
-
Register the detail in the database. To do this, execute the SQL query to the [SysDetails] database table.
Register the detail to make it visible in the Section Wizard and Detail Wizard.
-
-
Add the custom detail to a record page.
Create a replacing view model schema of the record page to place the editable list detail.
- Select the view model schema to replace as the parent object.
- Add the detail to the details property.
- Add the configuration object of the detail view model to the diff modification array.
View the example of the ContactPageV2 view model schema of the record page, on which the UsrRegDocumentFieldsDetail editable list detail, below.
Implement an add page detail
An add page detail lets you enter and edit data on the detail page. An add page detail is a subtype of a list detail. The BaseGridDetailV2 schema of the NUI package implements the functionality of a base list detail. For example, the Addresses detail of the contact page is an add page detail. You can add and edit the data of each address on the Contact address page.

To implement an add page detail in the Detail Wizard, follow the general procedure to implement a detal in the Detail Wizard.
To implement an add page detail in Creatio IDE:
-
Create a custom detail.
-
Create a detail object schema.
- Select BaseEntity as the parent object.
- Add the needed columns to the object schema.
-
Create a view model schema of the add page detail.
- Select BaseGridDetailV2 as the parent object.
- Select the Caption localizable string in the context menu of the Localizable strings node on the toolbar and specify the detail name in the Value property.
-
Create a view model schema of the detail record page. To do this, follow the guide in a separate article: Develop configuration elements.
- Select BasePageV2 as the parent object.
- Add the configuration object of the detail view model to the diff modification array.
View the example of the UsrCourierDetailPage view model schema of the UsrCourierInOrder detail record page below.
-
Register the detail in the database.
-
Register the connection between the detail object schema and the detail list schema. To do this, execute the SQL query to the [SysDetails] database table.
-
Register the connection between the detail object schema and the detail record page schema. To do this, execute the SQL query to the [SysModuleEntity] and [SysModuleEdit] database tables.
Register the detail to make it visible in the Section Wizard and Detail Wizard.
-
- Restart Creatio in IIS to apply the changes.
-
-
Add the custom detail to a record page.
Create a replacing view model schema of the record page to place the add page detail.
- Select the view model schema to replace as the parent object.
- Add the detail to the details property.
- Add the configuration object of the detail view model to the diff array of modifications.
- Take step 4 of the general procedure to implement a detail in Creatio IDE. If you skip this step, the detail will appear on the record page but will not contain records since the columns for display will not be specified.
Implement a lookup detail
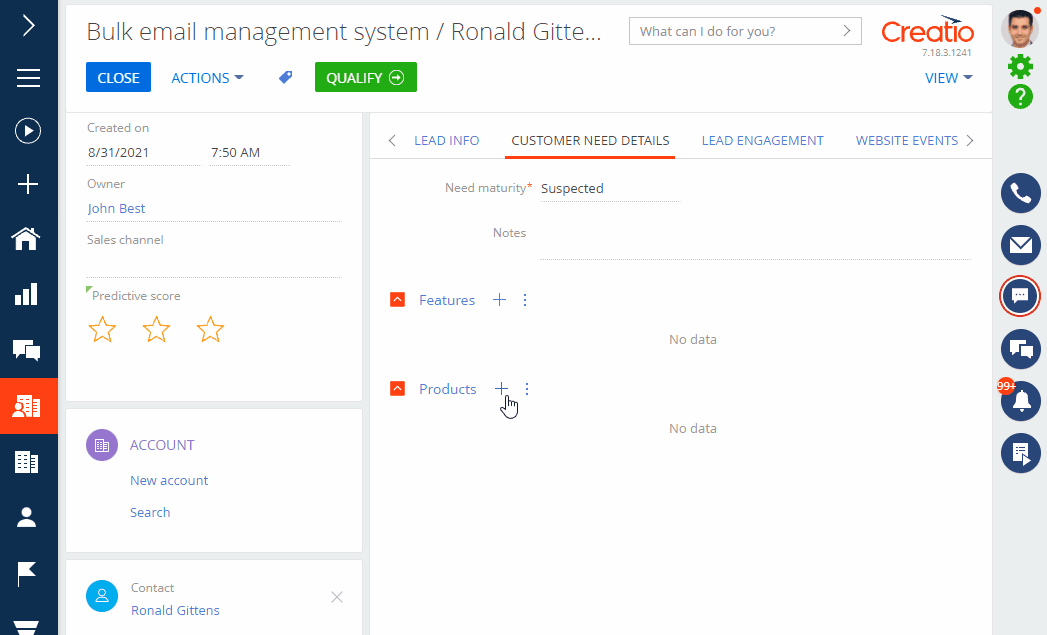
A lookup detail lets you select data from a lookup displayed in a pop-up box. A lookup detail is a subtype of a list detail. The BaseGridDetailV2 schema of the NUI package implements the functionality of a base list detail. For example, the Products detail on the lead page is a lookup detail. You can select the products in the Select: Products pop-up box.
Implement the lookup detail in the Detail Wizard
-
Create a custom detail.
- Add a Lookup type column to the detail.
- Set up the lookup view. To do this, select "Selection window" in the Lookup view property.
- Take step 2 of the general procedure to implement a detail in the Detail Wizard.
Implement the lookup detail in Creatio IDE
-
Create a custom detail.
-
Create a detail object schema.
- Select BaseEntity as the parent object.
- Add the Lookup type column and other needed columns to the object schema.
-
Implement the view model schema of the lookup detail.
- Select BaseGridDetailV2 as the parent object.
- Select the Caption localizable string in the context menu of the Localizable strings node on the toolbar and specify the detail name in the Value property.
-
-
Add the custom detail to a record page.
Create a replacing view model schema of the record page to place the lookup detail.
- Select the view model schema to replace as the parent object.
- Add the ConfigurationEnums module schema as a dependency of the record page’s view model schema.
-
Add the following methods to the methods property:
- onDocumentInsert(). Handles the record add event of the detail list.
- onCardSaved(). Handles the save event of the detail record page.
- openDocumentLookup(). Opens the lookup pop-up box.
- Auxiliary data management methods.
- Add the configuration object of the detail view model to the diff modification array.
View the example of the UsrCourierCertDetail view model schema of the record page with the lookup detail for UsrCourierCertInOrder below.
- Take step 4 of the general procedure to implement a detail in Creatio IDE. If you skip this step, the detail will appear on the record page without records since the columns to display will not be specified.
Implement a field detail
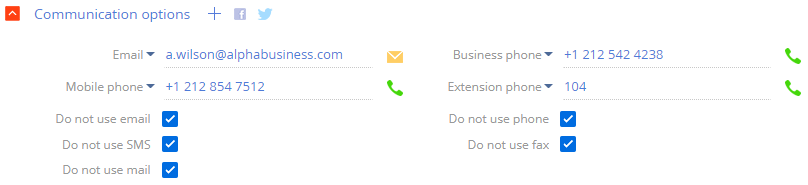
A field detail lets you enter and edit data directly in the detail fields. The detail can contain several field groups. For example, the Communication options detail of the contact page is a field detail.
A field detail lets you perform the following actions:
- Add records to the detail without saving the page that contains the current detail.
- Manage the detail as a record page.
- Use the base field validation.
- Implement custom field validation.
- Add a virtual record.
- Expand the record behavior logic.
You cannot implement a field detail using the Detail Wizard only since the Detail Wizard creates a list detail by default. To implement a detail, use both the Detail Wizard and Creatio IDE.
Implementation of a field detail for the Financial Services Creatio products is somewhat specific. The BaseFieldsDetail schema of the BaseFinance package implements the functionality of a base field detail for the Financial Services Creatio products. The BaseFieldRowViewModel schema of the BaseFinance package implements the record view model of a field detail.
Implement a field detail in Detail Wizard and Creatio IDE
- Download the sdkFieldsDetailPackage package to implement a field detail in Creatio CRM products.
- Import the package into your Creatio application to implement a field detail in Creatio CRM products. To do this, follow the guide in a separate article: Transfer packages.
- Add the sdkFieldsDetailPackage package as a dependency of the custom package to implement a field detail in Creatio CRM products. To do this, follow the guide in a separate article: Create a custom package.
- Take step 1 of the general procedure to implement a detail in the Detail Wizard. If needed, set up the detail column in Creatio IDE.
- Replace the parent object of the detail object with BaseFieldsDetail in Creatio IDE.
- Take step 2 of the general procedure to implement a detail in the Detail Wizard.
Implement a field detail in Creatio IDE
- Take steps 1-3 of the procedure to implement a field detail in the Detail Wizard and Creatio IDE to implement a field detail in Creatio CRM products.
-
Create a custom detail.
-
Create a detail object schema.
- Select BaseEntity as the parent object.
- Add the needed columns to the object schema.
-
Create a view model schema of the field detail.
- Select BaseFieldsDetail as the parent object.
- Select the Caption localizable string in the context menu of the Localizable strings node on the toolbar and specify the detail name in the Value property.
- Add the getDisplayColumns method to the methods property. The method returns the array of column names displayed as fields in the detail.
-
Add custom detail styles (optional).
- Create a module schema. Define the styles there. To do this, follow the guide in a separate article: Develop configuration elements.
-
Specify the parent class.
- Specify UsrBaseFieldRowViewModel to implement a field detail in Creatio CRM products.
- Specify BaseFieldRowViewModel to implement a field detail in Financial Services Creatio product lineup.
- Add the schema of the module that contains the style implementation as a dependency of the detail list’s view model schema.
-
Add the methods that override base CSS style classes to the methods property:
- getRowViewModelClassName(). Returns the class name of the detail record’s view model.
- getLeftRowContainerWrapClass(). Returns the string array of CSS class names required to generate the view of containers that have record field signatures.
-
Register the detail in the database. To do this, execute the SQL query to the [SysDetails] database table.
Register the detail to make it visible in the Section Wizard and Detail Wizard.
-
-
Add the custom detail to a record page.
Create a replacing view model schema of the record page to place the field detail.
- Select the view model schema to replace as the parent object.
- Add the detail to the details property.
- Add the configuration object of the detail view model to the diff array of modifications.
View an example of the ContactPageV2 replacing view model schema of the record page that contains the UsrRegDocumentFieldsDetail detail that has fields below.
Implement an Attachments type detail
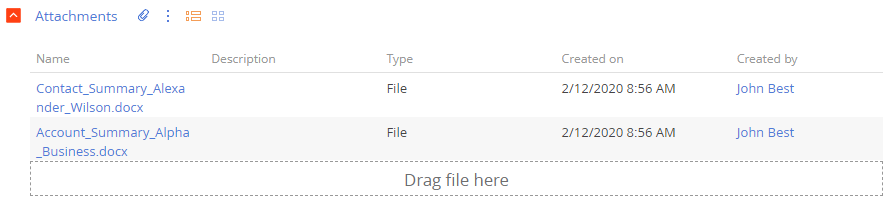
An Attachments type detail lets you store external files, links to web resources, and knowledge base articles. Available for all Creatio sections. The FileDetailV2 schema of the Uiv2 package implements the functionality of a base Attachments type detail. Learn more about the Attachments type detail in user documentation: Work with attachments. For example, the Attachments detail of the contact page is an Attachments type detail.
The Attachments type detail cannot be implemented only in the Detail Wizard since the Detail Wizard creates a list detail by default. To implement a detail, use both the Detail Wizard and Creatio IDE.
To implement an Attachments type detail in the Detail Wizard and Creatio IDE:
-
Create a custom detail.
-
Set up the object of the Attachments type detail.
- Select "Based on existing object" in the How to create detail? property to do this.
- Select "[CustomSectionName] attachment" in the Object property to do this.
- Replace the parent object of the detail record page with FileDetailV2 in Creatio IDE.
-
Add custom detail styles (optional).
- Create a module schema. Define the styles there. To do this, follow the guide in a separate article: Develop configuration elements.
- Add the module schema that contains the style implementation as a dependency of the detail’s view model schema.
-
- Take step 2 of the general procedure to implement a detail in the Detail Wizard.
Implement bulk addition of records to a detail
By default, a detail lets you add only one record. The purpose of the LookupMultiAddMixin is to expand the action that adds a record to the detail. Use the mixin to enable users to select multiple lookup records at once.
To implement the bulk addition of records to a detail:
- Create a replacing view model schema of the detail. To do this, follow the guide in a separate article: Develop configuration elements.
- Add the LookupMultiAddMixin mixin to the mixins property.
-
Make the following changes in the methods property:
-
Overload the following methods:
- init(). Implements the logic Creatio executes when loading the module. Initialize the LookupMultiAddMixin mixin in the method. Learn more about the init() method in a separate article: Module types and their specificities.
- getAddRecordButtonVisible(). Displays the add button.
- onCardSaved(). Saves the detail page. Use the openLookupWithMultiSelect() method to call the multiple selection dialog box in the overridden method.
- addRecord(). Adds a record to the detail. Use the openLookupWithMultiSelect() method in the overloaded method, similar to the onCardSaved() method. Set to true to check if the record is new.
- Implement the getMultiSelectLookupConfig() method connected to the openLookupWithMultiSelect() method. The getMultiSelectLookupConfig() window configures the dialog box and returns the configuration object of the box.
-
Delete a detail
To delete a detail:
- Unlock the files of the detail to delete in the SVN repository.
-
Delete the records from the database. To do this, execute the following SQL database query:
- Go to the Configuration section and delete the view model schema of the detail and schema of the detail object.

To use details with fields in CRM Creatio products:
- Download the sdkFieldsDetailPackage package: download package.
- Import the package into Creatio. To do this, follow the guide in a separate article: Transfer packages.
- Add the sdkFieldsDetailPackage package to the dependencies of a custom package.
1. Create a custom detail
- Create a custom package and set it as current. Learn more in a separate article: Packages basics.
- Click
 to open the System Designer.
 - Go to the System setup block → Detail wizard.
-
Fill out the detail properties:
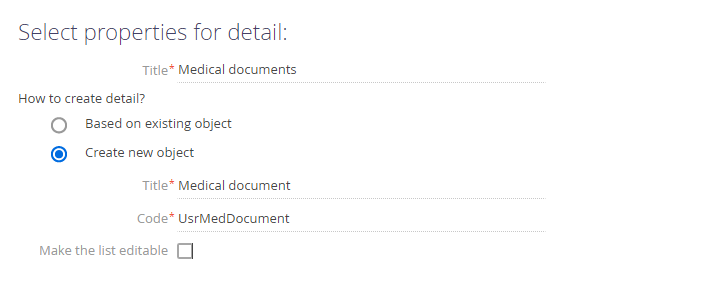
- Set Title to "Medical documents."
-
Set How to create detail? to "Create new object."
Fill out the object properties:
- Set Title to "Medical document."
- Set Code to "UsrMedDocument."
As a result, Creatio will add the following schemas to the configuration:
- The UsrMedDocument schema of the detail object.
- The UsrSchemac6fd3fd0Detail schema of the Medical documents detail list's view model.
- The UsrUsrMedDocument4988cee4Page schema of the Medical documents detail record page's view model.
- Go to the Page tab and set up the detail record page.
-
Set up the detail fields.
-
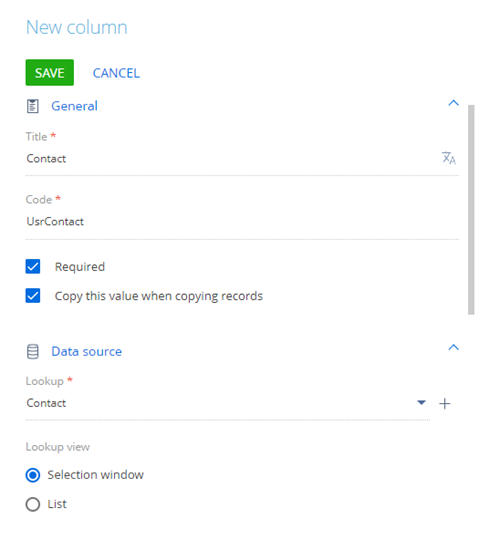
Fill out the Contact field of the Lookup type.
- Set Title to "Contact."
- Set Code to "UsrContact."
- Select the Required checkbox.
- Set Lookup to "Contact."
-
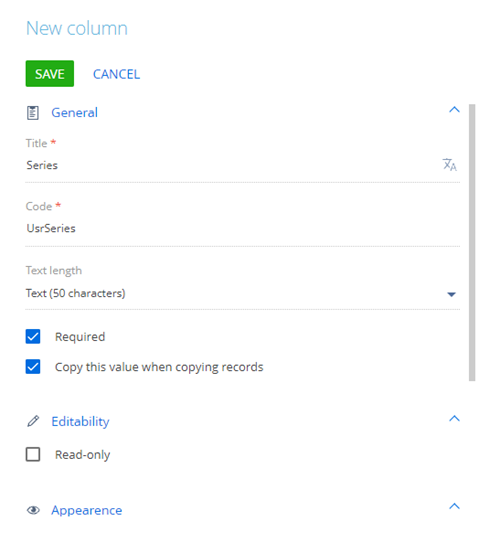
Fill out the Series field of the String type.
- Set Title to "Series."
- Set Code to "UsrSeries."
- Set Text length to "Text (50 characters)."
- Select the Required checkbox.
-
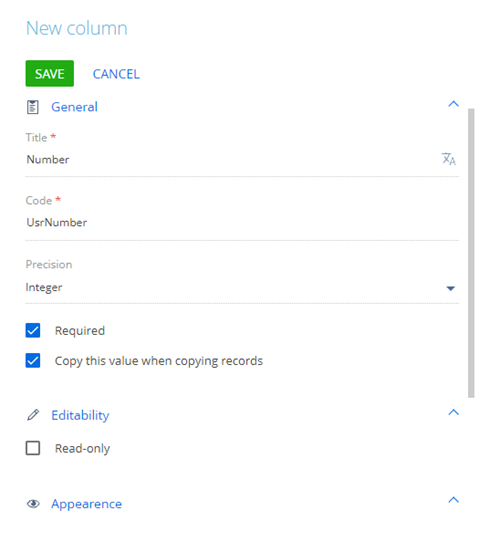
Fill out Number field of the Integer type.
- Set Title to "Number."
- Set Code to "UsrNumber."
- Select the Required checkbox.
-
- If necessary, modify the position of detail fields.
- Click Save on the Detail Wizard's toolbar.
As a result, Creatio will modify the UsrUsrMedDocument4988cee4Page configuration schema of the Medical documents detail record page's view model.
2. Set up the custom detail
- Go to the Configuration section and select a custom package to set as the current package.
- Open the UsrMedDocument schema of the detail object.
-
Delete the [UsrName] required column in the context menu of the object structure's Columns node.
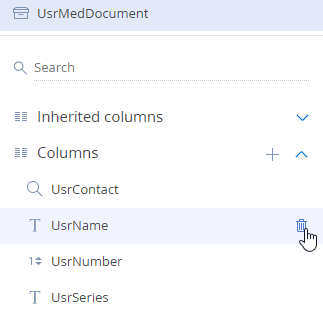
- Click Publish on the Object Designer's toolbar.
- Open the UsrSchemac6fd3fd0Detail schema of the Medical documents detail list's view model.
-
Click the
/scr_edit_button.png) button on the properties panel and specify BaseFieldsDetail in the Parent object field. The BaseFieldsDetail schema implements the detail that has fields. By default, the parent object in the Detail Wizard is the schema of a base detail that has a list.
button on the properties panel and specify BaseFieldsDetail in the Parent object field. The BaseFieldsDetail schema implements the detail that has fields. By default, the parent object in the Detail Wizard is the schema of a base detail that has a list.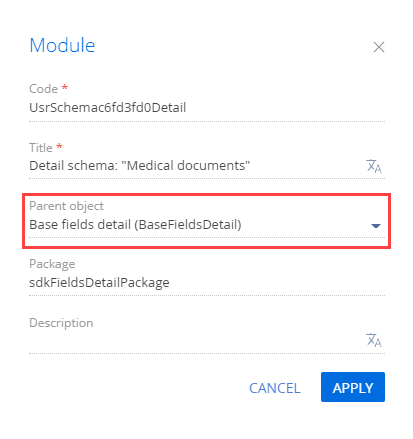
-
Add the getDisplayColumns method to the methods property of the detail's view model schema. The method returns the array of column names displayed as fields in the detail.
View the source code of the UsrSchemac6fd3fd0Detail schema below.
- Click Save on the Module Designer's toolbar.
3. Add the detail to the section record page
- Go to the Contacts section and open the contact page.
- Click View → Open section wizard on the toolbar.
- Go to the History tab of the Section Wizard workspace and click the New detail button.
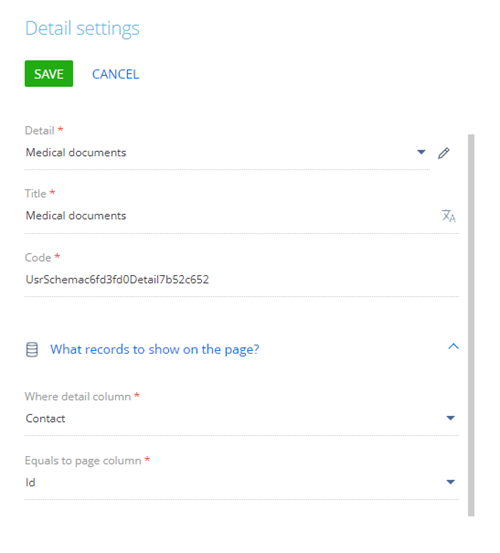
-
Fill out the detail parameters.
- Set Detail to "Medical documents." Creatio will populate the Title and Code fields.
-
Set Where detail column to "Contact."
Leave other columns as they are.
- Click Save → Section wizard → Save.
As a result, Creatio will add the Medical documents detail to the History tab of the contact page.

4. Add custom detail styles
The view model schema of a detail page does not support visual styles. As such, take the following steps to add the styles:
- Create a module schema. Define the styles there.
- Add the style module to the dependencies of the detail module.
1. Create a module schema
- Go to the Configuration section and select a custom package to set as current.
-
Click Add → Module on the section list toolbar.
/scr_add_module.png)
-
Fill out the following schema properties:
- Set Code to "UsrMedDocumentRowViewModel."
- Set Title to "MedDocumentRowViewModel."
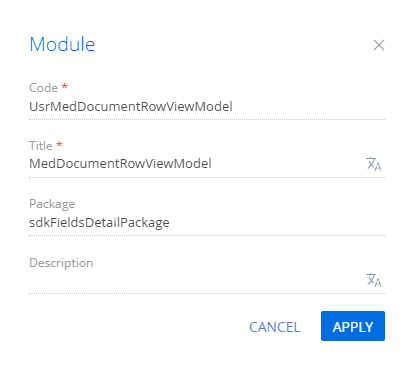
Click Apply to apply the properties.
-
Add the source code in the Schema Designer. Create a module description in the source code of the schema. Define the Terrasoft.configuration.UsrMedDocumentRowViewModel class inherited from the Terrasoft.BaseFieldRowViewModel class in the module description.
-
Go to the LESS node of the object structure and set up the needed visual styles of the detail.
- Click Save on the Designer's toolbar.
2. Modify the view model schema of the detail
To use the module and its styles in the detail schema:
- Open the UsrSchemac6fd3fd0Detail schema of the Medical documents detail list's view model.
- Add the UsrMedDocumentRowViewModel module to the dependencies of the UsrSchemac6fd3fd0Detail schema.
-
Add the following methods that override the base CSS style classes to the definition of the detail schema module:
- The getRowViewModelClassName() method. Returns the class name for the view model of the record on the detail.
- The getLeftRowContainerWrapClass() method. Returns the string array of CSS class names. The names are required to generate the view of containers that include the record field signatures.
View the source code of the modified schema below.
- Click Save on the Designer's toolbar.
As a result, Creatio will render the field names of the Medical documents detail added to the History tab of the contact page blue.

5. Add validation to the detail field
- Open the UsrMedDocumentRowViewModel schema of the module.
-
Add a localizable string with the warning about an incorrect Number field value.
- Click the
/scr_add_button.png) button in the context menu of the Localizable strings node.
button in the context menu of the Localizable strings node. -
Fill out the localizable string properties:
- Set Code to "NumberMustBeGreaterThenZeroMessage."
- Set Value to "Number must be greater than zero."
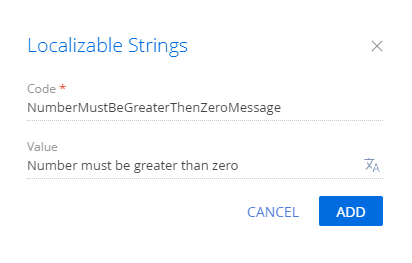
- Click Add to add a localizable string.
- Add the UsrMedDocumentRowViewModelResources resource module to the dependencies of the UsrMedDocumentRowViewModel module. This is required for Creatio to display the localizable string value in the front-end.
- Click the
-
Add the validation logic of the Number field value. To do this, implement the following methods:
- the validateNumberMoreThenZero() method that contains the validation logic of the field value
- the setValidationConfig() method that binds the [Number] column to the validateNumberMoreThenZero() validator method.
- the init() overridden base method that calls the base logic and the setValidationConfig() method
View the source code of the modified schema below.
- Click Save on the Designer's toolbar.
As a result, if you enter a negative value in the Number field, Creatio will display the corresponding warning.

6. Make the detail fields virtual
- Open the UsrSchemac6fd3fd0Detail schema of the Medical documents detail list's view model.
-
Add the useVirtualRecord() method implementation.
View the source code of the modified schema below.
- Click Save on the Designer's toolbar.
As a result, if you open the History tab with the Medical documents detail, Creatio will display a virtual record.


1. Create a replacement object schema
- Go to the Configuration section and select a custom package to add the schema.
-
Click Add → Replacing object on the section list toolbar.
/scr_add_entity_schema_replaced.png)
-
Fill out the schema properties.
- Set Code to "OrderProduct."
- Set Title to "Product in order."
- Set Parent object to "OrderProduct."

-
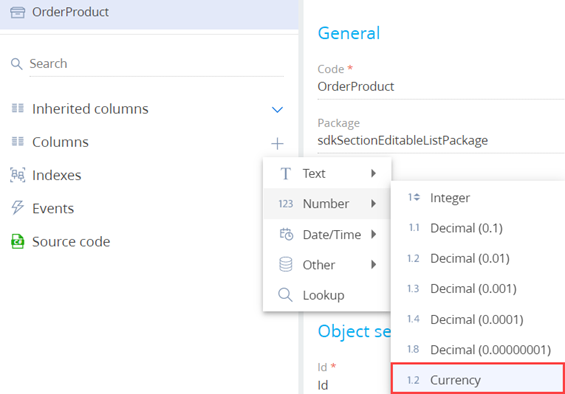
Add a column to the schema.
- Click
 in the context menu of the object structure's Columns node.
 -
Click Number → Currency in the drop-down list.
-
Fill out the properties of the added column.
- Set Code to "UsrCustomPrice."
- Set Title to "Custom price."
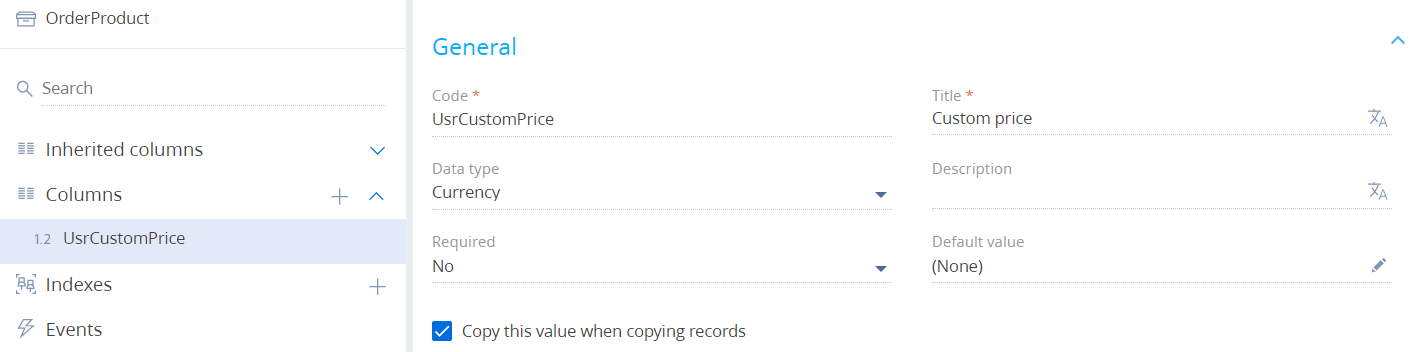
- Click
- Click Save then Publish on the Object Designer's toolbar.
2. Create a schema of the replacing section view model
- Go to the Configuration section and select a custom package to add the schema.
-
Click Add → Replacing view model on the section list toolbar.
/scr_add_replacing_module.png)
-
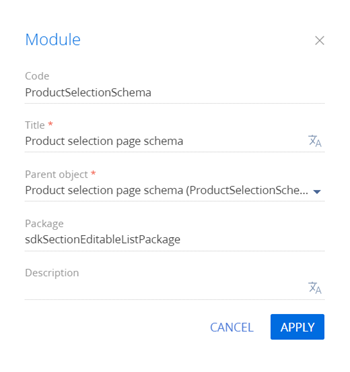
Fill out the schema properties.
- Set Code to "ProductSelectionSchema."
- Set Title to "Product selection page schema."
- Set Parent object to "ProductSelectionSchema."
-
Implement an editable list. To do this, implement the following methods in the methods property:
- getEditableColumns(). Retrieves the array of columns to edit and adds a custom column to the array.
- setColumnHandlers(). Binds the custom column's update event handler.
- onCustomPriceChanged(). Handler method called upon changes to the field value.
View the source code of the replacing view model schema of the section below.
- Click Save on the Designer's toolbar.
Outcome of the example
To view the outcome of the example:
- Refresh the Orders section page.
-
Set up the columns of the add product page.
- Click View → Select fields to display on the section toolbar and open the setup mode of the section list's tile view (Tile view) on the column setup page.
- Add the column to the section list. To do this, click
 . Then, click
  and select the Product in order object in the Select object field.
 - Select the Discount, % column in the Column field.
- Add the Custom price column similarly.
As a result of the example, the list on the add product page (the Products detail) of the Orders section now includes the Discount, % and Custom price editable columns.
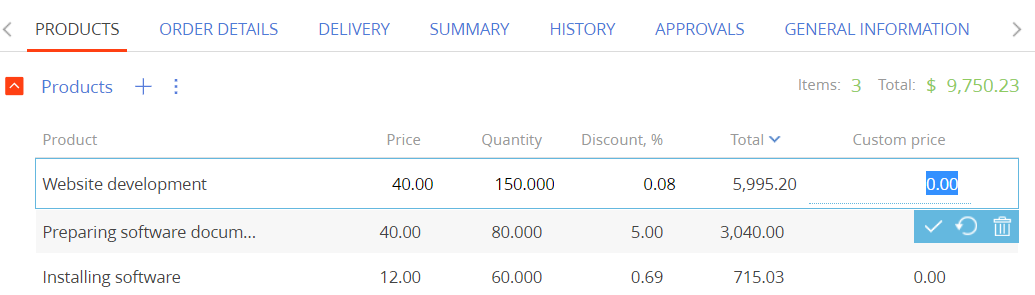
1. Create a detail object schema
- Go to the Configuration section and select a custom package to add the schema.
-
Click Add → Object in the section list toolbar.

-
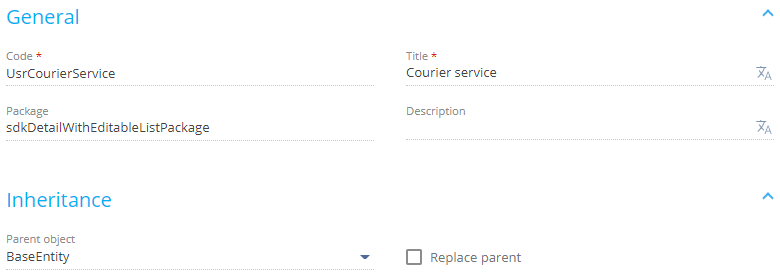
Fill out the schema properties.
- Set Code to "UsrCourierService."
- Set Title to "Courier service."
- Select "BaseEntity" in the Parent object property.
-
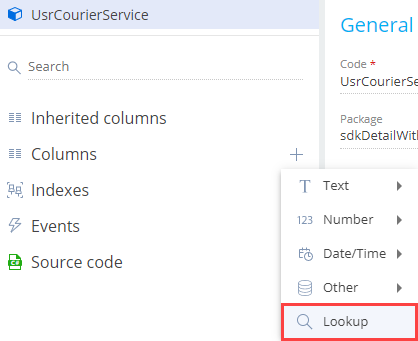
Add a column that stores the order to the schema.
- Click in the context menu of the object structure’s Columns node.
-
Click Lookup in the drop-down menu.
-
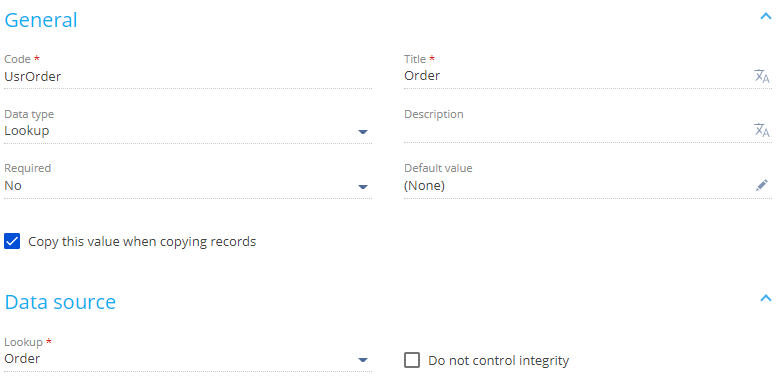
Fill out the properties of the added column.
- Set Code to "UsrOrder."
- Set Title to "Order."
- Select "Order" in the Lookup property.
- Click
-
Add a column that stores the account to the schema in a similar way.
- Click in the context menu of the object structure’s Columns node.
- Click Lookup in the drop-down menu.
-
Fill out the properties of the added column.
- Set Code to "UsrAccount."
- Set Title to "Account."
- Select "Account" in the Lookup property.
- Click
- Click Save then Publish on the Object Designer’s toolbar.
2. Create a view model schema of the detail
- Go to the Configuration section and select a custom package to add the schema.
-
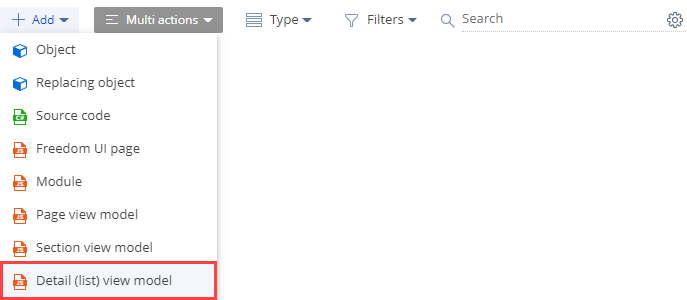
Click Add → Detail (list) view model on the section list toolbar.
-
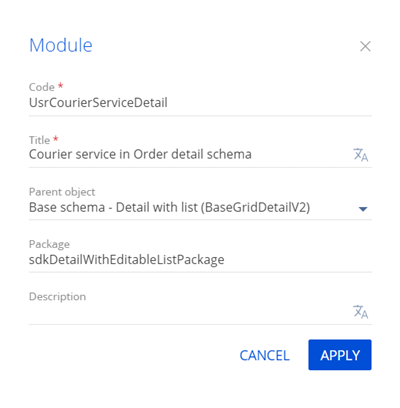
Fill out the schema properties.
- Set Code to "UsrCourierServiceDetail."
- Set Title to "Courier service in Order detail schema."
- Select "BaseGridDetailV2" in the Parent object property.
-
Add a localizable string.
- Click the button in the context menu of the Localizable strings node.
-
Fill out the localizable string properties.
- Set Code to "CourierServiceCaption."
- Set Value to "Courier service."

- Click Add to add a localizable string.
- Click the
-
Implement an editable detail list.
- Add the ConfigurationGrid, ConfigurationGridGenerator, ConfigurationGridUtilitiesV2 module schemas as dependencies.
- Add the ConfigurationGridUtilitiesV2 mixin to the mixins property.
- Add the IsEditable attribute to the attributes property. Set the value property of the attribute to true.
- Add the configuration object to the diff array of modifications. This object must have the property settings and binding of the detail list events' handler methods.
View the source code of the UsrCourierServiceDetail view model schema of the detail below.
- Click Save on the Module Designer’s toolbar.
3. Create a replacing view model schema of the order page
- Go to the Configuration section and select a custom package to add the schema.
-
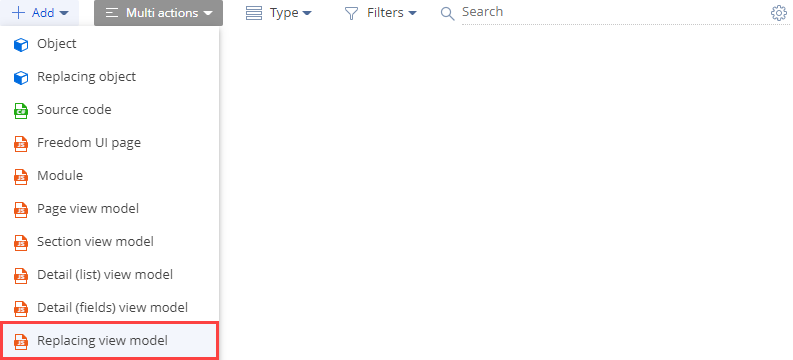
Click Add → Replacing view model on the section list toolbar.
-
Fill out the schema properties.
- Set Code to "OrderPageV2."
- Set Title to "Order edit page."
- Select "OrderPageV2" in the Parent object property.

-
Add the custom UsrCourierServiceDetail detail to the order page.
- Add the UsrCourierServiceDetail detail to the details property.
- Add a configuration object with the settings that determine the detail layout to the diff array of modifications.
View the source code of the order page’s replacing view model below.
- Click Save on the Module Designer’s toolbar.
4. Register the custom detail in the database
To make the detail visible in the Section Wizard and Detail Wizard, register it in the database. To do this, execute the SQL query to the [SysDetails] database table.
Outcome of the example
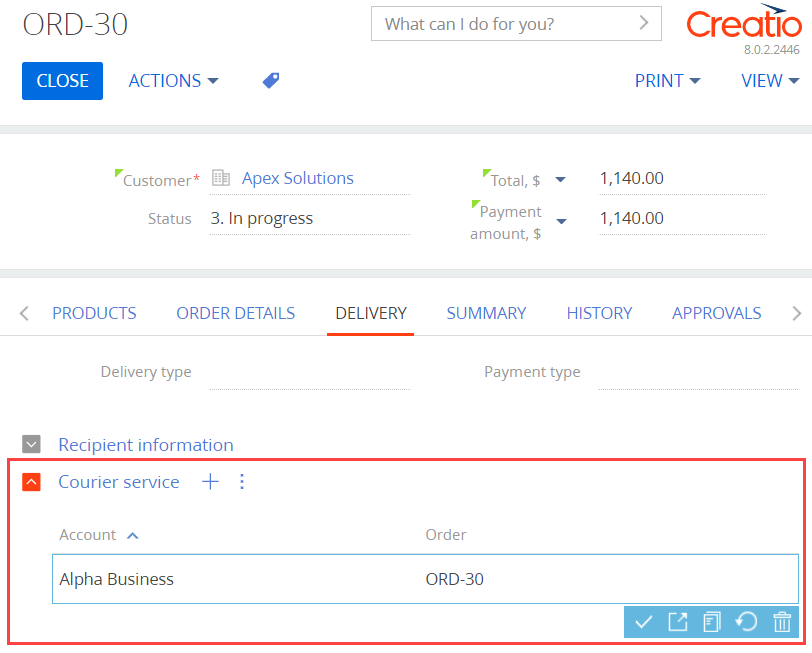
To view the outcome of the example:
- Refresh the Orders section page.
- Open an order page and go to the Delivery tab.
As a result, Creatio will add the custom Courier service detail to the Delivery tab of the order page. The detail displays the index of available courier services (the values of the Account lookup) for the current order (the Order column). The order is populated automatically.
The purpose of the Copy, Edit, Delete menu items is the management of detail list records.
Create the view model schema of the detail list
- Go to the Configuration section and select a custom package to add the schema.
-
Click Add → Replacing view model on the section list toolbar.
-
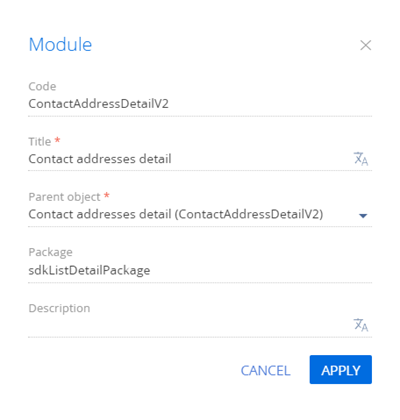
Fill out the following schema properties:
- Set Code to "ContactAddressDetailV2."
- Set Title to "Contact addresses detail."
- Set Parent object to "ContactAddressDetailV2."
-
Add the source code in the Module Designer.
- Click Save on the Designer's toolbar.
Outcome of the example
As a result, Creatio will hide the Copy, Edit, Delete menu items from the Addresses detail.
1. Create the view model schema of the detail
- Go to the Configuration section and select a custom package to add the schema.
-
Click Add → Replacing view model on the section list toolbar.
-
Fill out the schema properties in the Module Designer:
- Set Code to "OpportunityContactDetailV2."
- Set Title to "OpportunityContactDetailV2."
- Set Parent object to "OpportunityContactDetailV2."

2. Implement the business logic of the detail
- Add the LookupMultiAddMixin mixin to the mixins property of the detail schema.
- Initalize the LookupMultiAddMixin mixin in the overridden init() method of the detail schema. Learn more about the init() module in a separate article: Module types and their specificities.
- Override the getAddRecordButtonVisible() method that displays the addition button.
-
Override the onCardSaved() method that saves the detail page.
Use the openLookupWithMultiSelect() method that calls the multiple selection dialog box.
-
Implement the getMultiSelectLookupConfig() method that configures the dialog box. The method is connected to the openLookupWithMultiSelect() method and returns the configuration object for the dialog box.
The object properties are as follows:
- rootEntitySchemaName is the root object schema.
- rootColumnName is the connected column that indicates the root schema record.
- relatedEntitySchemaName is the connected schema.
- relatedColumnName is the column that indicates the connected schema record.
- Override the addRecord() method that adds records to the detail. Use the openLookupWithMultiSelect(), similar to onCardSaved() method. Set the value to true to run a check if the record is new.
In this example, the dialog box uses the data of the [OpportunityContact] table connected to the [Opportunity] column of the [Opportunity] root schema and the [Contact] column of the [Contact] connected schema.
View the source code of the detail schema below.
Click Save on the Module Designer's toolbar.
Outcome of the example
- Refresh the Creatio page.
-
Click the
button on the Contacts detail on the record page of the Opportunities section.
As a result, you will be able to select multiple records from the lookup.
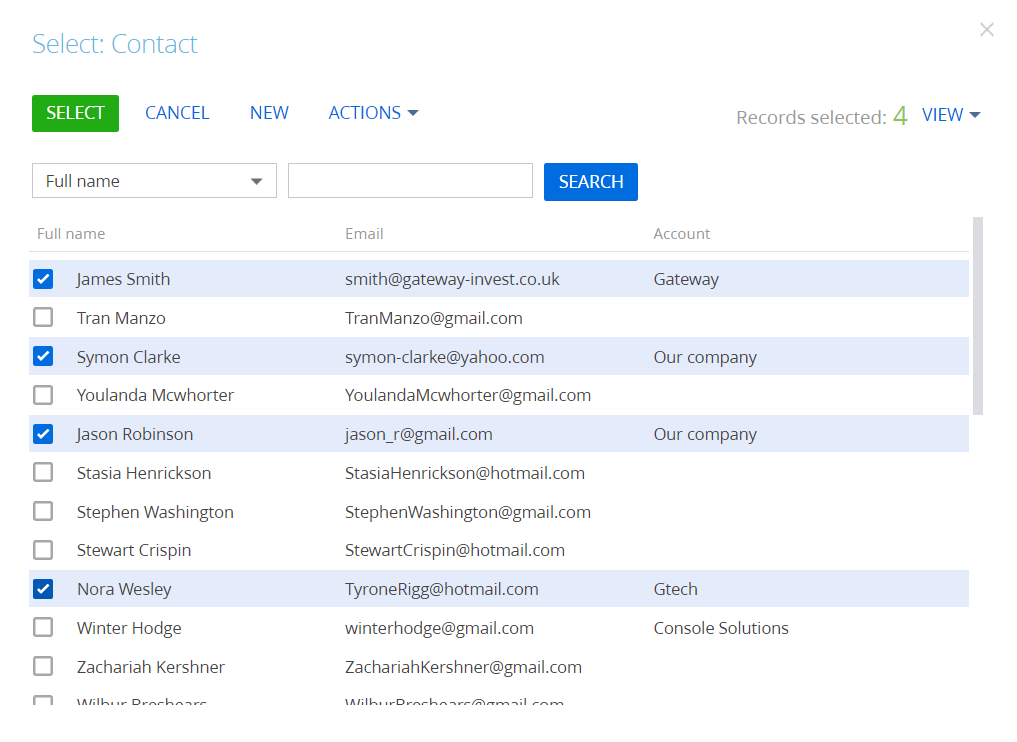
Once you confirm the selection, Creatio will add the records to the Contacts detail on the record page of the Opportunities section.
1. Create a custom section
- Create a custom package and set it as the current package. Learn more in a separate article: Packages basics.
- Click to open the System Designer.
- Go to the System setup block → Section wizard.
-
Fill out the section properties:
- Set Title to "Photos."
- Set Code to "UsrPhotos."
- Set Workplace to "Sales."
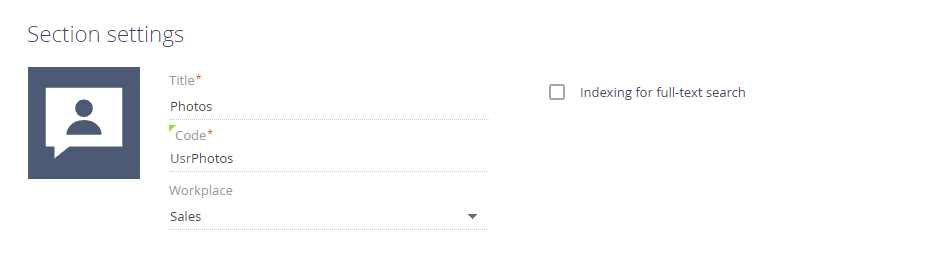
- Click Save on the Section Wizard's toolbar.
As a result:
-
Creatio will display the Photos custom section in the Sales workplace.
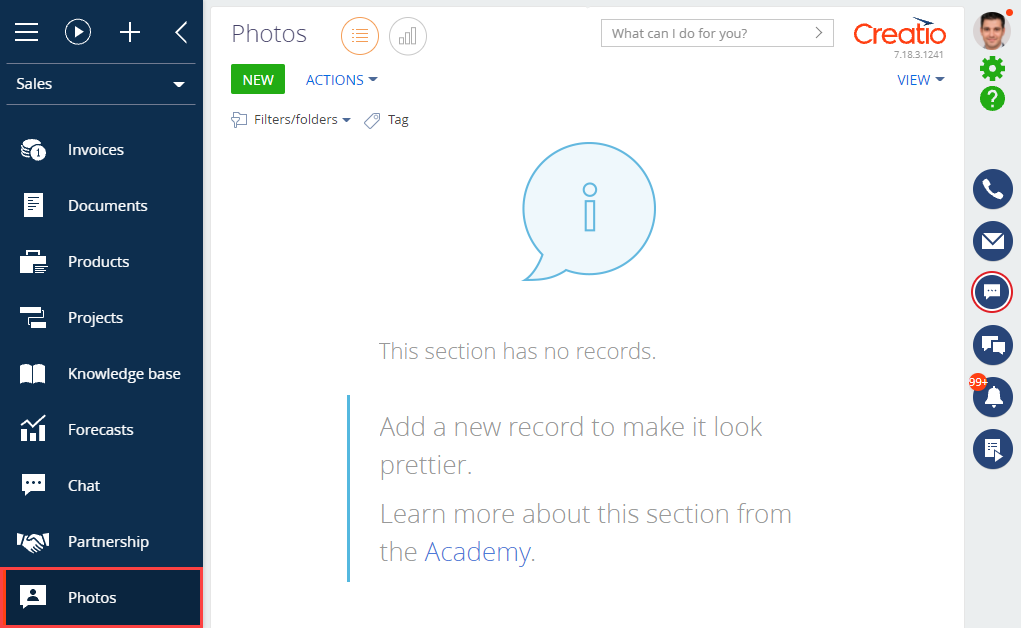
-
Creatio will add the schemas of the Photos section to the configuration.
2. Create a custom detail
- Click to open the System Designer.
- Go to the System setup block → Detail wizard.
-
Fill out the detail properties:
- Set Title to "Photos attachment."
- Set How to create detail? to "Based on existing object."
- Set Object to "Photos attachment."
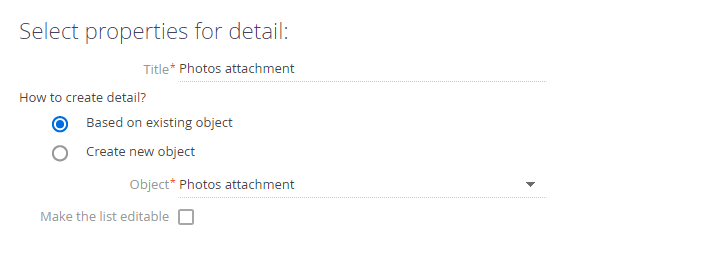
- Click Save on the Detail Wizard's toolbar.
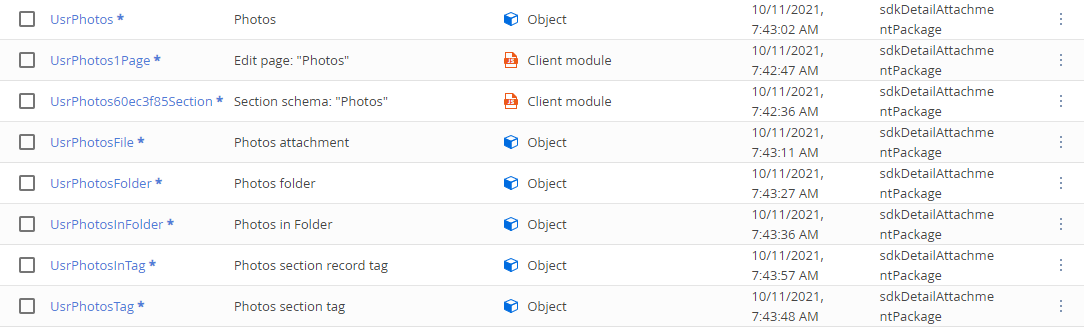
As a result, Creatio will add the following schemas to the configuration:
- The UsrSchemae9733d1bDetail schema of the Photos attachments detail's view model.
- The UsrUsrPhotosFiled6a229baPage schema of the Photos attachments detail's record page.
3. Set up the custom detail
- Go to the Configuration section and select a custom package to set as current.
- Open the UsrUsrPhotosFiled6a229baPage schema of the Photos attachments detail's record page.
-
Click the
button on the properties panel and specify FileDetailV2 in the Parent object field. The FileDetailV2 schema of the UIv2 package implements the Attachments detail. By default, the parent object in the Detail Wizard is the base detail schema that contains the list.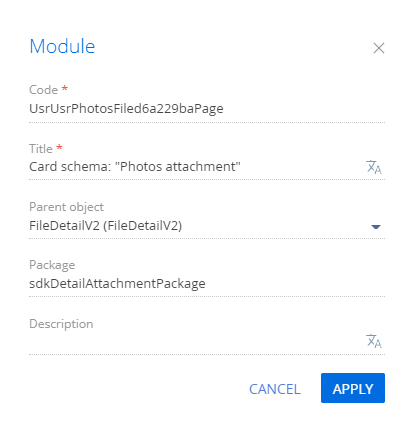
- Click Apply to apply the properties.
- Click Save on the Designer's toolbar.
4. Add the detail to the section
- Go to the Photos section.
- Click View → Open section wizard on the toolbar.
- Go to the Section pages block → the Edit page button.
- Click New detail in the Section Wizard workspace.
-
Fill out the detail parameters.
- Set Detail to "Photos attachment." Creatio will populate the Title and Code fields.
- Set Title to "Photos attachment."
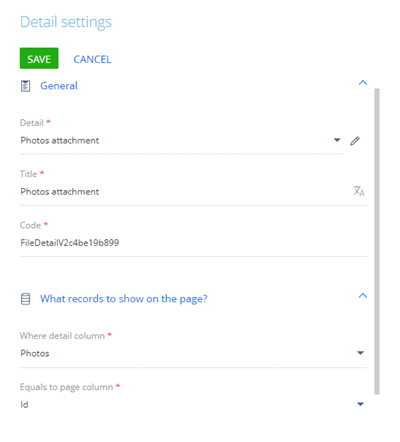
- Click Save → Section wizard → Save.
As a result, Creatio will add the Photos attachment detail to the record page of the Photos section.

5. Add custom detail styles
The view model schema of the detail page does not support visual styles. As such, take the following steps to add styles:
- Create a module schema. Define the styles in it.
- Add the style module to the dependencies of the detail module.
1. Create a module schema
- Go to the Configuration section and select a custom package to set as the current package.
-
Click Add → Module on the section list toolbar.
-
Fill out the following schema properties:
- Set Code to "UsrSchemaDetailCSS."
- Set Title to "SchemaDetailCSS."
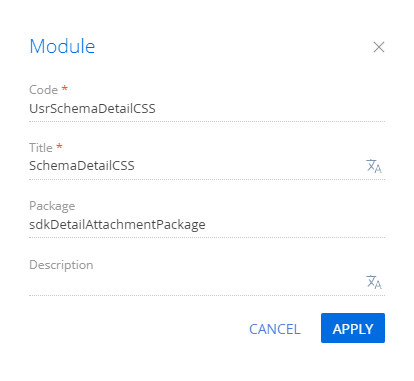
Click Apply to apply the properties.
-
Go to the LESS node of the object structure and set up the needed visual styles of the detail.
- Click Save on the Designer's toolbar.
2. Modify the view model schema of a detail
To use the module and its styles in the detail schema:
- Open the UsrSchemae9733d1bDetail schema of the Photos attachment detail's view model.
-
Add the UsrSchemaDetailCSS module to the dependencies of the UsrSchemae9733d1bDetail schema.
View the source code of the modified schema below.
- Click Save on the Designer's toolbar.
Outcome of the example
As a result, Creatio will add the Photos attachment detail to the record page of the Photos custom section.

BaseDetailV2 is the base detail schema. Provides base logic for detail data initialization and detail interaction with the record page Implemented in the NUI package. This is a view model schema. Learn more about the schema properties in a separate article: Client schema. Detail schemas must inherit the BaseDetailV2 schema.
Messages
| Name | Mode | Direction | Description |
|---|---|---|---|
| GetCardState | Address | Publishing | Returns the record page status. |
| IsCardChanged | Address | Publishing | Informs of record page changes. |
| SaveRecord | Address | Publishing | Informs the record page of the requirement to save the data. |
| DetailChanged | Address | Publishing | Informs the record page of detail data changes. |
| UpdateDetail | Address | Subscription | Subscribes to record page updates. |
| OpenCard | Address | Publishing | Opens the record page. |
| GetColumnsValues | Address | Publishing | Returns the requested column values. |
| UpdateCardProperty | Address | Publishing | Changes the value of the record page model. |
| GetEntityInfo | Address | Publishing | Requests the main record entity data. |
The Terrasoft.core.enums.MessageMode enumeration represents the message modes, and the Terrasoft.core.enums.MessageDirectionType enumeration represents the message directions. Learn more about the MessageMode enumeration in the JS class library. Learn more about the MessageDirectionType enumeration in the JS class library.
Attributes
The flag that enables data addition.
The flag that enables data editing.
The flag that enables data deletion.
The data collection of the detail.
The detail filter. Required to filter the detail data.
The name of the column by which to filter the data.
The parent record key value.
The flag that collapses the detail.
The default model column values.
The detail title.
The Terrasoft.core.enums.DataValueType enumeration represents the attribute data types. Learn more about the DataValueType enumeration in the JS class library.
Methods
Initializes the detail page.
| {Function} callback | The callback function. |
| {Object} scope | The method execution context. |
Initializes the schema profile. Set to Terrasoft.emptyFn by default.
Sets the default detail title.
Initializes the collection of list view data.
Subscribes to messages required for the detail to operate as intended.
Generates a tag array for the UpdateDetail message.
Updates the detail based on the passed parameters. Set to Terrasoft.emptyFn by default.
| {Object} config | Configuration object that contains the detail properties. |
Initializes the collection of list view data.
| {Function} callback | The callback function. |
| {Object} scope | The method execution context. |
Returns the record page name based on the type of selected record (when editing) or the selected type of record to add (when adding).
Detail expansion or collapse handler.
| {Boolean} isCollapsed | Flag that collapses the detail. |
Returns the detail collapse value.
Publishes the message for retrieving data about the detail.
BaseGridDetailV2 is a base schema of a list detail. Provides the base logic for list management (loading, filtering), as well as deleting, adding, and editing detail records. Implemented in the NUI package. This is a view model schema. Learn more about the schema properties in a separate article: Client schema. Inherits the BaseDetailV2 schema. Schemas of list details must inherit the BaseGridDetailV2 schema.
Messages
| Name | Mode | Direction | Description |
|---|---|---|---|
| getCardInfo | Address | Subscription | Returns the record page data: default values, typing column name, typing column value. |
| CardSaved | Broadcasting | Subscription | Processes the saving message of the record page. |
| RerenderQuickFilterModule | Address | Publishing | Publishes the message that has the filter applied. |
| GetExtendedFilterConfig | Address | Subscription | Publishes the configuration of a custom filter. |
| GetModuleSchema | Address | Subscription | Returns data about the entity that manages the filter. |
| UpdateFilter | Broadcasting | Subscription | Updated the filters in the detail. |
| LoadedFiltersFromStorage | Broadcasting | Publishing | The filters loaded from the repository. |
| InitFilterFromStorage | Broadcasting | Subscription | Initializes the filters loaded from the repository. |
| GetColumnsValues | Address | Publishing | Retrieves the column values of the record page model. |
| IsCardChanged | Address | Publishing | Notifies of record page changes. |
| ValidateCard | Address | Publishing | Requests to validate the record page. |
The Terrasoft.core.enums.MessageMode enumeration represents the message modes, and the Terrasoft.core.enums.MessageDirectionType enumeration represents the message directions. Learn more about the MessageMode enumeration in the JS class library. Learn more about the MessageDirectionType enumeration in the JS class library.
Attributes
The primary column value of the active list record.
The flag that marks the list as empty.
The flag that enables multiple selection.
The array of selected records.
The number of rows in the list.
The flag that enables list pagination.
Index of the sorting column.
Record page opening mode.
Unique ID of the record page.
Collection of detail filters.
The flag that marks the Detail Wizard as available.
The Terrasoft.core.enums.DataValueType enumeration represents the attribute data types. Learn more about the DataValueType enumeration in the JS class library.
Methods
Replaces the BaseDetailV2 class method. Calls the logic of the parent schema’s init method, registers messages, initializes filters.
| {Function} callback | The callback function. |
| {Object} scope | The method execution context. |
Replaces the BaseDetailV2 class method. Calls the logic of the parent’s initData method, initializes the data collection of the list view model.
| {Function} callback | The callback function. |
| {Object} scope | The method execution context. |
Loads the list data.
Initializes the default values for list management.
Returns the list collection.
Returns the detail filters collection.
Returns the ID of the selected list record.
Adds a new record to the list. Saves the record page if needed.
| {String} editPageUId | The ID of the typed record page. |
Copies the record and opens the record page.
| {String} editPageUId | The ID of the typed record page. |
Opens the page of the selected record.
| {Object} record | The model of the page to edit. |
Subscribes to messages required for detail to operate as intended.
Replaces the BaseDetailV2 class method. Calls the logic of the parent schema’s updateDetail method, updates the detail.
| {Object} config | Configuration object that contains the detail properties. |
Opens the record page.
| {String} operation | Operation type (add/edit). |
| {String} typeColumnValue | The value of the record typing column. |
| {String} recordId | Record ID. |
Processes the detail record page’s save event.
Adds elements to the collection of the functional button’s drop-down list.
| {Terrasoft. |
The collection of the functional button’s drop-down list |
Initializes the detail filter.
Sets the value of detail filters.
| {String} key | Type of the filters. |
| {Object} value | Value of the filters. |
Loads the quick filter.
| {Object} config | The load parameters of the filter module. |
Clears data, unloads the detail.
GridUtilitiesV2 is a mixin that provides the management logic for the "List" control. Implemented in the Terrasoft.configuration.mixins.GridUtilities class of the NUI package. Learn more about the “List” control in the user documentation: Work with record lists.
The mixin lets you:
- Subscribe to messages.
- Load data.
-
Manage the list:
- Select records (search for active records).
- Add, delete, edit records.
- Set the filters.
- Sort the records.
- Export records to a file.
- Check the access permissions to the list records.
Methods
Subscribes to events.
Clears event subscriptions.
Loads the list data.
Prepares the view model before the data is loaded.
Prepares the view model after the data is loaded.
Handles data load events. Executed when the server returns data.
| {Object} response | The result of database data selection. |
Adds the collection of new elements to the collection of the list.
| {Object} dataCollection | The collection of new elements. |
| {Object} options | Addition parameters. |
Initializes the query instance settings (pagination, hierarchy).
| {Terrasoft. |
The query in which to initialize the relevant settings. |
Initializes the sorting columns.
| {Terrasoft. |
The query in which to initialize the relevant settings. |
Modifies the data collection before loading it to the list.
| {Object} collection | Collection of list elements. |
Returns the filters applied to the schema. Overload the method in the inheritors.
Exports the list contents to a file.
Sorts the list.
| {String} tag | Specifies how to sort the list. |
Initiates deletion of the selected records.
Checks whether the record can be deleted.
| {Array} items | IDs of selected records. |
| {Function} callback | The callback function. |
| {Object} scope | The method execution context. |
Deletes the record after the user confirms the deletion.
Returns the selected list records.
Removes the deleted records from the list.
| {Array} records | The deleted records. |
Reloads the list.
ConfigurationGrid is a module that provides the management logic for the "Configuration grid" control. Implemented in the Terrasoft.controls.ConfigurationGrid class of the UIv2 package. The Terrasoft.controls.ConfigurationGrid class inherits from the Terrasoft.Grid class.
Methods
Initializes the component. Subscribes to events.
Selects a row and adds edit elements.
| {String|Number} id | The list row ID. |
Deselects a row and deletes edit elements.
| {String|Number} id | The list row ID. |
Formats the row cell data.
| {Object} cell | Cell. |
| {Object} data | Data. |
| {Object} column | Cell configuration. |
| {Object} link | Link. |
Record’s update event handler.
| {Terrasoft. |
Collection item. |
Destroys the list and its components.
| {Boolean} clear | Clears the list and its components. |
ConfigurationGridGenerator is a module that generates the list configuration. Implemented in the Terrasoft.controls.ConfigurationGridGenerator class of the UIv2 package. The Terrasoft.controls.ConfigurationGridGenerator class inherits from the Terrasoft.ViewGenerator class.
ConfigurationGridUtilities is a module that contains methods that initialize the list row view model, handle the active record actions, and handle hotkeys. Implemented in the Terrasoft.configuration.mixins.ConfigurationGridUtilities class of the Uiv2 package.
Properties
The name of the currently selected column.
Column configuration.
Collection of system column names.
Methods
Handles the active record’s action click event.
| {String} buttonTag | Tag of the selected action. |
| {String} primaryColumnValue | ID of the active record. |
Handles the record save event.
| {Object} row | List row. |
| {Function} [callback] | The callback function. |
| {Object} scope | The scope of the callback function call. |
Subscribes to active row’s button click events.
| {Array} keyMap | Description of events. |
Returns the configuration of the list cell’s edit elements.
| {Terrasoft. |
List cell column. |
Copies and adds a record to the list.
| {String} recordId | ID of the record to copy. |
Initializes classes of the collection items from the list to edit.
| {Function} callback | The callback function. |
| {Object} scope | The scope of the callback function call. |
Saves the record.
| {Object} row | List row. |
| {Function} [callback] | The callback function. |
| {Object} [scope] | The scope of the callback function call. |
BasePageV2 is a base schema of a mini page. Implemented in the NUI package. This is a view model schema. Learn more about the schema properties in a separate article: Client schema.
Messages
| Name | Mode | Direction | Description |
|---|---|---|---|
| Update |
Address | Publishing | Updates the page header. |
| Grid |
Address | Subscription | Retrieves the ID of the selected list record when the record changes. |
| Update |
Address | Subscription | Changes the model parameter value. |
| Update |
Address | Subscription | Updates the add page header. |
| Close |
Address | Publishing | Closes the add page. |
| Open |
Address | Subscription | Opens the add page. |
| Open |
Address | Publishing | Opens an add page chain. |
| Get |
Address | Subscription | Returns the add page status. |
| Is |
Address | Publishing | Informs of the add page change. |
| Get |
Address | Publishing | Retrieves the name of the active view. |
| Get |
Address | Subscription | Retrieves data about the master entity of the mini add page. |
| Get |
Address | Subscription | Retrieves page tooltips. |
| Get |
Address | Subscription | Retrieves column data. |
| Get |
Broadcasting | Publishing | Sends entity column data when the column changes. |
| Reload |
Address | Publishing | Reloads the section row depending on the primary column value. |
| Validate |
Address | Subscription | Launches the add page validation. |
| Re |
Address | Publishing | Relaunches the action dashboard validation. |
| Re |
Address | Subscription | Updates the action dashboard configuration. |
| Reload |
Broadcasting | Publishing | Reloads the dashboard elements. |
| Reload |
Address | Publishing | Reloads the dashboard elements on the current page. |
| Can |
Broadcasting | Subscription | Allows or prohibits changing the current history state. |
| Is |
Address | Subscription | Returns the changed entity. |
| Is |
Address | Subscription | Returns true if the filtered columns changed. |
| Update |
Broadcasting | Bidirectional | Updates the parent lookup record in accordance with the configuration. |
| Update |
Broadcasting | Bidirectional | States that data must be reloaded on the following launch. |
The Terrasoft.core.enums.MessageMode enumeration represents the message modes, and the Terrasoft.core.enums.MessageDirectionType enumeration represents the message directions. Learn more about the MessageMode enumeration in the JS class library. Learn more about the MessageDirectionType enumeration in the JS class library.
Attributes
The visibility flag of LeftModulesContainer.
The visibility flag of ActionDashboardContainer.
The visibility flag of DcmActionsDashboardContainer.
Custom attributes of DcmActionsDashboardContainer.
The visibility flag of the page title.
Saves the name of the active tab.
The name of the GridData view.
The name of the AnalyticsData view.
Attribute of the add page body when the add page is displayed or hidden.
Attribute of the add page body when the main header is displayed or hidden.
The array of page header column names.
Flag that marks the page as not available.
Flag that marks the page as customizable.
Operations of the add page.
Flag that forces entity reload on the following launch.
The Terrasoft.core.enums.DataValueType enumeration represents the attribute data types. Learn more about the DataValueType enumeration in the JS class library.
Methods
Handles the Discard button click event.
| {String} [callback] | The callback function. |
| {Terrasoft. |
The method execution scope. |
Adds switchpoint views to the drop-down list of the View button.
| {Terrasoft. |
Items in the drop-down list of the View button. |
Adds the Open section wizard item to the drop-down list of the View button.
| {Terrasoft. |
Items in the drop-down list of the View button. |
Returns the query filter collection.
Initializes the column names of the page header.
Returns the values of ViewModel parameters.
| {Array} parameters | Parameter names. |
Sets the ViewModel parameters.
| {Object} parameters | Parameter values. |
Returns the ID of the lookup page module.
ReloadCard message handler. Reloads the data of the add page entity.
| {Object[]} defaultValues | Array of default values. |
Returns the column information.
| {String} columnName | The name of the column. |
Returns the visibility status of container tabs.
Returns the visibility status of the Print button’s drop-down list items (i. e., reports).
| {String} reportId | Report ID. |
Retrieves the section view.
Runs a business process using the start button for global business processes.
| {Object} tag | ID of the business process schema. |
Runs a business process with parameters.
| {Object} config | The configuration object. |
Checks for unsaved data. Edit the cached config.result if the data was changed but not saved.
| {String} cacheKey | The key of the cached configuration object. |
Displays an error message if the add page is invalid.
BaseGridDetailV2 is a base schema of a field detail. Implemented in the BaseFinance package of Financial Services Creatio product lineup. This is a view model schema. Learn more about the schema properties in a separate article: Client schema.
Messages
| Name | Mode | Direction | Description |
|---|---|---|---|
| LookupInfo | Address | Subscription | Returns data about the lookup. |
| UpdateCardProperty | Address | Publishing | Changes the value of the record page model. |
| CardSaved | Broadcasting | Subscription | Listens to the parent page’s save event. |
| IsCardChanged | Address | Publishing | Notifies of the add page changes. |
FileDetailV2 is a base schema of an Attachments type detail. Implemented in the UIv2 package. This is a view model schema. Learn more about the schema properties in a separate article: Client schema.
Attributes
Saves the record page name.
The parent entity.
The Terrasoft.core.enums.DataValueType enumeration represents the attribute data types. Learn more about the DataValueType enumeration in the JS class library.