Work with record lists
The tile view shows each record as a set of tiles, each tile representing a field from the corresponding section. A record in tile view usually occupies several rows. Tile view is best used when the list must show a lot of information about each record, as well as images, such as contact profile photos and account logos.
When a record page opens the list is displayed in the additional vertical view. In this view, the list data is displayed in a column. Each field of the record corresponds to a certain line in the vertical view. When you toggle between records in the vertical view, the right side of the page displays the detailed information about the selected record.
In Creatio you can edit records directly in the list without opening the corresponding pages. The editable list is used for fast and frequently changing objects.
In this view, the emails and web addresses are displayed as links. Clicking a web address opens a window containing the specified web page. Clicking an email address opens a window where you can create a new message using the default mail client.
Some other values in the system are also displayed as links to allow quick switching between the records. For example, the value in the Owner field of the Activities section is displayed as a link to enable switching from the activities list to the activity's owner page.
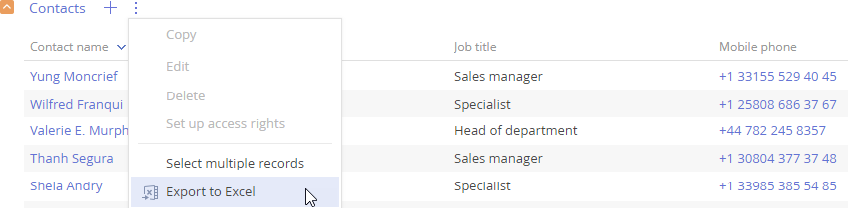
Data displayed in the list can be exported to Excel as an *.xlsx file for future processing.
Use data import in Creatio to add large numbers of records.
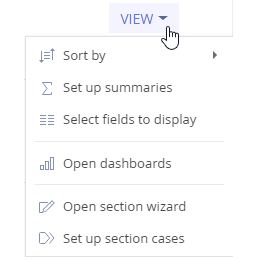
You can customize the appearance of a list, its field group, and the data sorting parameters. You can also bring up the summary information for displayed records. To set up lists, use the View menu (Fig. 1).
Set up columns
Any list can be set up individually for each system user. You can add or remove columns from a list, edit column position, width, and display style.
You can display columns of the current object as well as columns from connected objects. For example, in the list of the Accounts section, you can display information about the account’s primary contact (such as the primary contact’s position, phone, and email address).
Also, the list can display aggregate columns that show the summary information about the subordinate objects. For example, for the "Account" object, you can calculate the number of activities by account; for the "Contact" object, you can display the date of the last call by the customer, etc.
Objects that contain fields with the current object specified are called "subordinate objects" or "objects with the reverse connection."
The name of the connected column is generated in the format "Object.Column," for example, "Primary contact.Job title" or "Account.City." The name of the aggregate column is generated in the format "Function(Object (the way it is connected)).Column." For example, to see the date of the last activity registered for a contact, display the following column in the list: "Maximum(Activity(by column Contact)).End date." The column caption that is displayed in the list can be customized.
Select the Select fields to display command in the View menu to open the columns setup page.
To add a new column, click  :
:
-
Clicking the button in an empty cell will add a column at that position. In the list mode, you can add columns only if free cells are available in the column setup area. If no free cells are available in the column setup area, a click on
 in the tile view will add a new row to the column.
 -
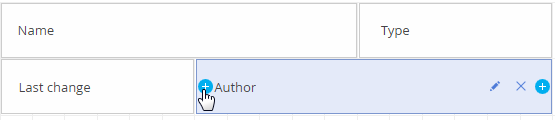
near the border of any column. To do this, select the column and click
 at the right or left border to add a new column on the right or left of the existing column (Fig. 2).
To set up the display column properties, select it, and then click  . Edit or hide column captions, specify functions and filters for calculating aggregate columns, as well as select the caption display style.
You can only set up the Hide caption column if you select in the tile view of the record list.
To hide a column, select it and click  . If there are no columns in the row after the column has been removed in the tile view, then the row will be hidden.
To adjust column width, drag its left or right border with your mouse (Fig. 3). If no free cells are available in the row, the width of other columns will be modified to accommodate the new column size.

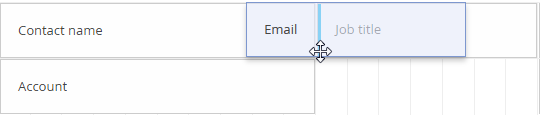
To move a column, select it, and then drag it to an empty cell with your mouse (Fig. 4).
To save column settings, click the Save button. The changes will be saved for the current user. If the column settings must be saved for all users that have the same Creatio culture as you, select the Save for all users command from the Save button menu. The Save for all users command is available if the current user has permission for the List setup for all users system operation.
To cancel custom column settings in all sections, click the Restore default settings button in the user profile. Read more in the User management block of articles.
Add a regular list column
Described below is the procedure for adding current object columns to the list.
Display the City and Department columns in the Contacts section.
To do this:
-
Open the Contacts section
-
In the View menu, select the Select fields to display command.
-
On the column setup page, click the
 button.
 -
Select the column to be displayed, for example, "City." Click the Select button (Fig. 5).
Fig. 5 Selecting a column 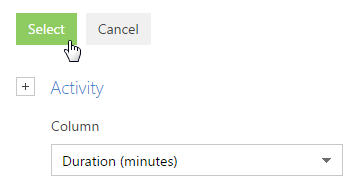
-
In the column settings area, select the added column and set up its width (Fig. 6).
Fig. 6Widening a column 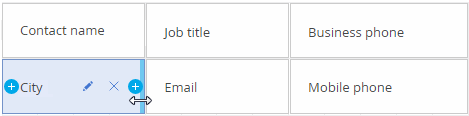
-
Use the same procedure to add the Department column. Use the preview area to optimize the column width (Fig. 7). Click Save.
Fig. 7Setting up columns in the Contacts section 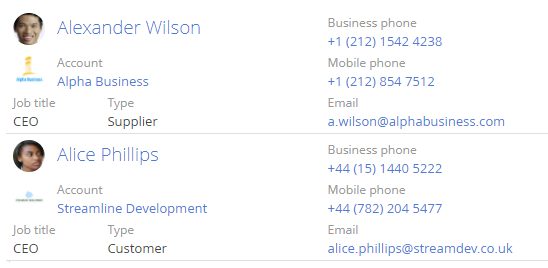
Add an aggregated column
You can display aggregate columns of the connected objects. For example, you can get the summary information about the "Account" object by the connected "Activity" object.
Display several current contact’s activities connected to each account in the list of the Accounts section.
-
Open the Accounts section.
-
In the View menu, select the Select fields to display command.
-
On the column setup page, click the
 button.
 -
In the opened column selection window:
-
Click the + button next to the object name.
-
In the added field, select an object with the reverse connection, for example, "Activity (by the Account column)."
-
In the Column field, specify the column of the connected object, for example, "Quantity."
-
Click the Select button (Fig. 8).
Fig. 8 Selecting an aggregate column 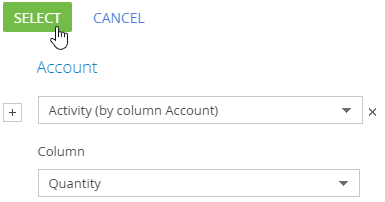
-
-
On the opened page, specify the display and filter parameters for the selected column (Fig. 9).
Fig. 9 The column setup page 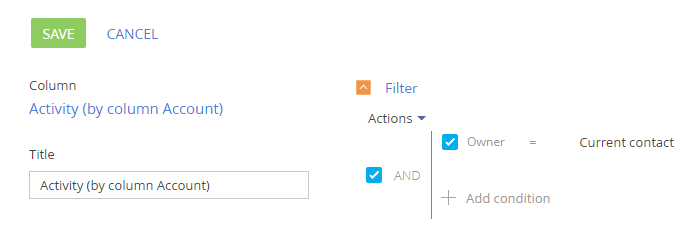
-
Enter the caption for the column to be displayed, for example, "Number of activities."
-
Specify the filter for data aggregating. For example, to display the number of activities, whose owner is the current user, apply filtering by Owner: Current contact.
-
Click the Save button on the column setup page.
-
Save the column setup parameters.
As a result, the accounts list will display the number of activities of the current user for each account.
Sort records in a list
For convenience, the section records can be sorted by the values in the selected column in ascending or descending order.
To sort records, select the Sort by command in the View menu. The columns displayed on the section page are listed in the menu. The sorting order (ascending or descending) is indicated next to the name of the column by which sorting is done. For example, all records of the Activities section can be sorted by the values in the Due column in descending order (Fig. 10).
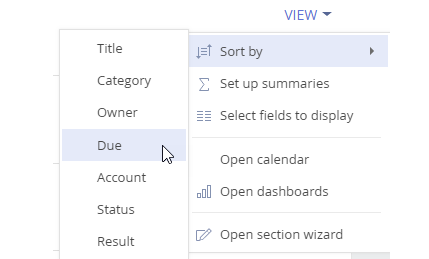
To sort records by column, select the Sort by command in the View menu. Then select the needed column. Selecting the column repeatedly changes the sort order. To display the needed column in the menu, set up the section list.
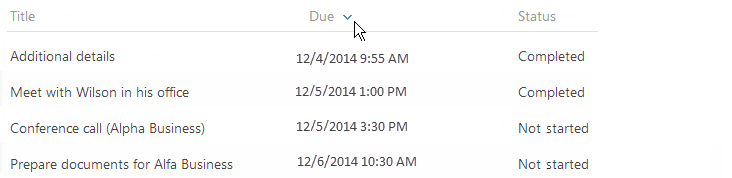
In the list view, you can quickly sort records by clicking the column caption (Fig. 11).
Creatio automatically saves sorting parameters for each user individually. To return to the default sorting parameters, click Restore default settings in the user profile. In this case, all custom settings including sorting will be discarded in all system sections.
Set up list summaries
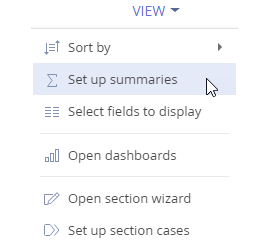
Set up the summaries to display the summary information based on the data in the section columns. Select the Set up summaries command in the View menu to manage summaries (Fig. 12).
The configured summaries will be displayed in the top right part of the section area (Fig. 13).

Summaries are used to calculate:
-
the total number of records (available for all columns). For example, you can calculate the number of registered customers in the Contacts section.
-
the minimum or maximum value in a column (available for numeric columns, date/time columns). For example, in the Accounts section, you can find out the last date that a new company was added.
-
The sum or the average value in a column (for numeric columns only). For example, in the Activities section, you can display the average activity duration.
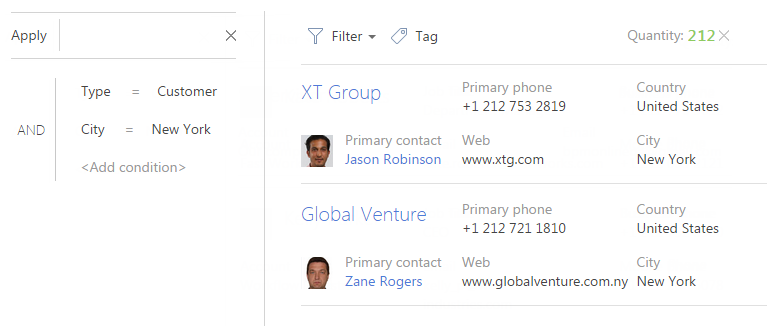
If the section records are filtered (for example, a folder is selected, or one or more filters are applied), then summaries will be calculated only for the filtered records. For example, if you want to calculate the number of customers from New York, set the corresponding filter and display summaries (Fig. 14).
Calculate the number of records
To calculate the number of records:
-
Open the needed system section.
-
In the View menu, select the Set up summaries command.
-
Select the Display number of records checkbox on the opened page.
-
Click Save.
-
As a result, the total number of system records will be displayed in the summary area.
Calculate the results by the column value
Described below is the procedure of setting up summaries by column values, using the average activity duration value as an example. To set up:
-
Open the required section, for example, the Activities section.
-
In the View menu, select the Set up summaries command.
-
On the opened page, click the Add button.
-
In the list, select the numeric column the summaries should be displayed by, for example, "Duration (minutes)." Click the Select button (Fig. 15).
Fig. 15 Selecting a column noteTo select a column of a subordinate object, click the
 button and select the needed subordinate object from the list.
 -
On the summary setup page, specify the display parameters for the summary information:
-
Select the function from the list for calculating data, for example, "Average."
-
Enter the caption that will be displayed in the summary area, for example, "Average duration (minutes)," and click the
 button.
 -
Click the Save button to save the user settings (Fig. 16).
As a result, the average activity duration will be displayed in the summary area of the Activities section.
Fig. 16 Setting up summaries by column values of an object 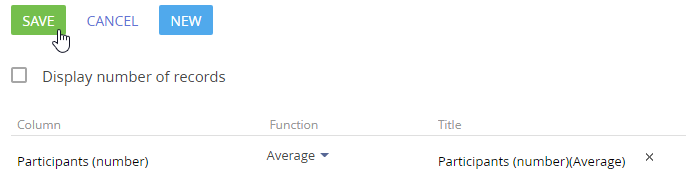
-
To view summaries for specific records, apply a filter, or select a folder. For example, you can specify the owner, activity category, and the required period.
Remove summaries
To remove summaries from the page, click the  button next to the record in the summary area (Fig. 17).

List FAQ
How many columns can I add to a section list?
Section lists can be displayed in either "list" or "tile" view.
The maximum number of columns displayed in the list view is 24. However, selecting a significant number of columns may be uninformative since the visible area of the list depends on your monitor size. Also, the column width depends on your monitor resolution. Column width may not be sufficient to display the information on smaller monitors (768px, 1024px).
The number of columns displayed in the tile view is unlimited. However, selecting a significant number of columns affects the overall performance of the system due to increased database loading times.
We recommend selecting the optimal number of columns to display the most important data in the list.
How do I quickly update the list without reloading the entire section page?
If you make changes to the list (for example, if you modify filtering conditions or sort list entries) It may be necessary to quickly update the list without having to refresh the section page (by pressing the F5 button or using the "Reload" command). To update the list data, click on the name of the section (Fig. 18).

When I export data, a message that says "You have insufficient rights to operate" pops up
You may have not configured access permission to the Export list records system operation.
How to download detail values?
Data from the detail can be exported with the Export to Excel command available from the actions menu of the detail (Fig. 19).