A mini page is a short version of a record page with a limited number of fields. Use mini pages to view or edit the record data quickly without opening the full page. The purpose of a mini page is to streamline adding, editing, and viewing records. The set of fields is configured separately and therefore is different for each mini page type.
You can create a mini page for any Creatio object.
Learn more about working with mini pages in user documentation: Work with mini pages.
View model schema of a mini page
Creato IDE uses view model schemas to implement mini pages.
The view model schema of a mini page lets you set up:
- the content of the mini page
- the position of the mini page's UI elements
- the behavior of the mini page's UI elements
For example, the ContactMiniPage schema configures the contact mini page and the AccountMiniPage schema configures the account mini page. The mini page schemas inherit from the BaseMiniPage schema of the NUI package.
The structure of the mini page's view model schema is the same as the general structure of the client view model schema.
The required properties of the mini page schema structure include:
- entitySchemaName, the name of the object schema to bind the mini page
- diff, the array of mini page's visual element modifications
The optional properties of the mini page schema structure include:
- attributes, schema attributes
- methods, schema methods
- mixins, schema mixins
- messages, schema messages
The optional properties let you:
- add custom management elements
- register messages
- set up the mini page business logic
You can use custom styles to modify the appearance of mini page visual elements.
Mini page operations
Add a mini page to a section
- Add the view model schema of a page to a custom package.
- Select the BaseMiniPage schema as a parent object.
- Add the needed mini page functionality to the schema source code. Make sure to specify the name of the object schema to bind the mini page in the entitySchemaName element and perform at least one modification in the diff array.
- Modify the [SysModuleEdit] system database table via an SQL query.
- Add the [HasSectionCodeMiniPageAddMode] system setting. Learn more about adding system settings in user documentation: Manage system settings.
Add a mini page to a module
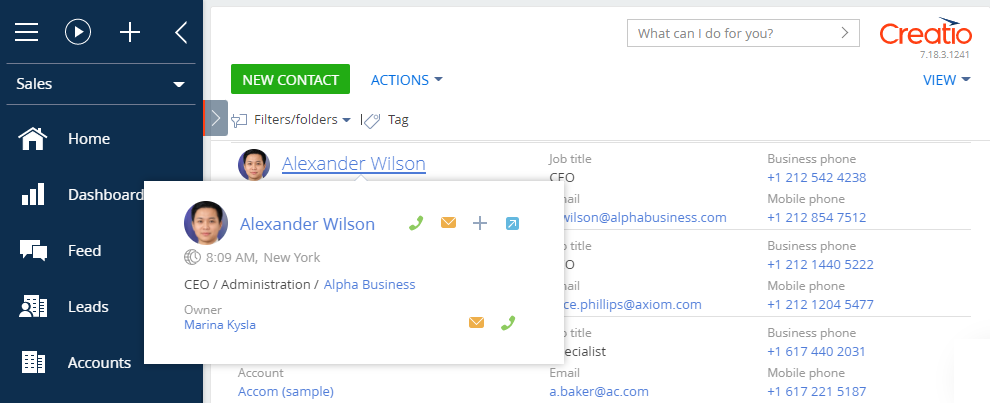
You might need to connect a mini page to a Creatio module to solve a business problem. Modules let you create links to specific Creatio objects. As such, a mini page connected to a module enables users to view the object data without opening the object section.
The following Creatio modules are connected to mini pages out-of-the-box:
- telephony in the communication panel
- email in the communication panel
- notification center in the communication panel
- the Feed section in the communication panel
- list in the dashboards section
To add a mini page to a module:
- Create a module schema.
- Create a module view and view model. Enable the Terrasoft.MiniPageUtilities utility class in the mixins view model property. The class lets you use the mini page call methods.
- Add the module styles.
- Create a container to display the module view.

1. Create a view model schema of the mini page
- Go to the Configuration section and select a custom package to add the schema.
-
Click Add → Page view model on the section list toolbar.
/scr_minicard_creating_1.png)
-
Fill out the schema properties in the Schema Designer:
- Set Code to "UsrKnowledgeBaseArticleMiniPage."
- Set Title to "KnowledgeBase Mini Page."
- Set Parent object to "BaseMiniPage."
/scr_minicard_creating_2.png)
Click Apply to apply the properties.
2. Display the fields of the primary object
Add the needed source code in the Schema Designer.
- Specify the KnowledgeBase schema as the object schema.
-
Add the needed modifications to the diff array of view model modifications.
The view model elements of the base mini page are as follows:
- MiniPage is the page field.
- HeaderContainer is the page heading. By default, the mini page places it in the first row of the field.
In this example, the diff modification array contains two new objects that configure the Name and Keywords fields.
View the source code of the view model schema below.
3. Add a functional button to the mini page
As per the example conditions, the mini page must let you download the files bound to the knowledge base article.
To implement the management of additional data, display the data as a drop-down list of a preconfigured button.
Modify the source code of the view model in the Schema Designer.
To add a button that selects the files of the knowledge base article:
- Add the FilesButton element, which is the button's description, to the diff array.
- Add the Article virtual column that connects the main and additional records to the attributes property.
- Add the MiniPageModes attribute that represents the array of the needed mini page operations to the attributes property.
- Add the button image to schema resources. For example, use the following image:
 . Learn more about adding images to resources in a separate article: Add a field with an image.
 - Add methods that manage the drop-down list of the file selection button to the methods property:
- init() is an overridden base method.
- onEntityInitialized() is an overridden base method.
- setArticleInfo() sets the value of the Article attribute.
- getFiles(callback, scope) retrieves the data about the files of the current knowledge base article.
- initFilesMenu(files) populates the collection of the file selection button's drop-down list.
- fillFilesExtendedMenuData() initiates the upload of files and the addition of them to the file selection button's drop-down list.
- downloadFile() initiates the download of the selected file.
View the view model schema's source code that adds the functional button below.
4. Apply styles to the mini page
To add styles to the view model, create an individual style module and enable it in the view model schema.
- Go to the Configuration section and select a custom package to add the schema.
-
Click Add → Module on the section list toolbar.
/scr_minicard_creating_6.png)
-
Fill out the schema properties in the Schema Designer:
- Set Code to "UsrKnowledgeBaseArticleMiniPageCss."
- Set Title to "Knowledge base minipage styles."
/scr_minicard_creating_5.png)
Click Apply to apply the properties.
-
Specify the needed styles in the context menu of the LESS node.
UsrKnowledgeBaseArticleMiniPageCss.js -
Add the module loading to the source code of the view model schema in the Schema Designer.
View the full source code of the mini page below:
UsrKnowledgeBaseArticleMiniPage.js
5. Register the mini page in the database
You must register new mini pages in the database. Run the following SQL query to modify the database:
As a result of the query, Creatio will add a unique mini page identifier to the [MiniPageSchemaUId] field of the [SysModuleEdit] table record that corresponds to the Knowledge base section.

6. Add the system setting
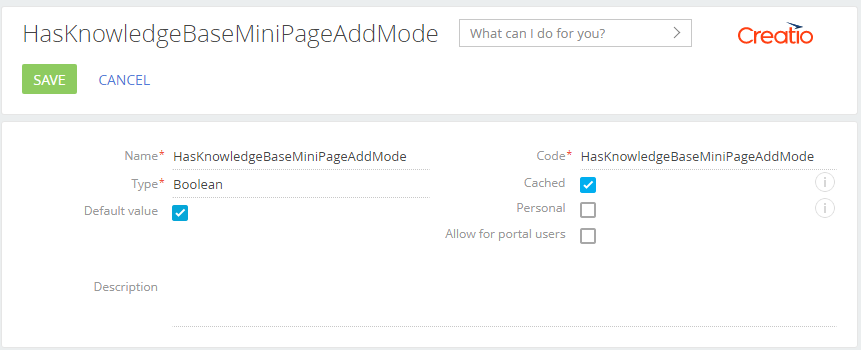
Add the system setting that has the following properties to the System settings section of the System Designer:
- Set Name to "HasKnowledgeBaseMiniPageAddMode."
- Set Code to "HasKnowledgeBaseMiniPageAddMode."
- Set Type to "Boolean."
- Set Default value to selected checkbox.
Outcome of the example
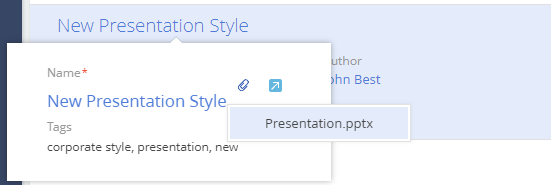
After you save the schema and refresh the Creatio web page, hover over the article name in the Knowledge base section to bring up a custom mini page that displays the files bound to the record. You will be able to download the files.
1. Create a view model schema of the mini page
- Go to the Configuration section and select a custom package to add the schema.
-
Click Add → Page view model on the section list toolbar.
-
Fill out the schema properties in the Schema Designer:
- Set Code to "UsrProductMiniPage."
- Set Title to "Product Mini Page."
- Set Parent object to "BaseMiniPage."
/scr_props.png)
Click Apply to apply the properties.
2. Display the fields of the primary object
Add the needed source code in the Schema Designer.
- Specify the Product schema as the object schema.
-
Declare the MiniPageModes attribute. Assign the array that has the collection of the needed mini page operations to the attribute.
-
Add the needed modifications to the diff array of view model modifications.
The view model elements of the base mini page are as follows:
- MiniPage is the page field.
- HeaderContainer is the page heading. By default, the mini page places it in the first row of the field.
In this example, the diff modification array contains two new objects that configure the Name and Code fields.
View the source code of the view model schema below.
3. Register the mini page in the database
Register new mini pages in the database. Run the following SQL query to do that.
As a result of the query, Creatio will add the unique mini page identifier to the [MiniPageSchemaUId] field of the [SysModuleEdit] table record that corresponds to the Products section.

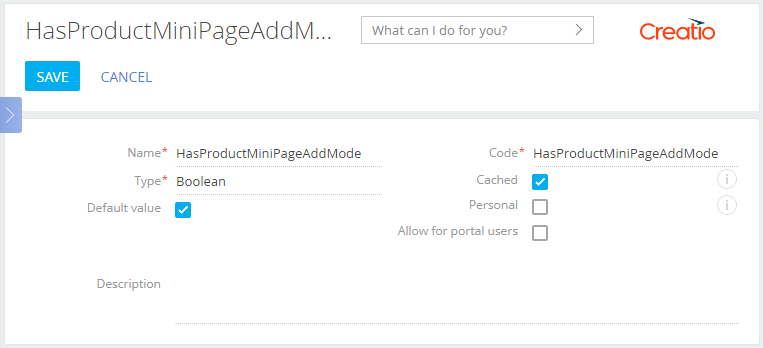
4. Add the system setting
Add the system setting that has the following properties to the System settings section of the System Designer:
- Set Name to "HasProductMiniPageAddMode."
- Set Code to "HasProductMiniPageAddMode."
- Set Type to "Boolean."
- Set Default value to selected checkbox.
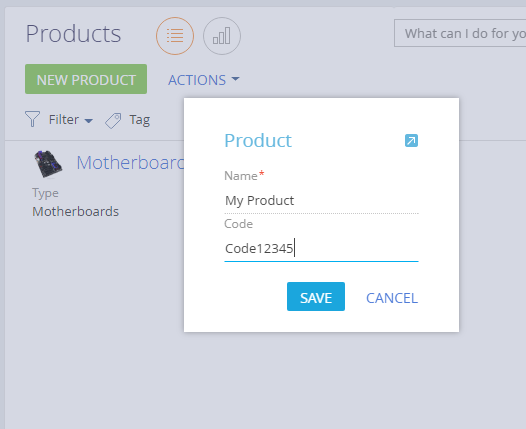
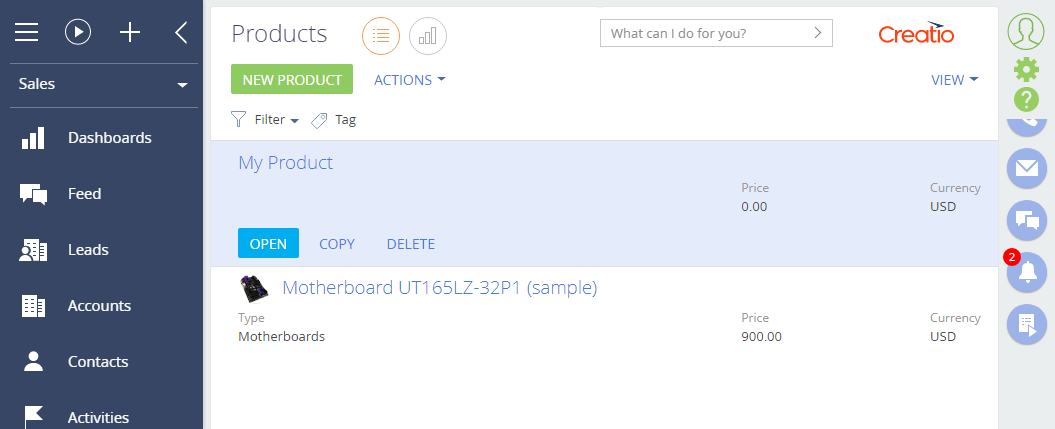
Outcome of the example
As a result, Creatio will display the mini page with two fields when you add a new product.
After you save the mini page, the corresponding record will appear in the section list.
1. Create a module schema
- Go to the Configuration section and select a custom package to add the schema.
-
Click Add → Module on the section list toolbar.
-
Fill out the schema properties in the Schema Designer:
- Set Code to "UsrCurrentUserModule."
- Set Title to "Current user module."
/scr_minipage_anymodule_module_props.png)
Click Apply to apply the properties.
2. Create a view and view model of the module
Add the source code to the UsrCurrentUserModule module in the Schema Designer.
- Implement the class inherited from Terrasoft.BaseViewModel to create a view model.
- Enable the Terrasoft.MiniPageUtilities utility class in the mixins property of the view model. The class lets you use the mini page call methods.
- Implement the class inherited from Terrasoft.BaseModule to create a view.
- Override the following methods of the Terrasoft.BaseModule class in the new class:
- init() initializes the view model of the module.
- render() binds the view model to the container view display passed in the renderTo parameter.
- getViewModel() creates the view model.
- getView() retrieves the view to display it. The view must contain the full name of the current user and a hyperlink to the contact page. Define the hover event handler when creating the hyperlink.
- Define the viewModel property that stores the link to the retrieved view model.
View the source code of the module below.
3. Add the module styles
Add styles to the module to customize the appearance of the hyperlink.
To add the module styles:
- Select the LESS node in the Schema Designer.
-
Add the following source code.
Module styles
Save the module.
4. Create the view display container
To display a link to the user profile in the top right of Creatio, place the container and upload the view of the module to the container.
To do this, create the schema of the replacing view model that expands the functionality of the MainHeaderSchema schema.
- Go to the Configuration section and select a custom package to add the schema.
- Click Add → Replacing view model on the section list toolbar.
/scr_add_replacing_module.png)
-
Select the MainHeaderSchema parent object in the Module Designer.
After you confirm the parent object, Creatio will populate the other properties.
/scr_minipage_anymodule_page_props.png)
Click Apply to apply the properties.
-
Add the source code in the Module Designer.
Use the diff property to display the view in the source code of the replacing view model schema. Set the RightHeaderContainer element as a parent element of the container to display the container in the top right of the page. Then, override the onRender() method and implement the upload of the created module in the method.
View the source code of the replacing view model schema below.
MainHeaderSchema.js - Click Save on the Module Designer's toolbar.
Outcome of the example
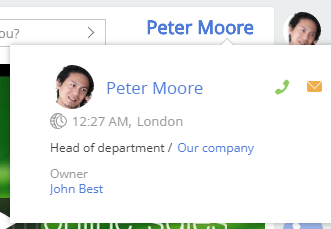
After you refresh the web page, Creatio will display the full name of the current user and a hyperlink to their contact page. Hover over the link to bring up the mini page that contains the data of the current user.