Creatio uses the Cases section to manage any incoming requests from the customers.
Service Creatio, enterprise edition uses the Cases section for managing ITSM incidents and service requests.
Service Creatio, customer center edition uses the Cases section for managing contact center inquiries, including incidents, claims, suggestions, feedback and service requests.
In Creatio a case can be created in the following ways:
-
Customers can register on your self-service portal on their own. Read more >>>
-
The system can automatically create a new case upon receiving an email sent to the specified support email address. Read more >>>
-
Agents can add cases based on the incoming calls using the communication panel Read more >>>
-
Employees can create new cases directly in the Cases section Read more >>>
-
Employees can create cases based on the incoming emails Read more >>>
Create a case from the [Cases] section
To manually register a new case:
-
Go the Cases section.
-
Click the New case button. The case page will open.
-
Enter the case data.
-
Populate the case profile:
-
Select the customer for this case in the Contact or Account field. One of these fields must be populated.
-
Select a service to which the case is connected. Service Creatio, enterprise edition will also automatically populte the Service agreement field.
-
The Response time and Resolution time fields will also be populated automatically.
-
Specify the case category.
-
Specify the assignee or assignees group for the case. If you set up the predictive case routing, the Service and Assignee group fields will be populated automatically.
-
-
Save the case.
As a result, a new Creatio case will be added (Fig. 1).
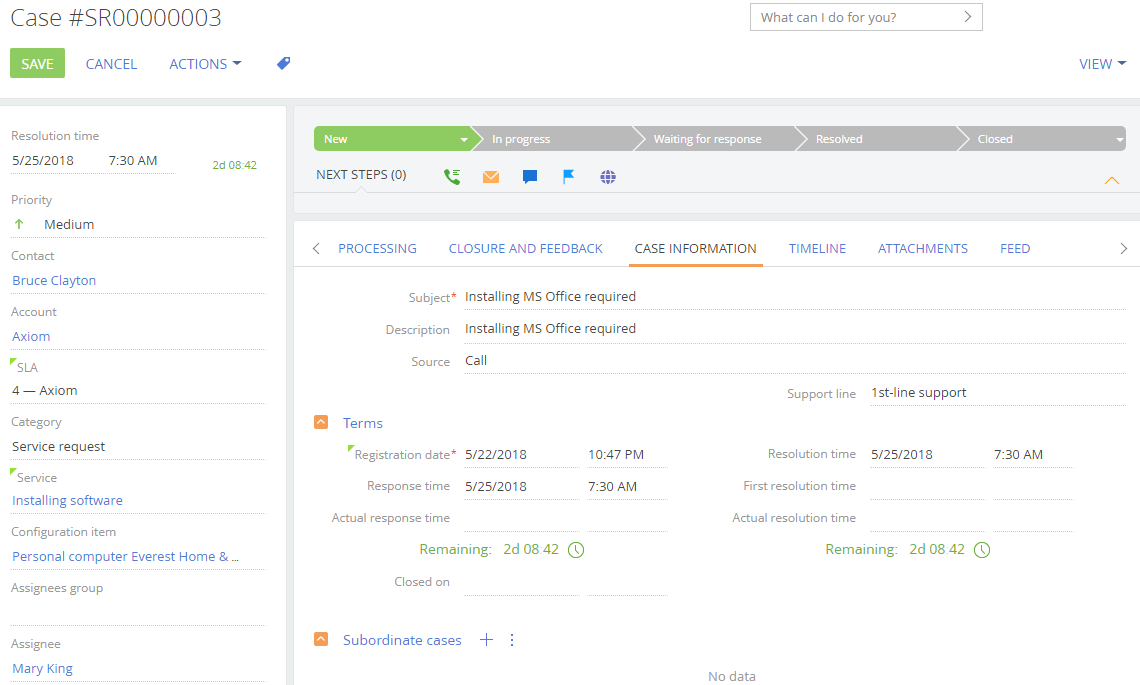
The date and time of a case registration display according to the time zone, specified in the user profile. If the time zone is not specified in the profile, Creatio uses the value from the “Default TimeZone” system setting. If the time zone is not specified neither in the user profile, nor in the “Default TimeZone” system setting, Creatio sets the date and time on the case page based on the time of the user browser.
Similarly, you can set the resolution time value.
Create a case from an existing case communication email thread
You can create a new case from the email thread of an existing case. For example, if you need to solve an additional task concerning another service during processing a specific case. To create a case from an existing case communication email thread:
-
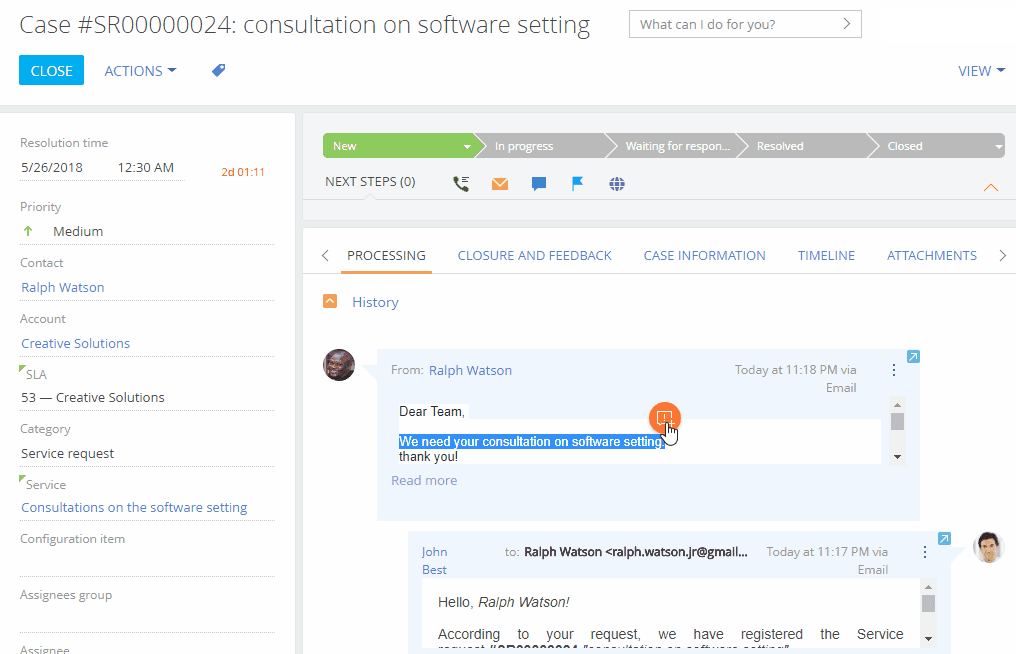
Open an existing case and go to the Processing tab.
-
Highlight a message text or portal post containing customer request. The
 button will appear in the top right corner of the highlighted text.
 -
Click the button that appears (Fig. 2). As a result, a new case will be created with the following values: Subject, Description, Source, Contact, Account, and Category of the new case will be populated automatically. Service Creatio, enterprise edition will also automatically populate the Service agreement field.
Create a case from the Communication Panel
You can register cases while receiving or making phone calls. To do this, use the Processes block on the communication panel (Fig. 3).
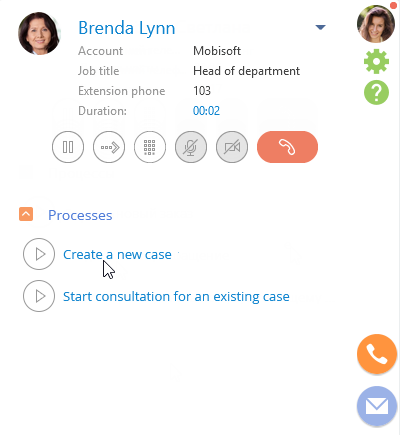
Create a new case
Click Create a new case. A new case page opens.
-
If the call contact has been identified, Creatio populates the Contact and Account fields automatically.
-
If the call contact was not identified, populate the case contact and account manually.
If you create a new contact, you will need to populate the contact data manually. If you click Yes, the contact page will open.
Consulting for an existing case
Click Consult on an existing case. As a result:
-
If the call contact was identified, this contact’s page will open. Go to the History tab, select a previously created case, and continue your consultation.
-
If the call contact is not found, a new contact page will open. Fill in the fields and save the contact. Continue processing the case by filling in the data on a new case page.
Automatic registration of cases based on incoming emails
Creatio adds a new case for any valid incoming email that is not a part of an existing case thread.
Case registration by email requires email integration. Additionally, set up at least one support mailbox and junk email processing rules.
Add a new case from an email
Creatio will add a new case in the following cases:
-
The email address of the recipient is in the List of email addresses for case registration lookup.
-
The email address from which the letter was received is in not the blacklist;
-
The email subject does not contain a case number; The system identifies the case number in the subject of an incoming email according to the Case number mask system setting.
-
The email subject contains a case number, but no corresponding case can be found;
-
The email subject contains a case number, but the corresponding case is in its final state i.e., “Closed” or “Cancelled”.
-
If the email address from which the letter was received is in the blacklist, and if the system is configured to check the unwanted messages and automatically assign them the status specified in the Junk case default status lookup.
Link an email to an existing case
For cases created by email, Creatio automatically links follow-up emails to the corresponding case. Messages from mailboxes specified in the List of mailboxes for case registration lookup will be associated with cases.
If an email cannot be connected to existing cases, Creatio automatically creates a new case. Creatio identifies the contact and account of the created case based on the sender's email address. All incoming emails are connected to accounts and contacts in the same manner.
Creatio finds the corresponding case using the following methods:
-
By email thread. If the email message is a part of an email thread, it inherits all links from the previous email in the thread, including case links.
-
By the case number in the email subject. If no cases are linked to an email thread, Creatio checks the message subject for a case number. The “Case number mask” system setting is taken into account. If the email subject contains a valid case number, Creatio searches for cases with this number. If the case number mask in the email subject is different from that in the “Case number mask” system setting, the email will not be liked to that case automatically. For example, if the current case number mask is “SR-{0}”, there is a case with number “SR_2”, the email that has “SR_2” in its subject will not be connected to this case. A new case will be created instead.
-
By the case number in the message body. If there is no valid case number in the email subject, Creatio checks the email body for the case number. Creatio checks both the message text and email markup. You can disable linking emails to cases by case number in the email body by changing the value of the following system setting: “Connect emails to cases by case number in the email body” (ConnectEmailsByCaseNumberInBody).
If a case was not found by any of the methods, Creatio creates a new case based on the email.
If a case was found, Creatio checks its status:
-
If the case status is “New” or “In progress,” the email will be linked to the case and display on the Processing tab of the case page.
-
If the case is in a final status (e.g., “Closed”), Creatio will add a new case and link the email to it. The email will also be displayed in the processing history of the closed case.
-
If the case is in a non-final resolved or paused state (e.g., “Resolved” or “Waiting for response”), Creatio will change its status to “Reopened” and link the email to the case.
Process incoming cases
Creatio analyzes all the incoming emails for auto-replies and spam, which helps to reduce the workload of support agents who initially process email messages, and increase the efficiency of their work.
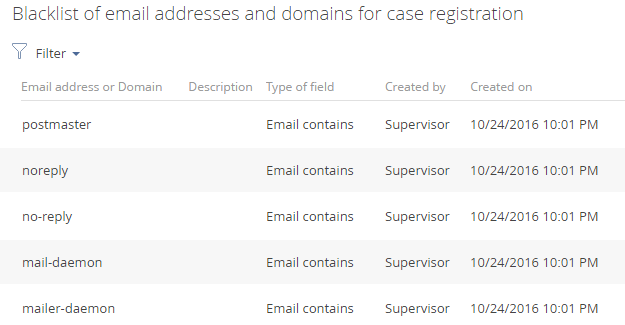
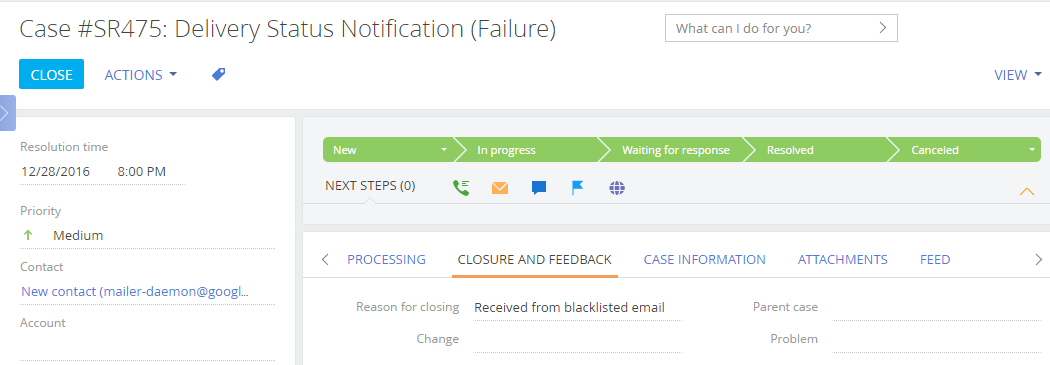
You can control the system behavior when "junk" emails are received and determine whether cases should be registered based on these emails. If the sender’s email address or its domain is included in the blacklist (Fig. 4), the system will either create a case or ignore the email, depending on the value of the Create cases from "junk" emails system setting.
By default, the system assigns the “Canceled” status with “Received from blacklisted email” reason for closing for all cases created from “junk” emails (Fig. 5). The “junk” case status can be changed in the Junk case default status system setting.
Read more in the Set up “Junk” case registration article.