The Approval case element (![]() ) is used for creating approvals, as well as for setting up approval-related notifications.
) is used for creating approvals, as well as for setting up approval-related notifications.
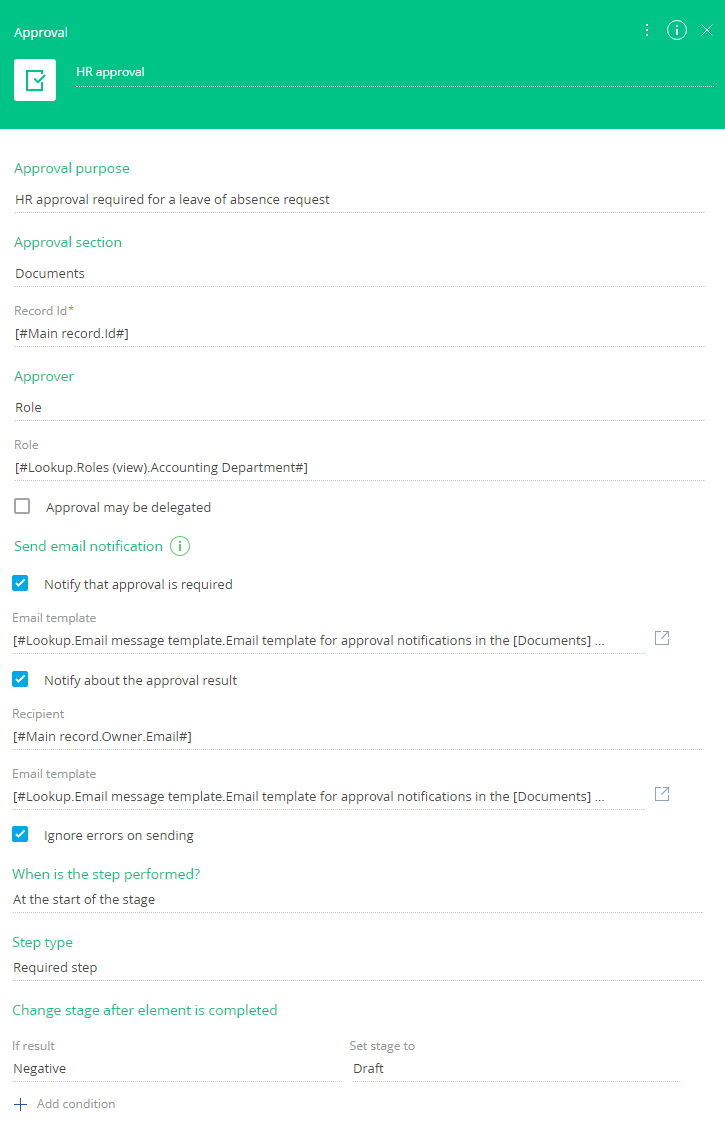
Specify the approval parameters in the element’s setup area (Fig. 1).
Set up an object to approve
Fill out the following fields:
- Approval purpose – default purpose is “Approval required.” The approval purpose is displayed on the Approvals detail of the record being approved.
- Approval section – the records of this section will be submitted for approval.
- Record Id – the record approved. This is a required field.
Set up the approver
Fill out the following fields:
- Approver – select one of the options and fill out a field that opens:
-
“User” – specify the approver in the Employee field.
-
“Employee’s manager” – specify the employee whose manager will be assigned as the approver in the Employee field. Creatio will submit the approval to the contact specified in the Manager profile on the employee page.
- “Roles” – specify the role the users with which can approve the record in the Role field.
-
- Approval may be delegated – select the checkbox to allow the approver to forward the approval to another employee.
Set up the approval notifications
Set up sending of email notifications for the employee who created the approval and the approver in the Send email notification area.
 button in the
  in the right part of the field to add a new email template. Learn more:
 - Select the Notify that approval is required checkbox to notify the approver. As a result, the approver user will be notified whenever a record is submitted for approval. If you select “Role” in the Approver field, all members of the corresponding role will receive a notification.
- Email template – select a notification email template from the Email templates lookup.
- Select the Notify about the approval result checkbox to notify the employee about the result of the approval.
- Recipient – specify who will receive the email notification: an email address, a contact, or an account. You can enter the value in the Recipient field directly or map it using the parameter value menu. For example, map the recipient to the Owner field of the record submitted for approval.
- Email template – select a notification email template from the Email templates lookup.
- Ignore errors on sending – select the checkbox to continue the case regardless of notification sending errors. Otherwise the case will end with an error should a sending error occur.
-
When is the step performed? – indicates whether to activate element at the start of the stage or after a case step. By default, the step is performed at the start of the stage. Select “After the previous step is complete” if the Approval element must start after the previous step in the case stage. Specify the step in the Perform after step field.
- Step type – specify if the step is required. Select “Required step” if the task must be completed to transition to the next stage. If the approval is not required to perform to transition to the next stage, select “Optional step.”
- Change stage after element is completed – click Add condition and set up transitions based on the approval results.
- Select one of the available approval results in the If result column and specify the next stage in the Set stage to the column.
What happens when the [Approval] element is activated
- A new approval record is created. All approval information, such as the approver, approval result, comments, etc. is displayed on the Approvals tab of the record that was submitted for approval. Learn more about the Approvals tab: Work with approvals.
- The first email notification is sent to the approver user or role when the approval record is created.
- After the approver approves or denies the approval, another email notification is sent to the employee specified in the Recipient field under the Notify about the approval result checkbox.