The Validation ![]() case element is used in cases that facilitate the processing of applications. This element is available only in Financial Services Creatio. Use the Validation element to create a validation checklist that an underwriter must complete to approve or deny a loan application. The general purpose of the Validation element is to automate the credit loan review.
case element is used in cases that facilitate the processing of applications. This element is available only in Financial Services Creatio. Use the Validation element to create a validation checklist that an underwriter must complete to approve or deny a loan application. The general purpose of the Validation element is to automate the credit loan review.
Set up the [Validation] case element
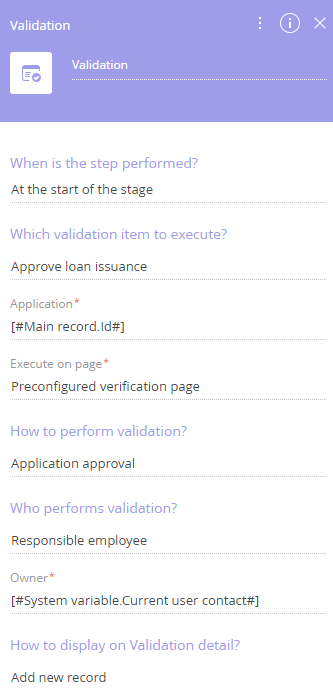
Specify the validation parameters in the element setup area (Fig. 1).
Use the parameter value window and parameter value menu to fill out the element parameters.
Specify the case element purpose by typing in a header at the top right-part of the element setup area. This makes the element easy to find on the case diagram. Set up the element parameters:
- When is the step performed? – indicates whether to activate the validation at the start of the stage or after a case step.
- Which validation item to execute? – select an item from the Validation items lookup. The lookup contains the list of actions that include validation questions and additional information that the employee may need during the validation process. This is a required field.
- Application – specify the loan application to validate. Use the parameter value window to specify where the element is supposed to get the application Id. By default, it is the application that the process was run for. This is a required field.
- Execute on page – specify the page where the validation item must be performed. By default, a pre-set Creatio validation item page is used. This is a required field.
- How to perform validation? – select what exactly the underwriter will validate: the loan application itself or its participants. Depending on the selected method, additional parameters become available. This is a required field.
-
Select “Single participant validation” if the underwriter will be validating a specific participant. In this case, the Participant role field becomes available where you specify the application participant, whose profile the underwriter will validate during this step. Optionally, specify the participant’s profile in the Participant application form field.
-
Select “Multiple participant validation” if the underwriter will be validating application participants of a specific role. Select the role in the Participant role field.
-
Select “Application approval” if the underwriter will be validating the loan application itself.
-
- Who performs the task? – select an employee or a group of employees who perform the validation. For example, the loan manager or the verification group. This is a required field.
-
Select “Group of employees” if the validation can be performed by any employee of a specific role. Select the corresponding role in the Role of employees field.
-
Select “Responsible employee” if the validation can be performed by a specific employee only. Select the employee in the Owner field.
-
- How to display on Validation detail? – select a method for displaying the validation result on the Validation detail of the application page.
-
Select “Add new record”, Creatio will add a new record on the Validation detail.
-
Select “Edit existing record” to update a specific record on the Validation detail. In this case, you will need to specify the record to update in the Record identifier field.
-
[Validation] element advanced settings
After Validation Saved – in addition to the standard settings available in the advanced mode, the Validation element has a field where you can specify C# code with the use of .NET Framework classes. The code will be executed after the business process creates and saves the validation item.