Creatio enables the users to submit records for approval by other users who can choose to approve or reject the record. Approvals can be managed (approved or rejected):
-
by a specific employee, for example, a department manager.
-
by an employee of the specific role (user group), such as “Finance department,” “Administration,” etc.
By default the approval functions are available in the Contracts, Invoices, and Orders sections. You can enable approving in any section.
If someone has submitted a record for your approval, you can approve, reject or forward it to another employee. You can manage your pending approvals with the help of:
-
The notification center on the communication panel.
-
The Approvals tab on the section record page.
-
The action panel of the record page.
Set up approvals
To set up approvals in a section:
-
Enable the approval function in the section wizard.
-
Set up approving process in the process designer or case designer.
1. Enable approvals in the section
-
Select the Open section wizard option from the View menu in the list of the corresponding section.
-
Select the Enable approval in section checkbox on the Section tab.
-
Save the changes. Saving may take some time.
As a result:
-
The Approvals tab will appear on the section record pages (Fig. 1). You may need to refresh the record page to display the tab.
-
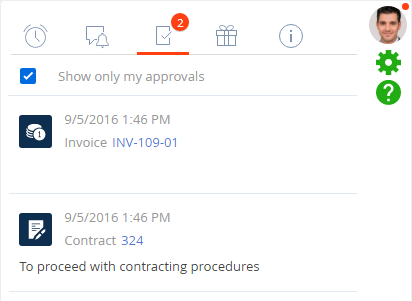
A new tab will appear in the notification center for approvers where they can view pending approvals and process them. The Show only my approvals checkbox is enabled by default. Clear the checkbox to display your subordinates' approvals (Fig. 2).


2. Set up the approval process
Depending on the specifics and complexity of your approval process, you can set up your approval sequence in:
-
The Process Designer. Use this option if the approval process is complex and has several stages. The behavior of the approval can be specified in the Approval business process element.
-
The Case Designer. Use this option if the approval process is simple and has no complex conditions and transitions, or if it does not have a set sequence and is difficult to structure. The approval will be created automatically when a corresponding case stage is activated.
Approve records
Records can be approved in the notification center on the communication panel, the action panel of the record page, or the Approvals tab on the section record page.
To approve a record on the Approvals tab:
- Open a record page in the needed section, for example, Accounts.
- Click the Approvals tab.
- Select the required record on the Approvals detail, click
 , and select Approve in the action menu of the detail.
Work with approvals
Use additional commands in the actions menu of the Approvals detail to manage approvals.
Show all approvals/Show active approvals – displays all approvals for the record, or only those for which the Canceled checkbox cleared. By default, it displays active approvals only.
Approve – sets the approval with a positive result. After you confirm the action, the approval status will be changed to “Positive.”
Reject – sets the approval with a negative result. Select this action to open an additional window for entering approval comments. After you confirm the action, the approval status will be changed to “Negative.”
Change approver – changes the employee assigned as approver. The action is available for approvers if the Delegation permitted checkbox is selected for the approval and the Delegated from field is not filled in. This action opens a list of users and user groups that comprise the organizational structure of your company. The user selected in this list will be specified in the Approver field, and the current user will be specified in the Delegated from field.
Delete – deletes the selected approval. Requires administrator privileges. An approval can only be deleted after being approved/rejected by the approver or if it is canceled.
The Approve, Reject, and Change approver commands can be used for approvals in the “To set” status that are not canceled.
You can enable approval’s email notifications in the properties of the Approval element in the business process or case.
Learn more about approvals in the mobile application in a separate article: Approve records.