If you want to add or remove access permissions to records in Creatio objects, use the Change access rights ![]() element. You can change access rights for multiple users or roles at the same time. To add or remove access sequentially, use several Change Access Rights elements.
element. You can change access rights for multiple users or roles at the same time. To add or remove access sequentially, use several Change Access Rights elements.
Set up the [Change access rights] element
Specify the permission parameters on the element setup area (Fig. 1).

The name of the element is displayed at the top of the setup area. This makes the element easy to find on the case diagram.
Fill out the following fields:
- When is the step performed? – indicates whether to activate the element at the start of the stage or after a case step. Select “At the start of the stage” if the access rights must be changed at the start of the case stage. Select “After the previous step is complete” if the access rights must be changed after the previous step in the case stage. Specify the step in the Perform after step field.
- Step type – specify if the step is required. Select “Required step” if the task must be completed to transition to the next stage. If it is not required to perform change access rights to transition to the next stage, select “Optional step.”
- In the Which object to apply access rights to? field, select the Creatio object for which you want to change permissions. Specify the filter conditions for records which you want to change access rights. For example, only for the “VIP” account records.
Remove access permissions
Access rights can be deleted for the user or all users, a certain role, as well as for several users selected via a filter.
To select users for whom you wish to delete access rights, click the  button (Fig. 2).
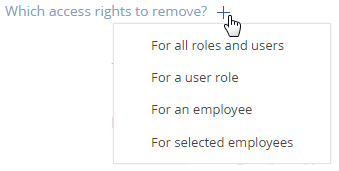
There are a few different options:
- For all roles and users – delete permissions to the selected operations for all users and roles.
- For roles – delete permissions for the selected organization structure item.
- For employee – delete permissions for the user. To ensure the correct element operation, specify the contact of the user whose permissions you would like to delete.
- For the employees who meet the filter conditions – delete permissions for all users that correspond to the filter conditions.
To delete or modify the selected role, click the  button and choose the action you want to perform from the menu.
Select the operations for which you would like to remove access rights – read ![]() , edit
, edit ![]() , or delete
, or delete ![]() data (Fig. 3).
data (Fig. 3).

Add access permissions
Select the users or roles to grant them access rights to read ![]() , edit
, edit ![]() , or delete
, or delete ![]() data.
data.
There are a few different options:
- For roles – grant permissions for the selected organization structure item.
- For employee – grant permissions for the user. To ensure the correct element operation, specify the contact of the user for whom you would like to grant permissions.
- For the employees who meet the filter conditions – grant permissions for all users that correspond to the filter conditions.
To delete or modify the selected role, click the  button and choose the action you want to perform from the menu.
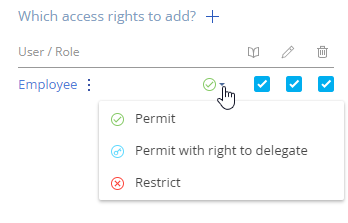
Select the operation access level that will be set when performing an action:
- Granted – users will obtain permission to execute selected operations.
- Granted with right to delegate – users will obtain permission to execute operations and to grant this operation permission to other users.
To select the access level, click the  button (Fig. 4).